Introduction to A1’s on-screen settings
While waiting for the first print to end, let’s use that time to learn more about the A1’s printer interface
A1 home screen
This is the printer’s home screen. It displays key details about its status and provides access to several submenus to control its functions.
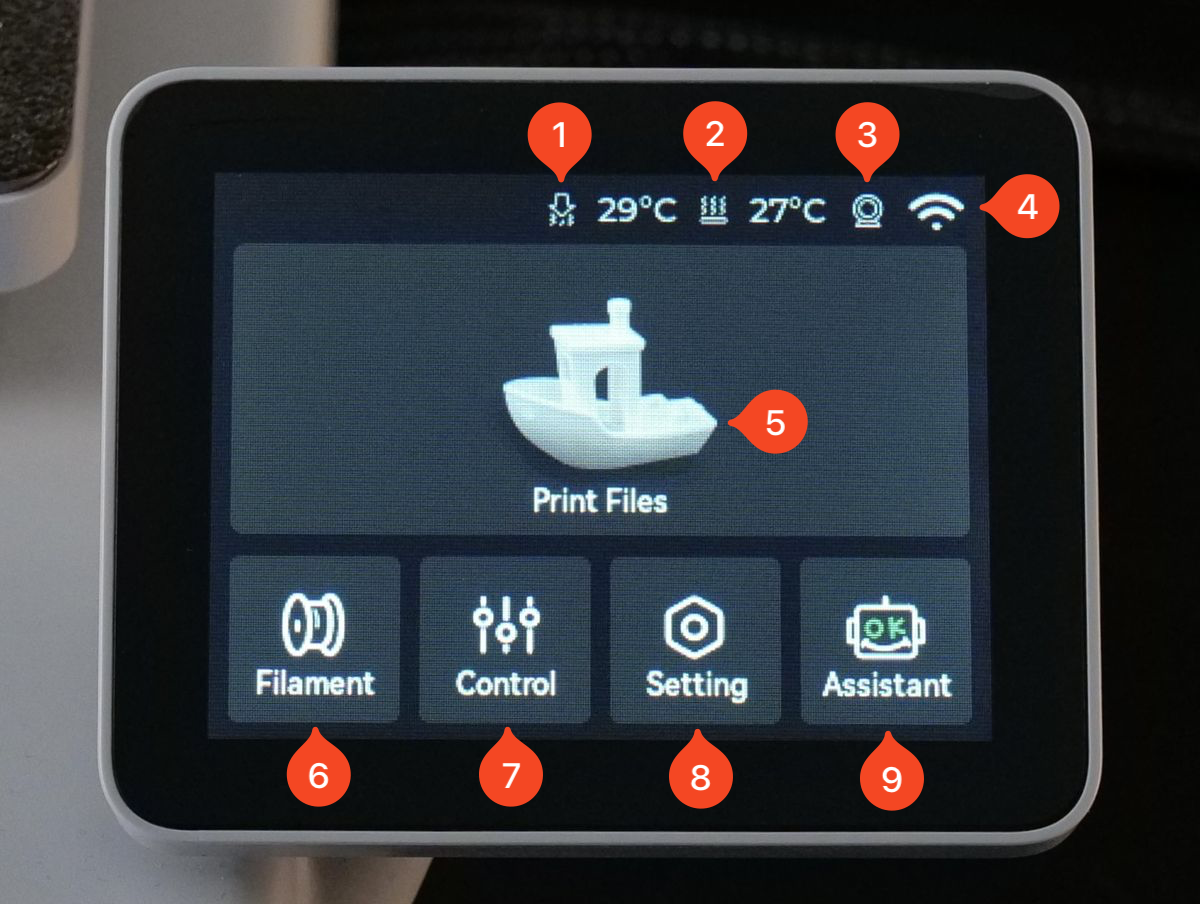
- Hotend Temperature – Displays the current temperature of the hotend. When the printer is idle, this temperature will be close to the surrounding environment.
- Heatbed Temperature – Shows the current temperature of the heatbed. Like the hotend, it remains near room temperature when the printer is idle.
- Camera Icon – Indicates the camera status, with a red dot appearing when the camera is active.
- Wi-Fi Icon – Displays the Wi-Fi connection status. If a diagonal line appears through the icon, the printer is not connected to Wi-Fi.
- Print Files – Opens the list of print files stored on the Micro SD card, allowing you to select a file to print.
- Filament – Opens the Filament Tab, where you can manage filament settings and options.
- Control – Accesses the Control Tab, allowing you to adjust temperature, print speeds, and manually move the printer’s axis.
- Settings – Opens the Settings Tab, where you can modify various printer configurations.
- Assistant – Provides access to the Assistant Tab, which displays printer messages and helps diagnose potential issues or errors.
Filament Tab
After tapping the Filament button on the home screen, you will be presented with the following options:
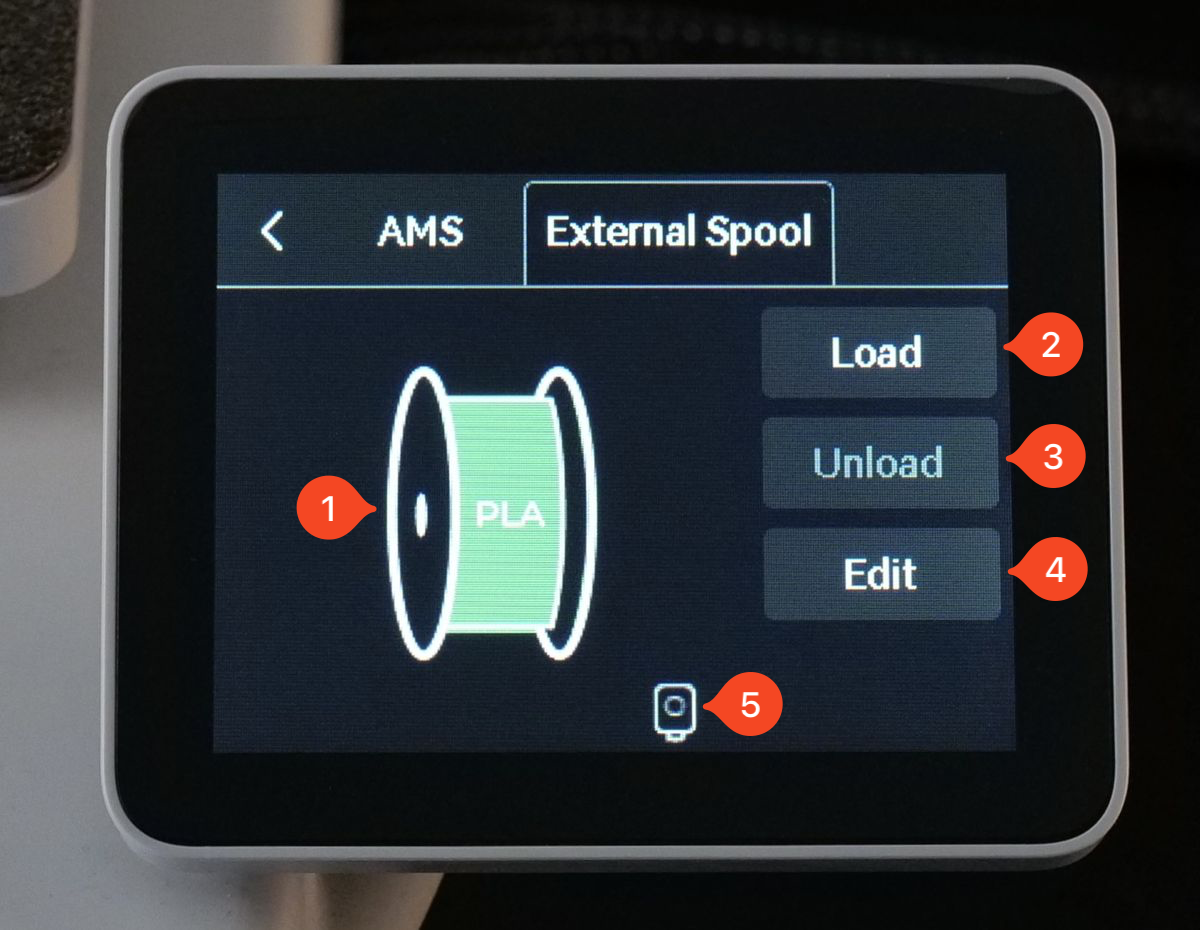
- Filament Spool Icon – Displays the current filament type and color that is loaded or set on the printer. When an AMS lite is connected, the filament type and color are automatically detected and configured on the printer.
- Load Button – Starts the filament loading process when tapped.
- Unload Button – Becomes active when filament is loaded, allowing you to unload it and replace it with a new one.
- Edit Button – Opens a menu where you can modify the filament brand, type, and color. Any changes made will be reflected on the filament spool icon.
- Filament Sensor Status Icon – Indicates the filament status. When filament is properly loaded, a green dot appears, confirming that it is inside the extruder.
Control and XYZ Tab
After tapping the Control button on the home screen, you will be presented with the following options:
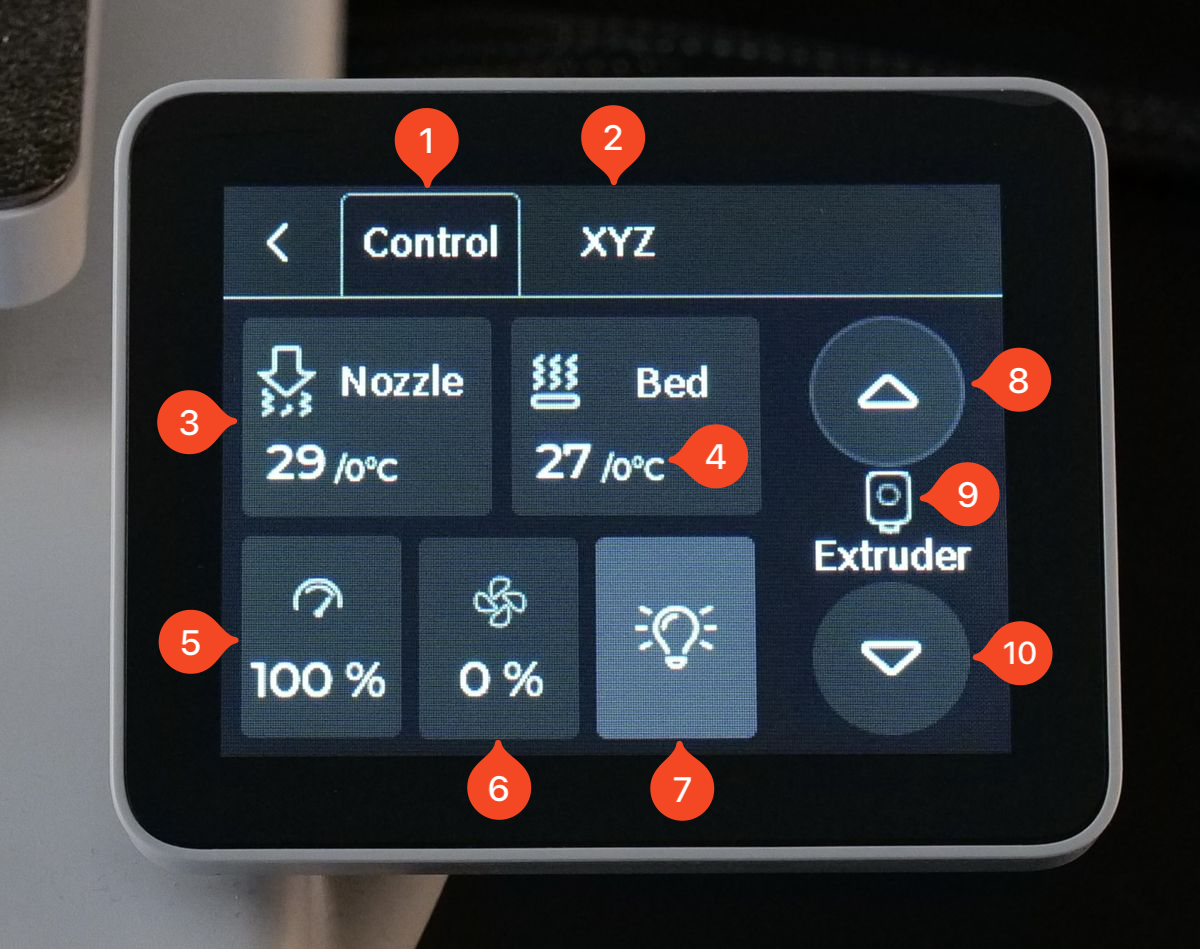
- Control Button – Opens the Control Tab if you are currently on a different screen.
- XYZ Button – Opens the XYZ Tab if you are on a different screen.
- Nozzle Button – Opens a menu where you can manually set a specific temperature for the nozzle.
- Bed Button – Opens a menu where you can manually set a specific temperature for the heatbed.
- Speed Button – Opens a menu that allows you to choose from four available print speeds.
- Fan Button – Opens a menu where you can adjust the part cooling fan speed.
- Light Button – Turns the printer’s LED light on or off.
- Arrow Up Button – Moves the extruder in reverse, retracting the filament. Useful for manually unloading filament.
- Extruder Icon – Indicates filament status. A green dot confirms that filament is loaded inside the extruder.
- Arrow Down Button – Moves the extruder forward, extruding filament. Useful for manually loading filament or purging material.
After tapping the XYZ tab, you will be presented with the following options:
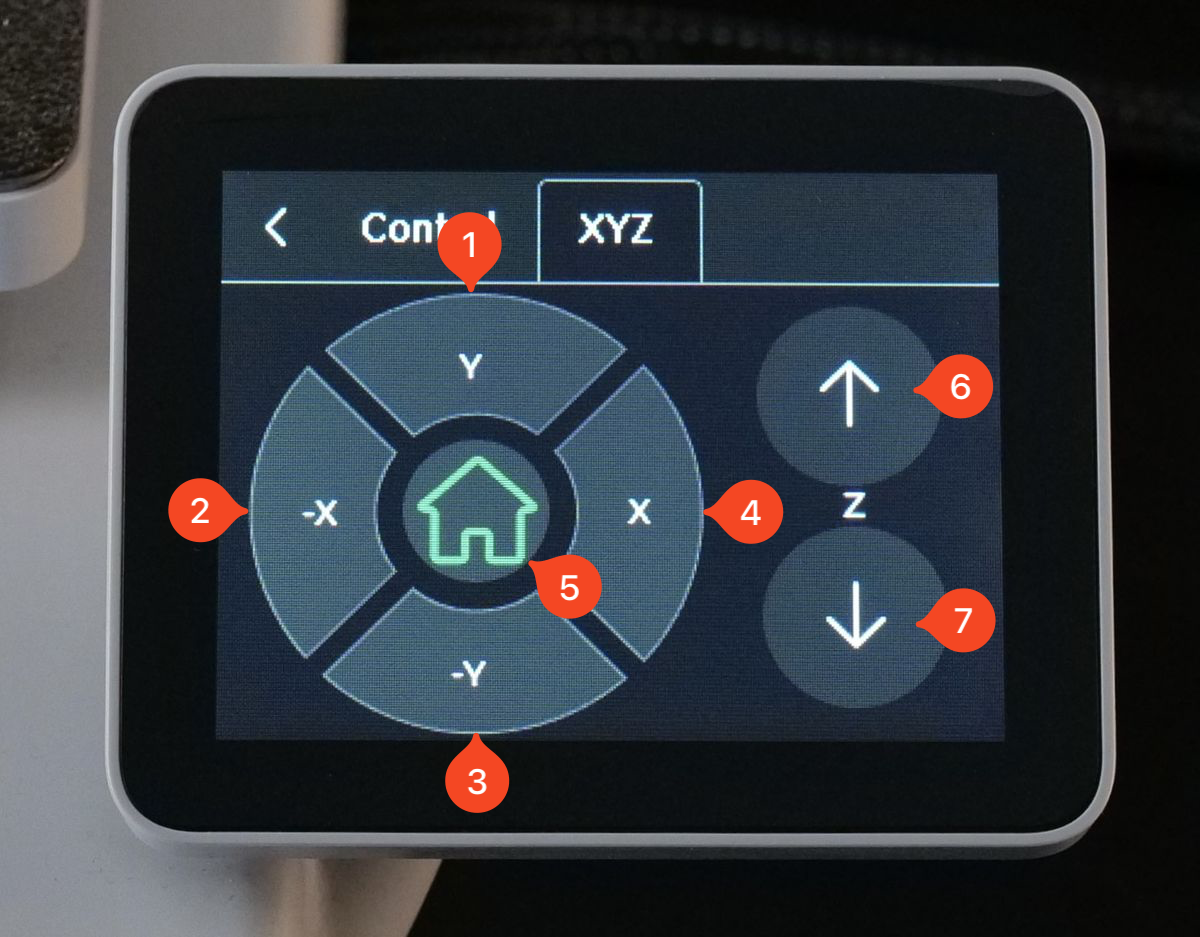
- Y Button – Moves the heatbed toward the back of the printer.
- X Button – Moves the toolhead toward the left side of the printer.
- -Y Button – Moves the heatbed toward the front of the printer.
- X Button – Moves the toolhead toward the right side of the printer.
- Home Button – Moves all printer axes to the home position, centering the nozzle on the heatbed.
- Arrow Up Button – Moves the X-axis upward.
- Arrow Down Button – Moves the X-axis downward.
Settings Tab
After tapping the Settings button on the home screen, you will be presented with the following options:
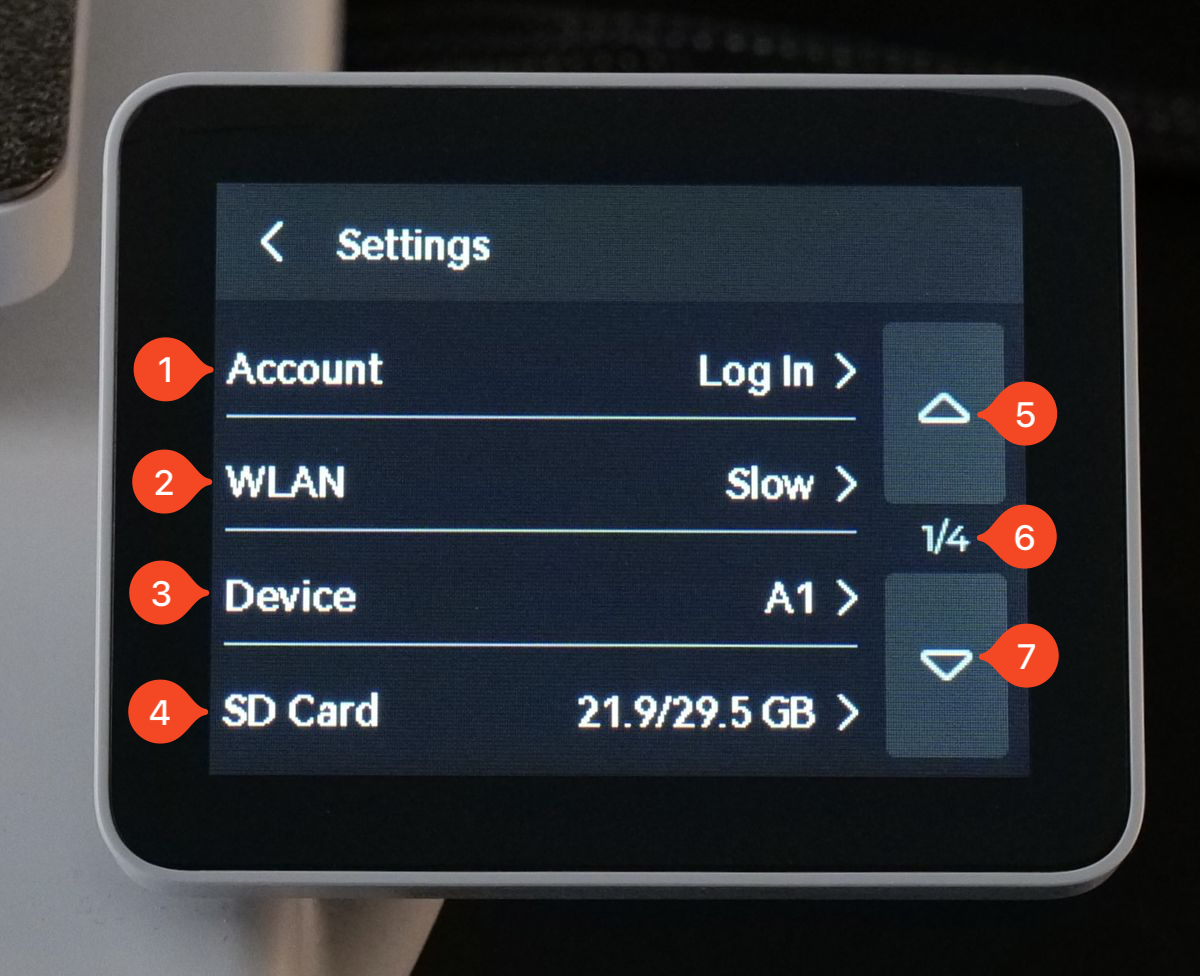
- Account – Opens a sub-menu where you can log into or sign out of your Bambu Lab account. When connected, your account name will be displayed.
- WLAN – Opens a sub-menu to connect or disconnect from a Wi-Fi network. The connected network’s name will be displayed.
- Device – Opens a sub-menu displaying printer details, including the serial number and total print hours. By default, it shows the printer’s name.
- SD Card – Opens a sub-menu where you can view Micro SD card details, format it, and safely eject it while the printer is on. Always use the Eject button before removing the card to prevent data corruption.
- Arrow Up Button – Scrolls up through the pages of the current menu list.
- ¼ Status Icon – Indicates the current page number and the total number of available pages.
- Arrow Down Button – Scrolls down through the pages of the current menu list.

- Maintenance – Opens a sub-menu where you can initiate a full printer calibration, adjust the installed nozzle type, and activate Maintenance Mode.
- Print Options – Opens a sub-menu where you can adjust various print settings.
- AMS Options – Opens a sub-menu to configure settings for an AMS lite (Automatic Material System) if connected to the printer.
- Camera Options – Opens a sub-menu where you can adjust settings for the camera.
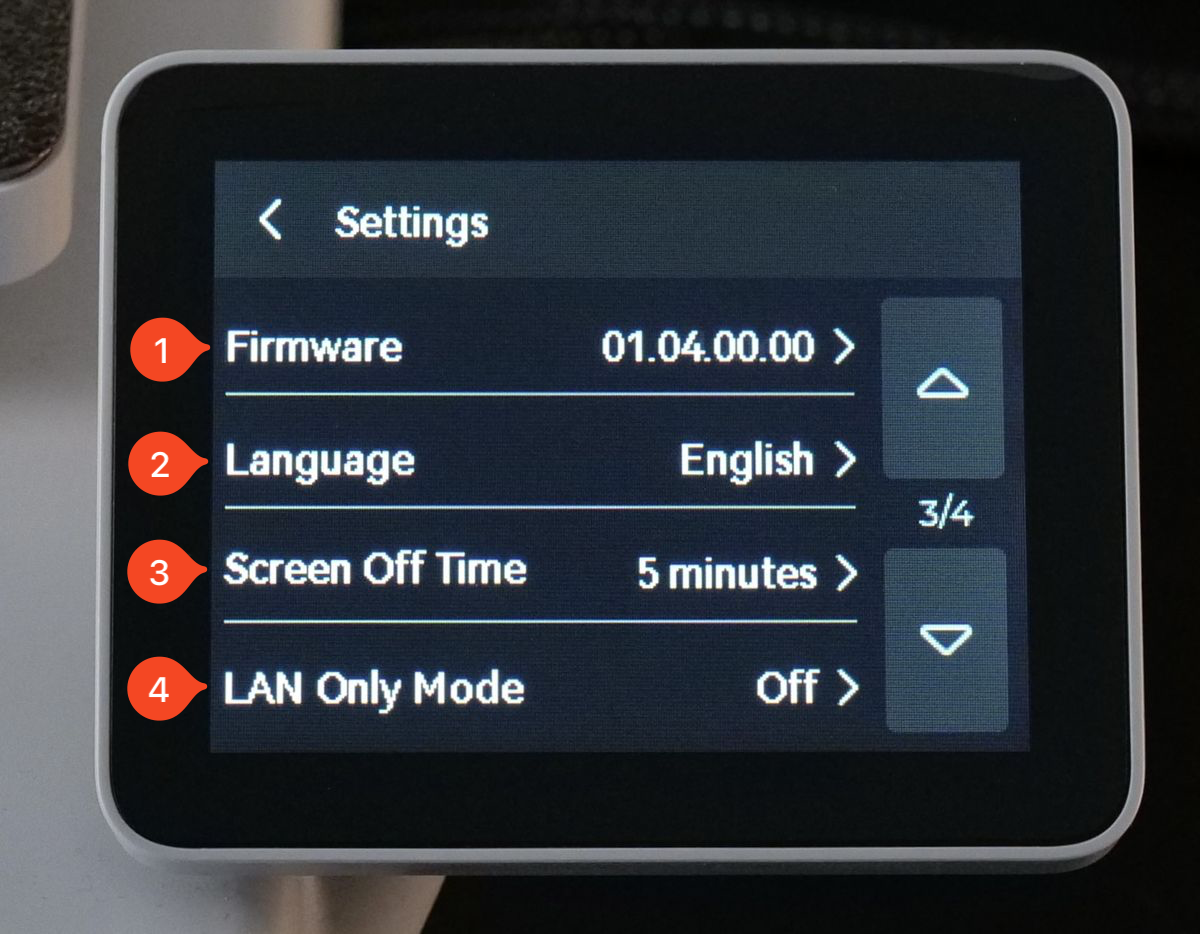
- Firmware – Opens a sub-menu where you can manually check for firmware updates. The current firmware version installed on the printer is displayed by default.
- Language – Opens a sub-menu where you can change the printer’s interface language. The currently selected language is displayed by default.
- Screen Off Time – Opens a sub-menu where you can adjust the time delay before the printer’s screen turns off. The current setting is shown by default.
- LAN Only Mode – Opens a sub-menu where you can enable LAN Only Mode. The current setting is displayed by default.
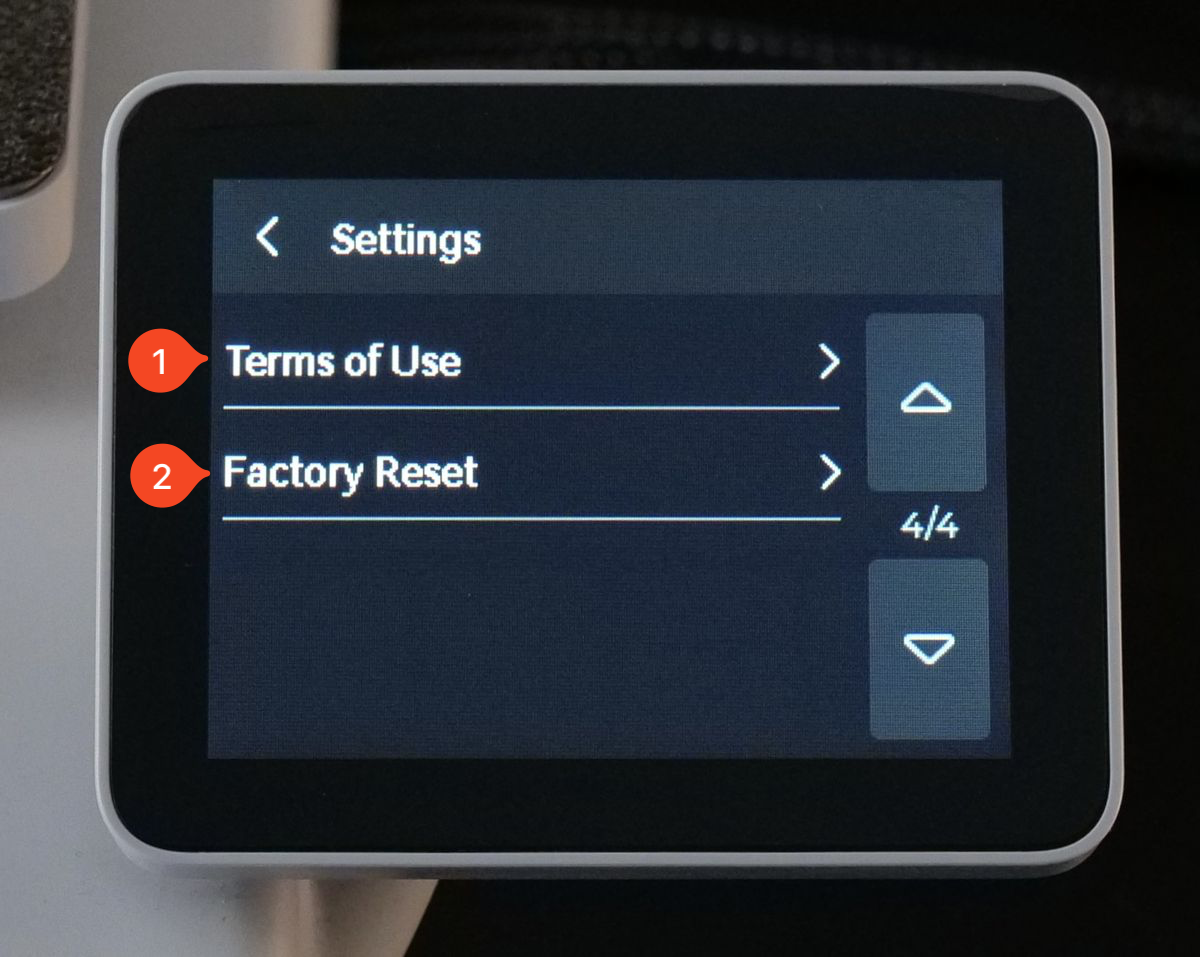
- Terms of Use – Opens a sub-menu displaying QR codes where you can scan the codes to access the Terms of Use.
- Factory Reset – Opens a sub-menu where you can initiate a factory reset of the printer.
Print Options Tab
The second option under the Settings button is the Print Options tab, which contains multiple settings that can be adjusted for the printer:
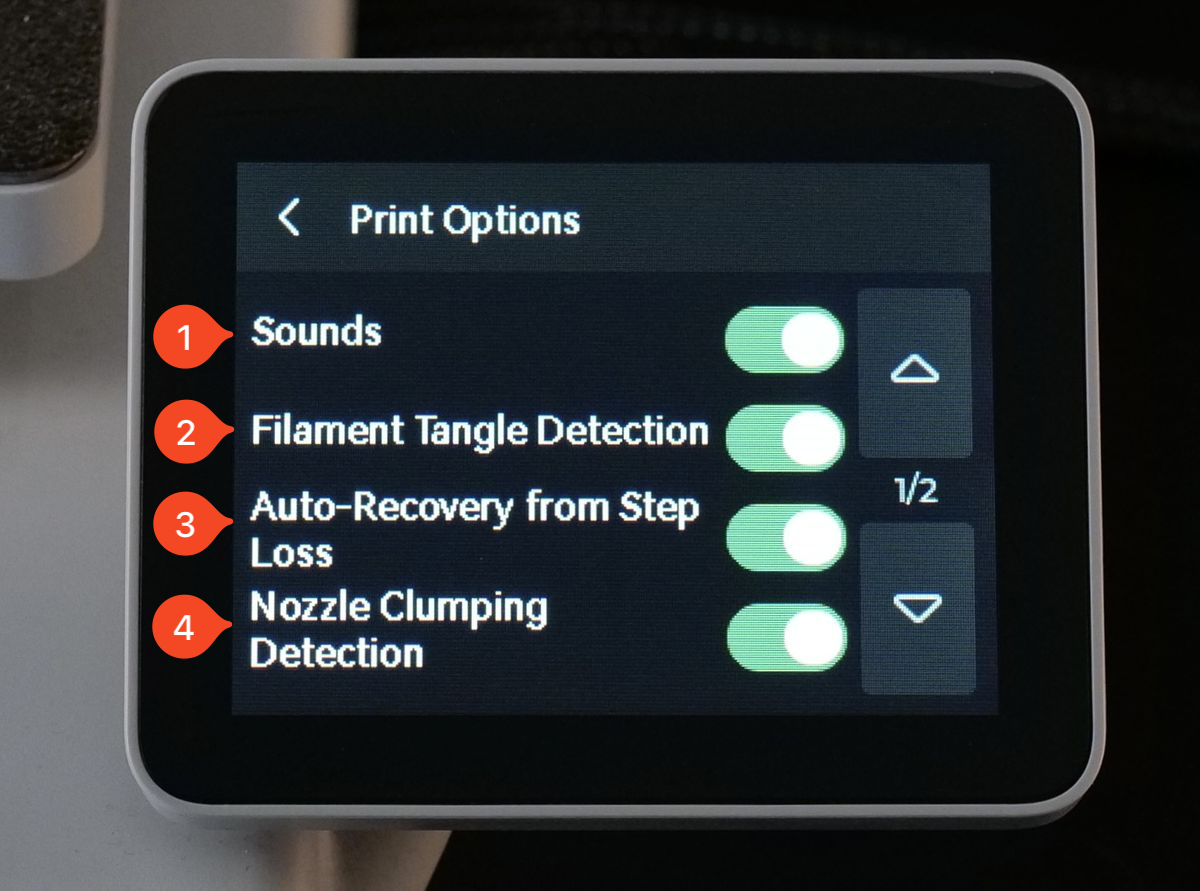
- Sounds – Enables printer sounds when starting or finishing a print.
- Filament Tangle Detection – Monitors filament movement during printing and pauses the print if any issues with the filament are detected.
- Auto-Recovery from Step Loss – Monitors motor movements during printing and attempts to recover if the toolhead or heatbed is impacted, preventing layer shifts.
- Nozzle Clumping Detection – Detects if a print failure occurs, where the printed model loses adhesion to the bed and gets stuck to the nozzle. This feature is intended to prevent further damage or filament waste.
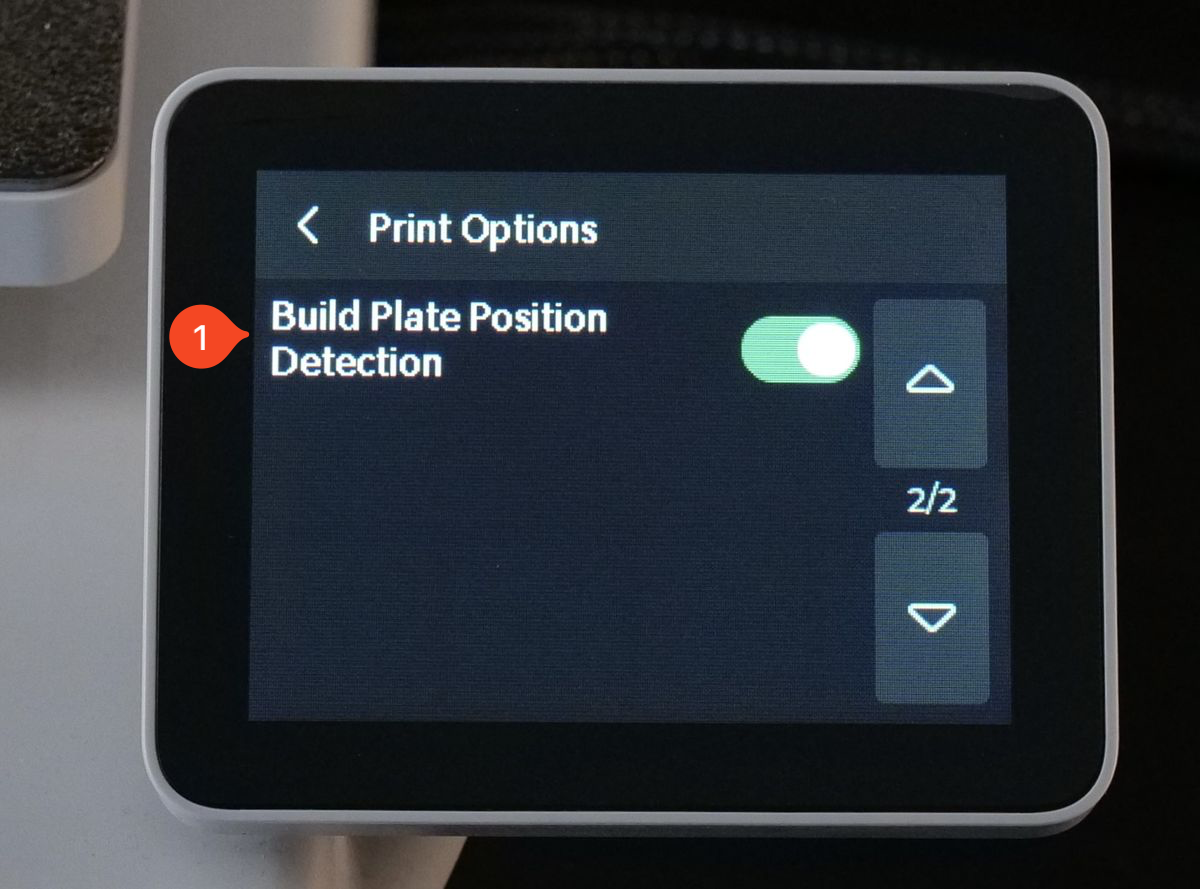
- Build Plate Position Detection – Ensures the build plate is correctly installed before starting a print. This feature is activated when turned on.
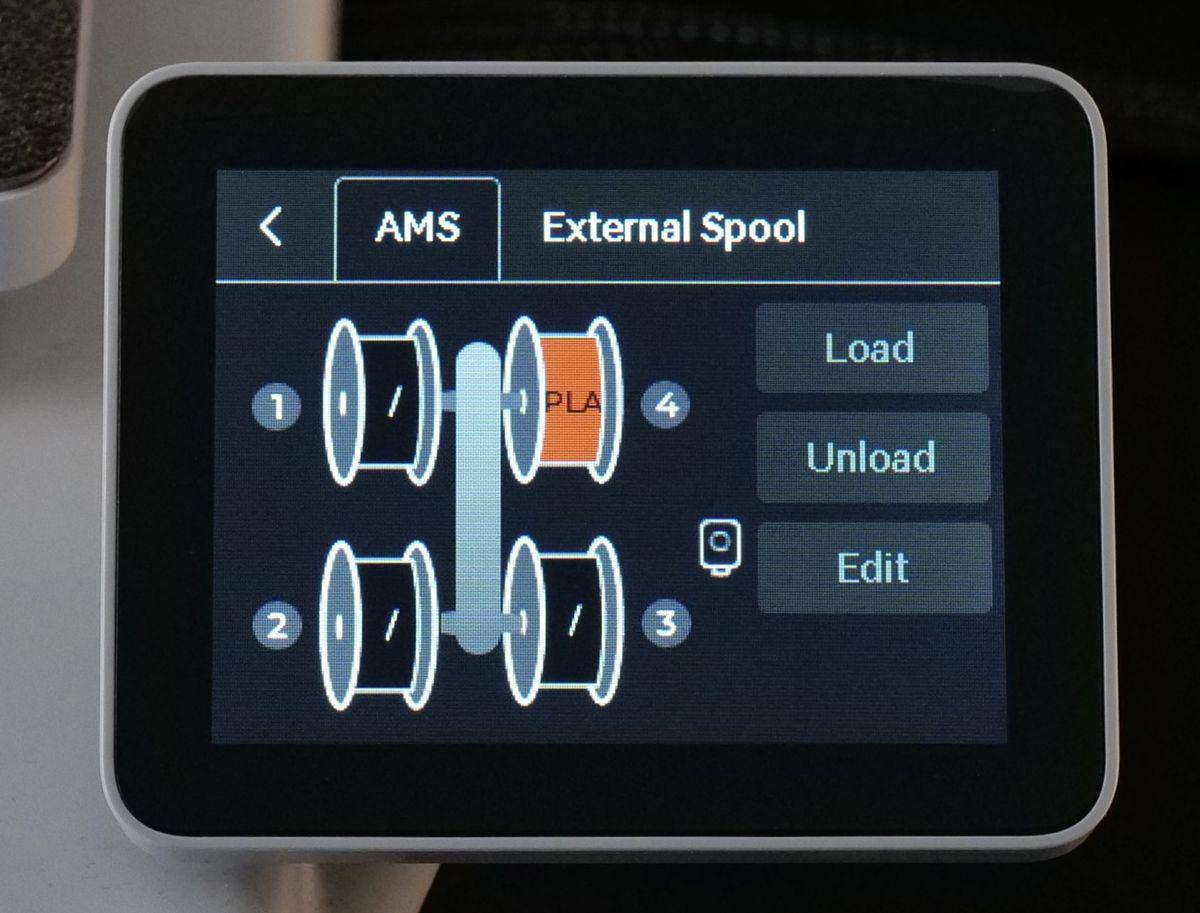
Changes to the interface when AMS lite is connected
When the AMS lite is connected to your A1, a new AMS tab will appear under the Filament button. This tab displays the four filament spools, each corresponding to the type of filament currently loaded into the printer.
If you’re using Bambu Lab filament, the system will automatically detect and display the filament type and color on the screen by scanning the RFID chip on the filament spool. However, if you’re using third-party filaments, you’ll need to manually edit each spool entry to specify the correct type and color. This ensures that the printer is properly set up for the filament you’re using.
An additional sub-menu called AMS Options will also become available:
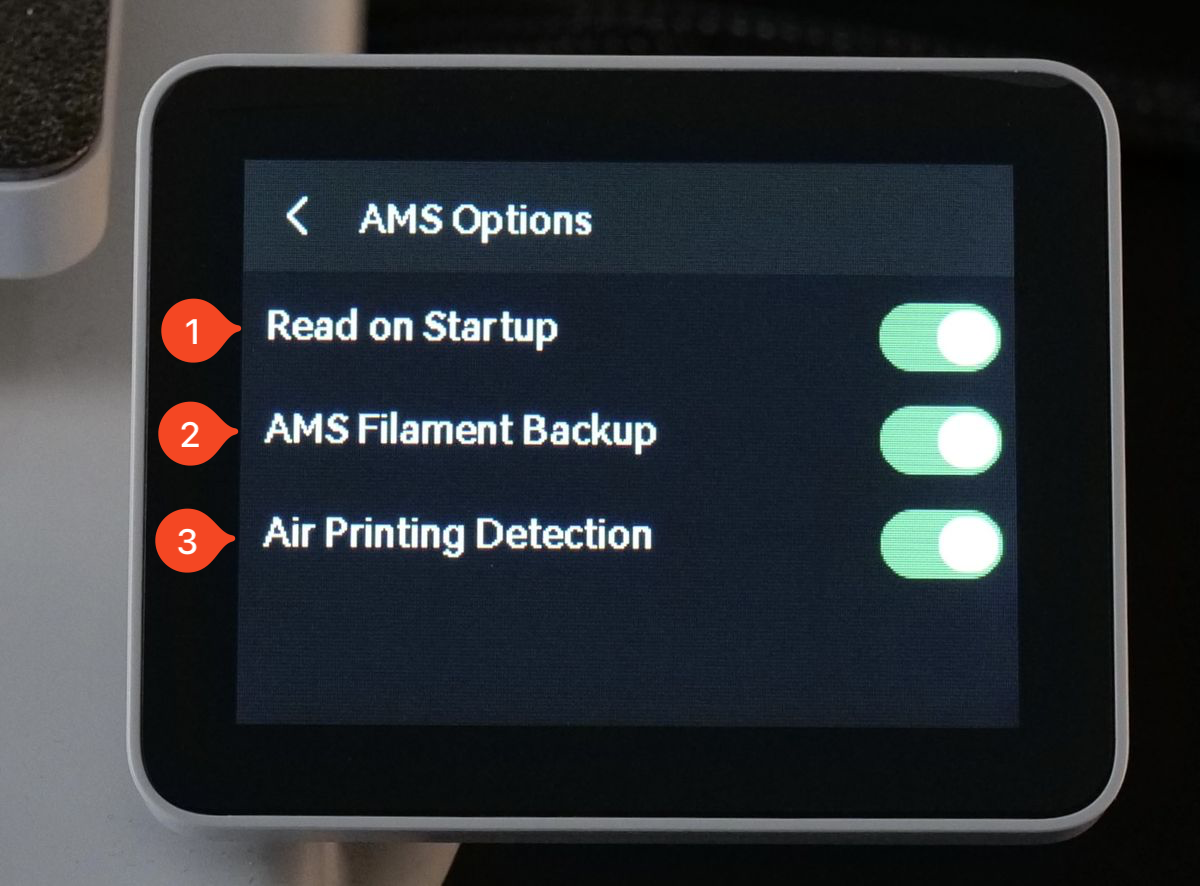
- Read on Startup – When this feature is enabled, the printer will automatically check the filament on the AMS lite as soon as it starts up. It will attempt to detect the RFID tag, and if Bambu Lab filament is loaded, the printer will automatically recognize and display the filament’s type and color. This streamlines the setup process, ensuring correct filament settings without needing manual input.
- AMS Filament Backup – With this feature turned on, the printer can seamlessly switch to the next spool of filament from the AMS lite once the current spool runs out. This transition happens automatically without any manual intervention. However, it’s important to ensure that the same filament type and color are set for the backup spool, as the system relies on matching the properties to prevent issues.
- Air Printing Detection – This feature helps prevent print failures related to filament issues. When activated, the AMS lite will monitor filament movement during printing. If the filament stops moving (for example, due to a blockage or run-out), the printer will pause and alert you to check the filament. This prevents situations where the nozzle would be running empty or where a clog could affect the print quality.