Extrusion Calibration: How and When to do it
What is Extrusion Calibration?
Extrusion calibration for a 3D printer like the Bambu Lab A1 is the process of adjusting how much filament the printer extrudes to match what your print settings expect. Think of it like tuning a musical instrument: you want the exact amount of filament to flow through the nozzle – not too much, not too little – to get perfect prints. This ensures:
- Strong layers that stick together well.
- Accurate dimensions, so parts fit as designed.
- Smooth surfaces without blobs, gaps, or rough textures.
Without calibration, you might see issues like over-extrusion (too much filament, causing bulges or stringy prints) or under-extrusion (too little filament, leading to weak or incomplete prints).
Why Does Extrusion Calibration Matter for the A1?
The Bambu Lab A1 is a high-precision printer, and even small errors in filament flow can affect your results. Here’s why calibration is important:
- Pre-Calibrated Profiles: If you use Bambu Lab filaments, the default profile settings in Bambu Studio are already tuned for those specific filaments. These profiles usually work great out of the box and they use a value which should cover all colors and potential changes in the filament (for example, moisture).
- Generic or Third-Party Filaments: If you’re using other brands or types of filament (e.g., a random spool of PLA or PETG), the default “generic” profiles in Bambu Studio are a good starting point but might not be perfect. Filaments vary slightly in diameter, material properties, or how they melt, which can lead to inconsistent results.
Flow Dynamics
Flow Dynamics (also known as Pressure Advance or Linear Advance) is a feature in 3D printing firmware that compensates for the lag in extrusion pressure to improve print quality, especially at higher speeds. When filament is extruded, it takes time for the pressure in the nozzle to build up to a level where plastic flows consistently.
During acceleration, this lag can cause underextrusion, resulting in gaps or thin lines. Conversely, when decelerating, the residual pressure causes excess filament to ooze out, leading to blobs or stringing. These issues worsen with faster print speeds.
Flow Dynamics counter these effects by preemptively adjusting the filament flow:
- During acceleration, the Flow Dynamics algorithm increases the extrusion rate slightly to build pressure faster, reducing underextrusion.
- During deceleration, the Flow Dynamics algorithm reduces or reverses the filament flow (similar to a mini-retraction) to relieve built-up pressure, preventing oozing.
This results in cleaner corners, sharper details, and more consistent extrusion, especially in complex prints with frequent speed changes.
Here’s an example in simpler terms: Imagine you’re squeezing a tube of toothpaste to draw a straight line on a plate. When you start squeezing, it takes a second for the toothpaste to come out smoothly, so the line might be too thin at first. When you stop squeezing, a little extra toothpaste oozes out, making a blob at the end.
Now, think of Flow Dynamics as a smart helper who knows exactly how hard to squeeze. When you start, the helper pushes a bit harder to get the toothpaste out right away, so the line starts nice and even. When you’re about to stop, the helper pulls back a little early to stop the extra toothpaste from blobbing out.
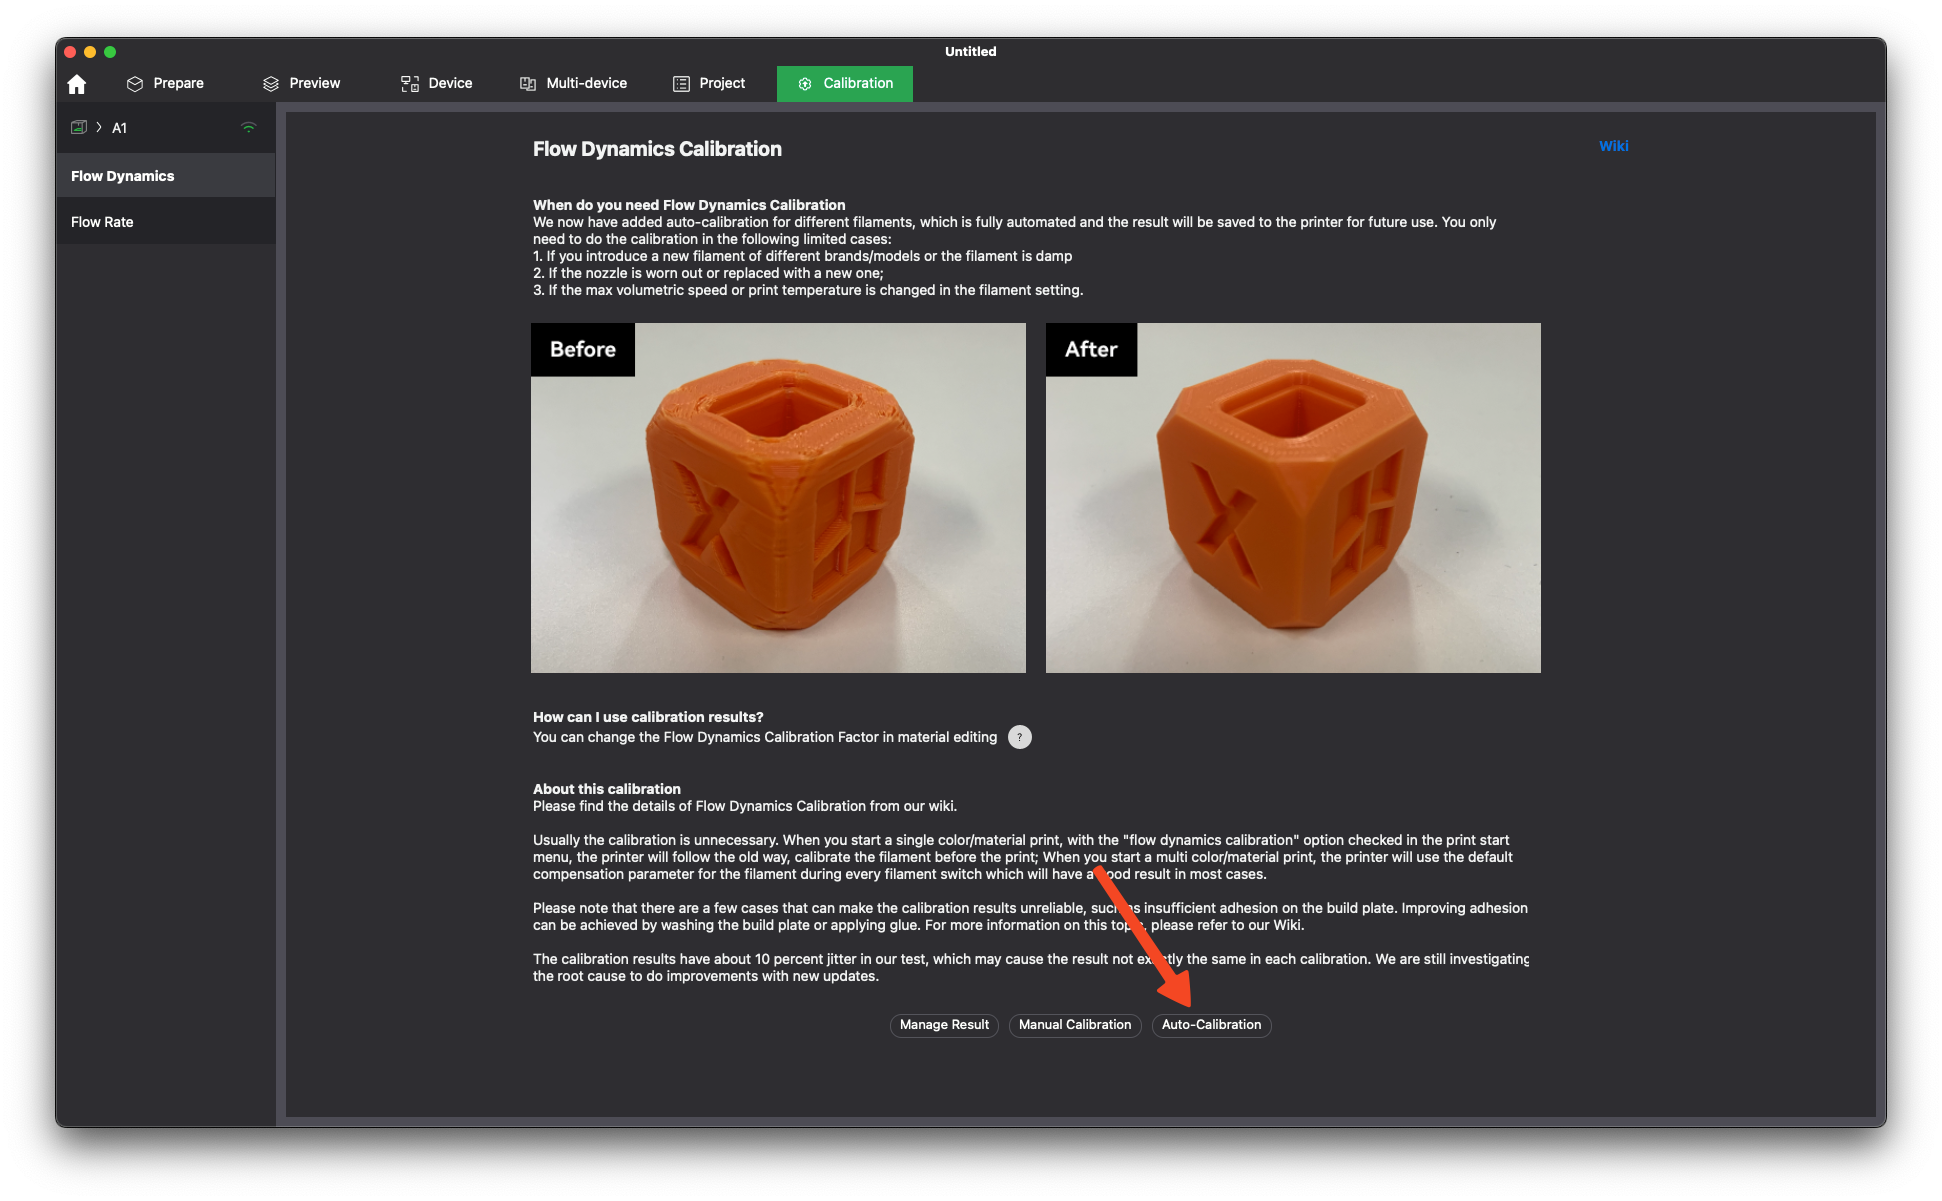
How to automatically calibrate Flow Dynamics for the A1
Thanks to the addition of sensors in the toolhead, the A1 can perform the Flow Dynamics calibration automatically. This is an option that can be enabled at the start of each print, to ensure that every filament loaded is calibrated before starting the print.
It is not necessary to perform this calibration every time the printer is used, as the setting can be saved and reused in the slicer.
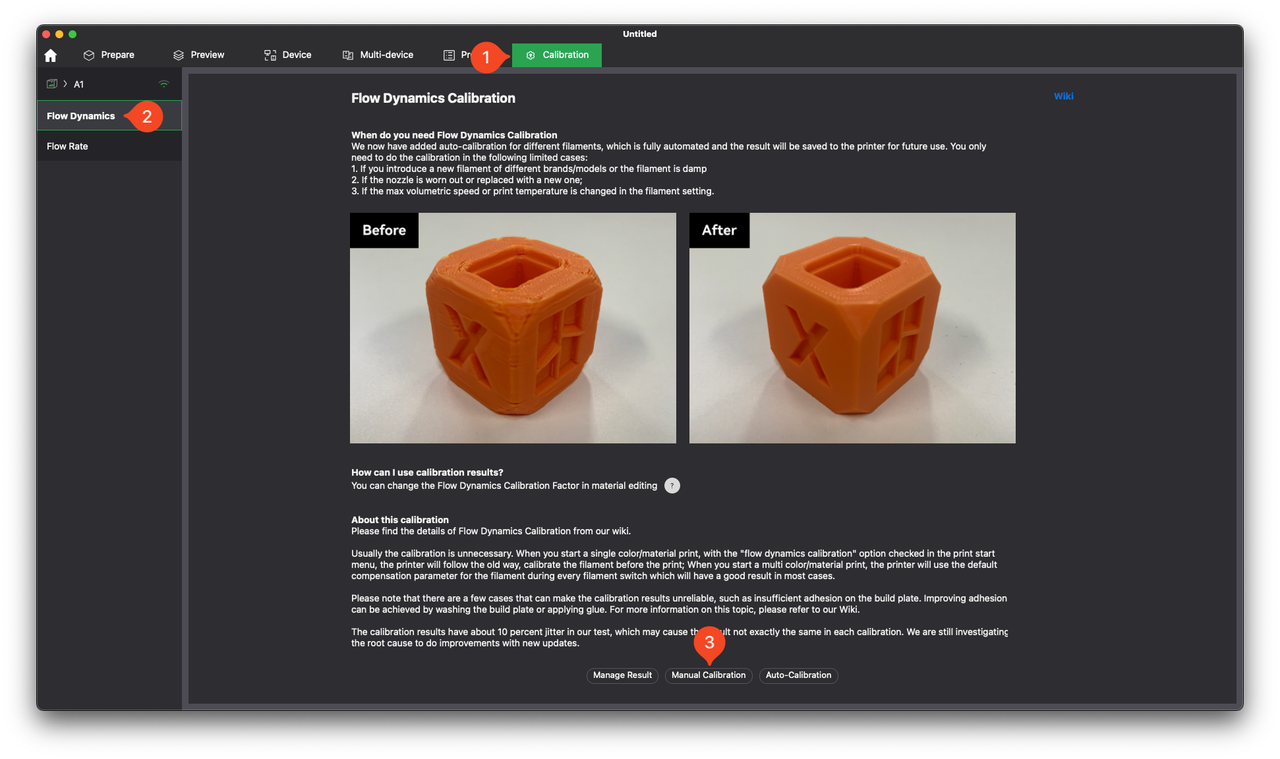
To start, navigate to the Calibration tab, select Flow Dynamics, then click on Auto-Calibration.
The next step in the calibration process will ask for the following steps:
- Click the Sync button to synchronize the information for the printer.
- Select the Nozzle Diameter installed on the printer, in our case 0.4mm.
- Select the Plate Type (you can use the default one, as there will be no model printed)
- Select the Filament For Calibration. It should be automatically detected based on the configuration done in the previous step. If you are using an AMS lite, make sure to select the external spool.
- Click Calibrate.
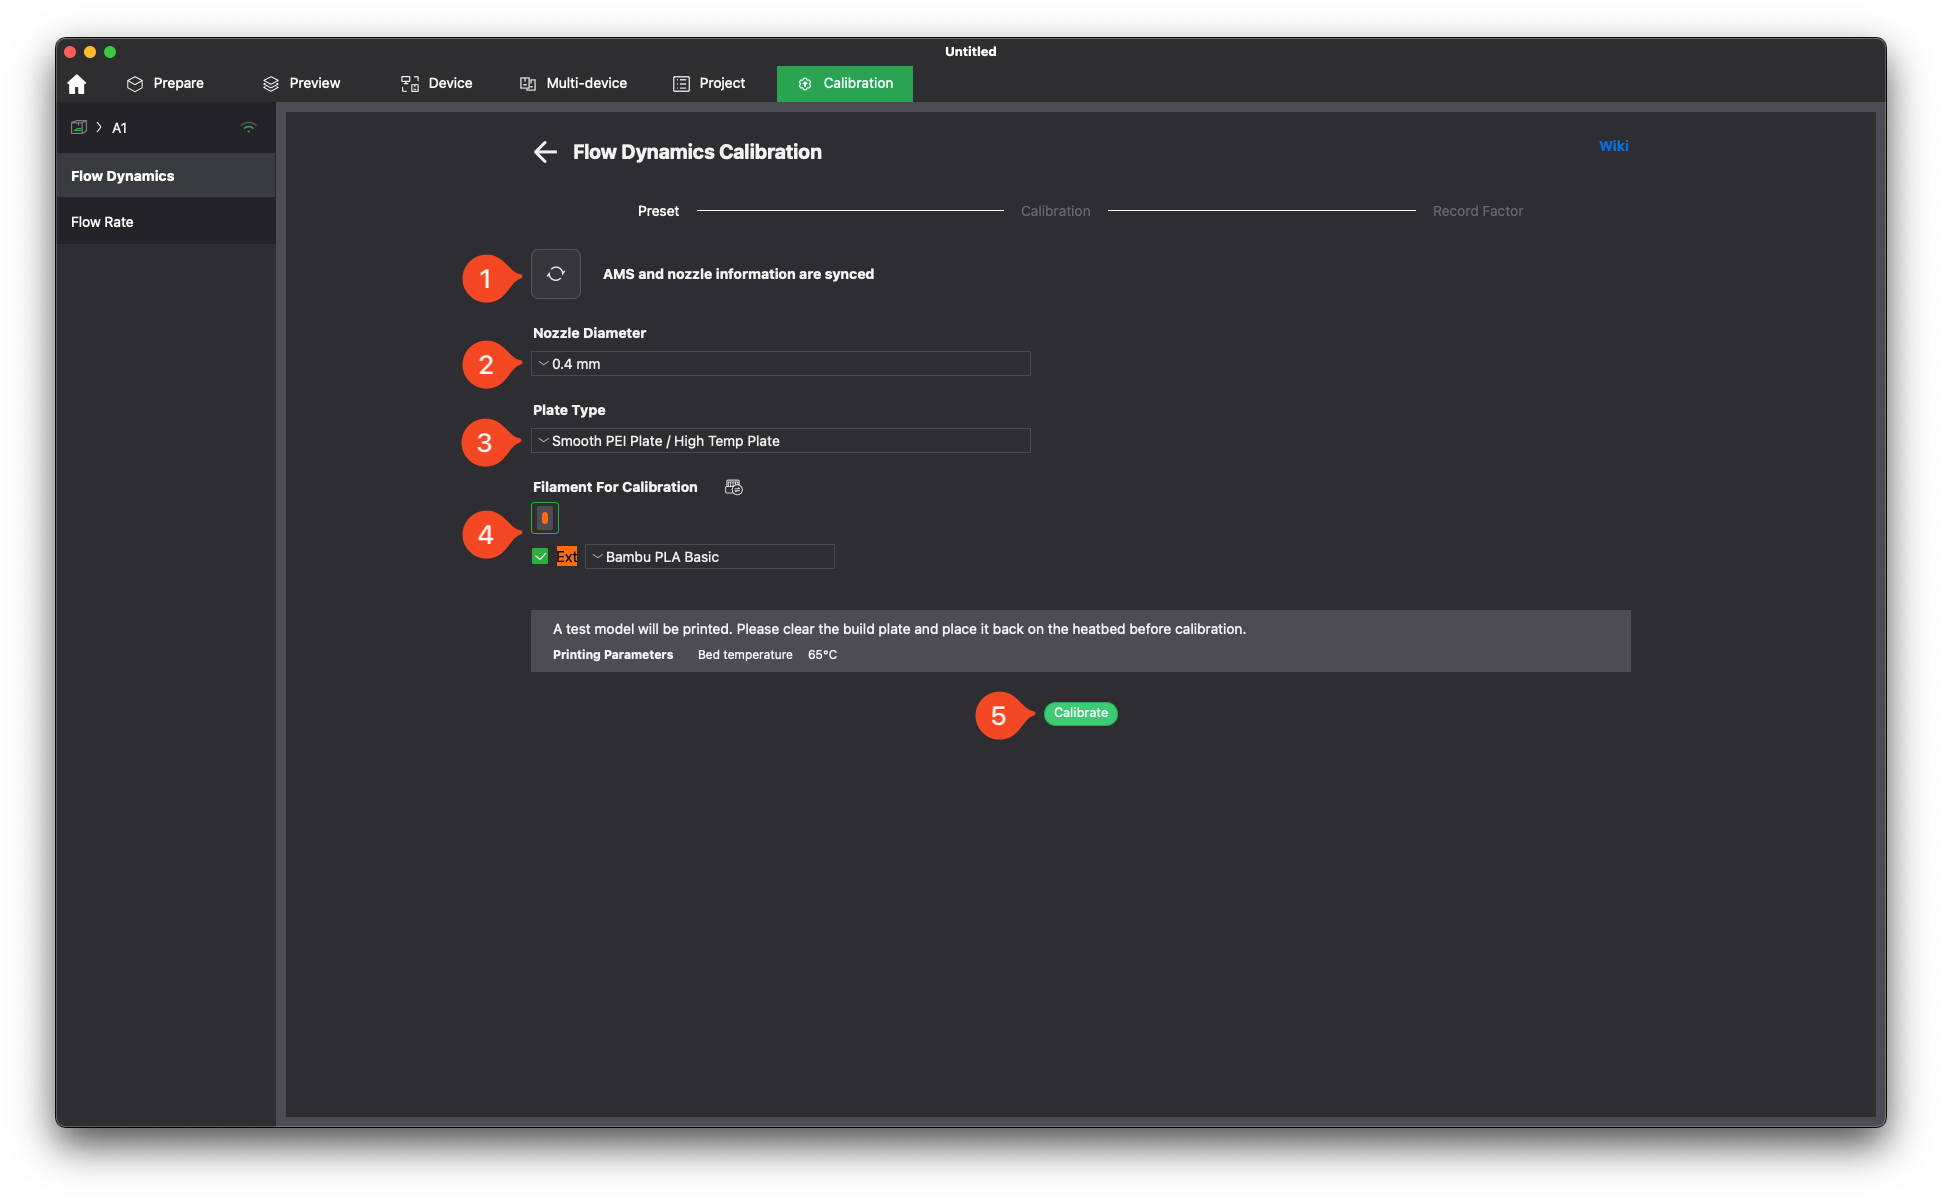
The Auto-Calibration process will start. The printer’s nozzle will be heated, then filament will be extruded from the nozzle, while the toolhead sensors will carefully monitor how the filament is flowing, and generate a calibrated value.

Once the process is complete, a Flow Dynamics Calibration Factor will be displayed, and you will be asked to set a name for the calibrated value.
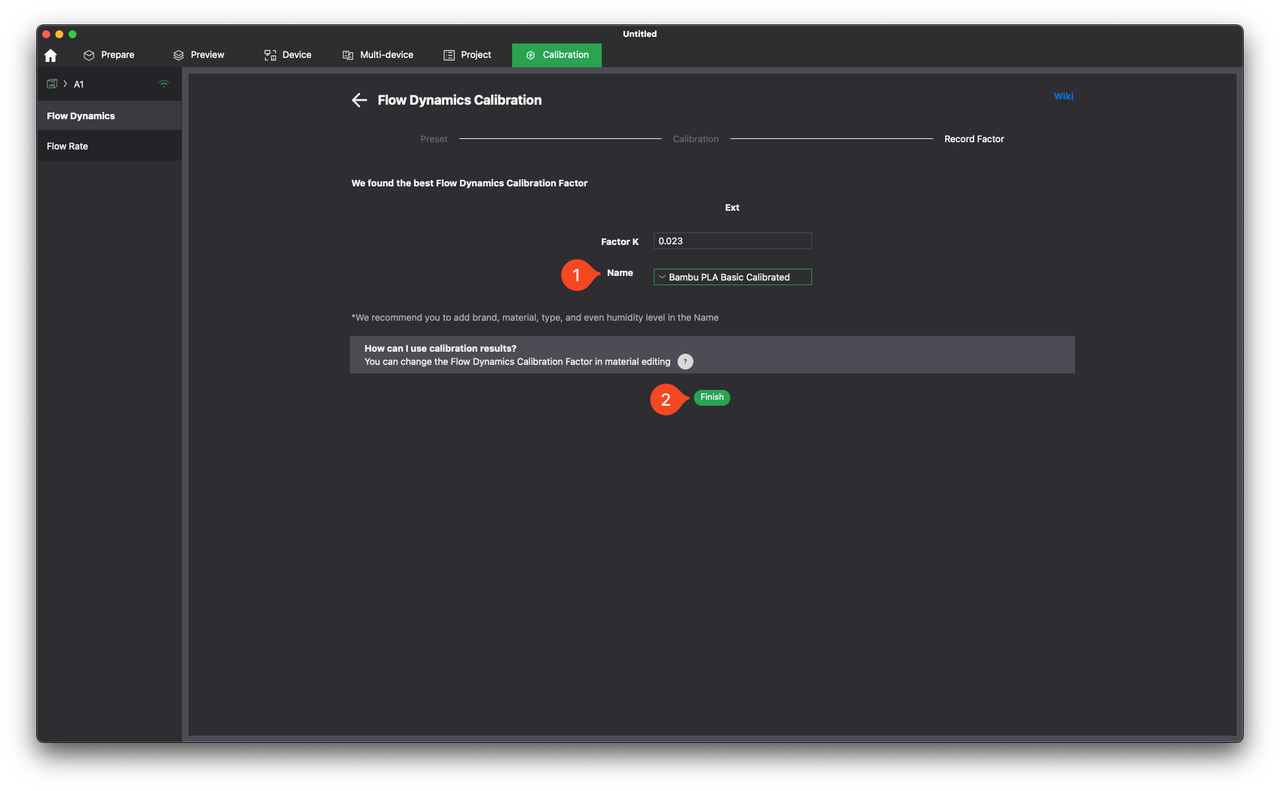
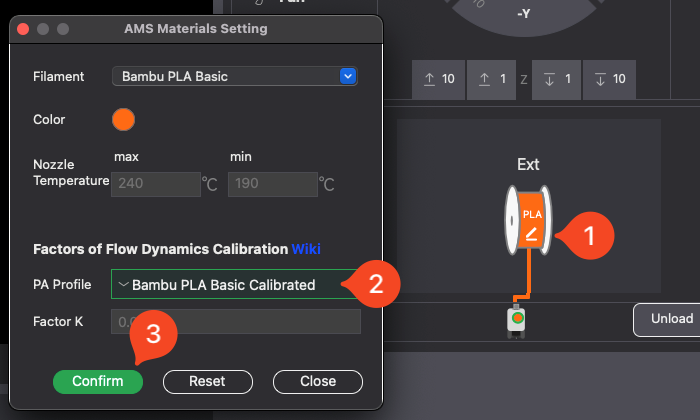
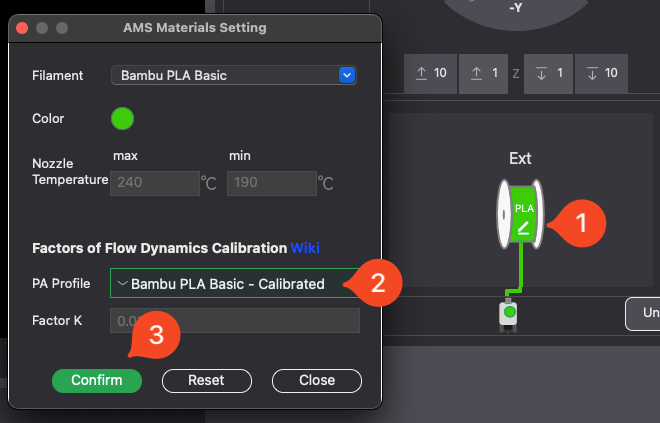
Next time you start a print, make sure the calibrated PA Profile is selected. You can then skip the auto-calibration option at the start of a print.
How to manually calibrate Flow Dynamics for the A1
Some filaments might produce slightly inaccurate results when using the Auto-Calibration feature. For such filaments, you can perform Manual calibration, where you can fine-tune the calibration results visually.
Before you start, make sure your plate is installed on the printer and has been thoroughly cleaned to ensure good adhesion. It’s recommended to do this calibration procedure on a smooth plate, like the Smooth PEI plate, but it can also be done on the Textured PEI plate. In this example we will use the Smooth PEI Plate as the results can be evaluated easier with a dark backgroud.
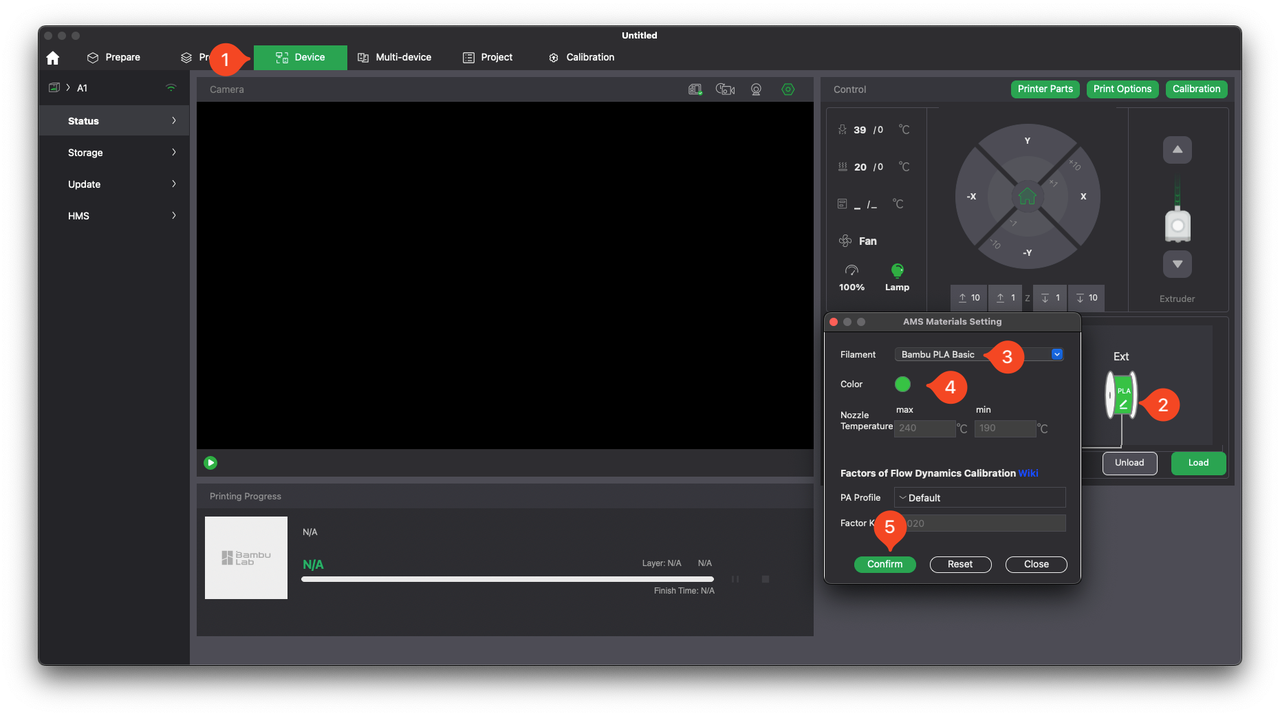
To calibrate Flow Dynamics, Open Bambu Studio, and ensure the filament is correctly configured in the settings. For this example, we will use Green Bambu Lab PLA Basic printed from the spool holder. Go into the Device tab, select the type and color of the filament, then confirm it.
If you haven’t already, load the filament to the printer. The loading process will also allow you to select the filament type.
Next, navigate to the Calibration tab, select Flow Dynamics, then click on Manual Calibration.
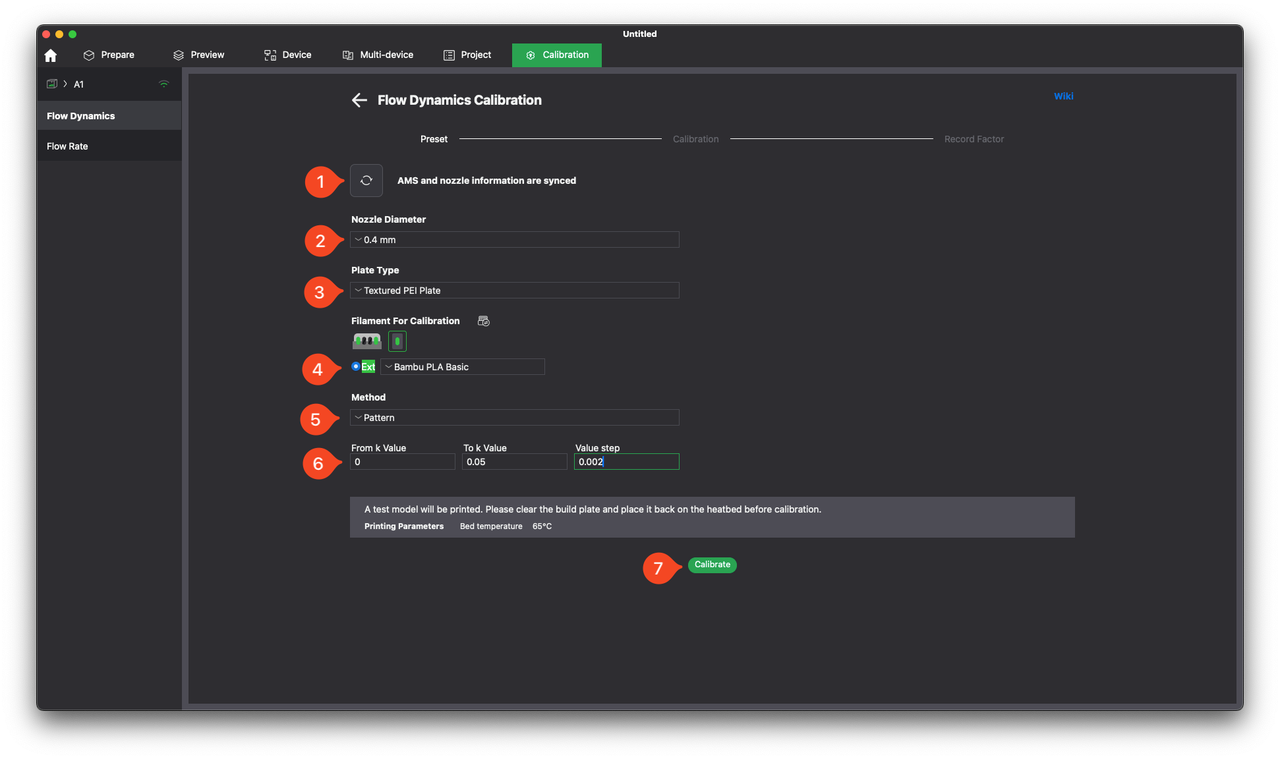
The next step in the calibration process will ask for the following steps:
- Click the Sync button to synchronize the information for the printer.
- Select the Nozzle Diameter installed on the printer, in our case 0.4mm.
- Select the Plate Type, in our case the Smooth PEI Plate.
- Select the Filament For Calibration. It should be automatically detected based on the configuration done in the previous step. If you are using an AMS lite, make sure to select the external spool.
- Select the Pattern Method, which will help visually determine the correct value.
- Select the Interval for the test. It is recommended to use the value step of 0.002 as it will create more calibration lines to have a finer gradient of results to choose from.
- Click Calibrate.
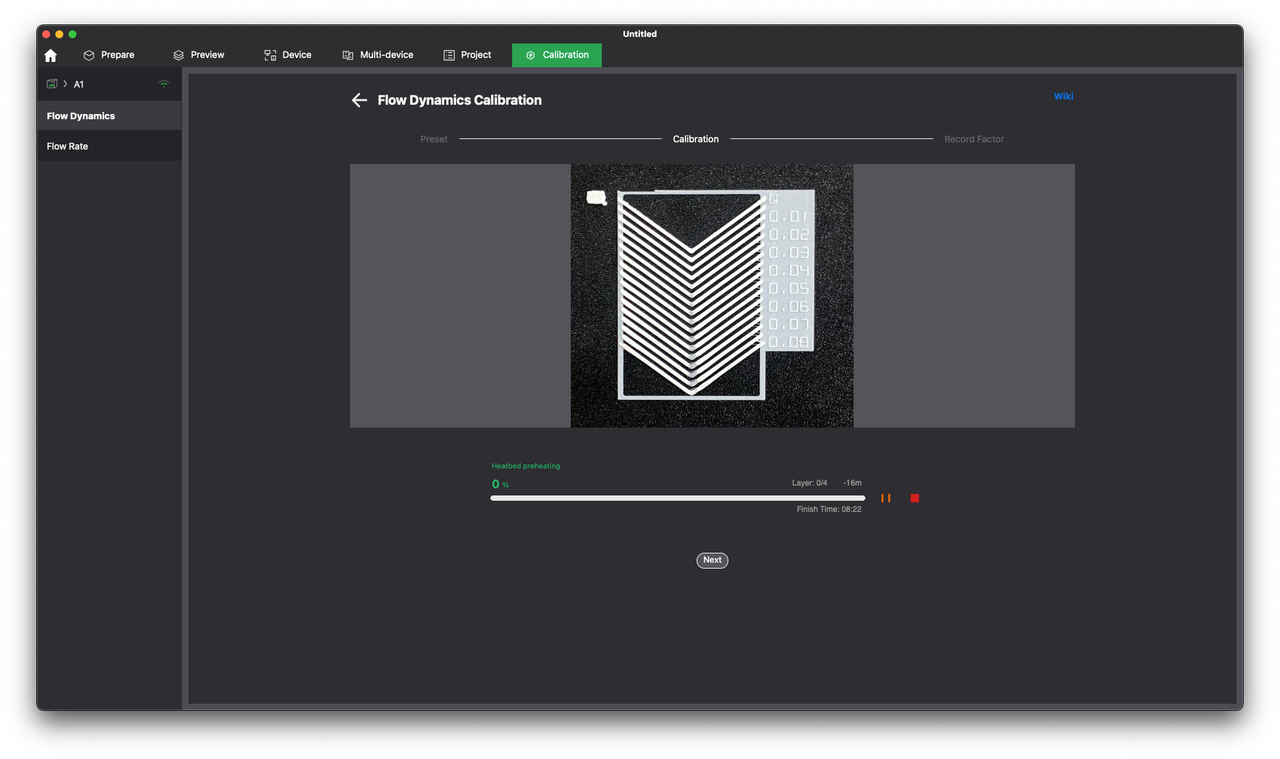
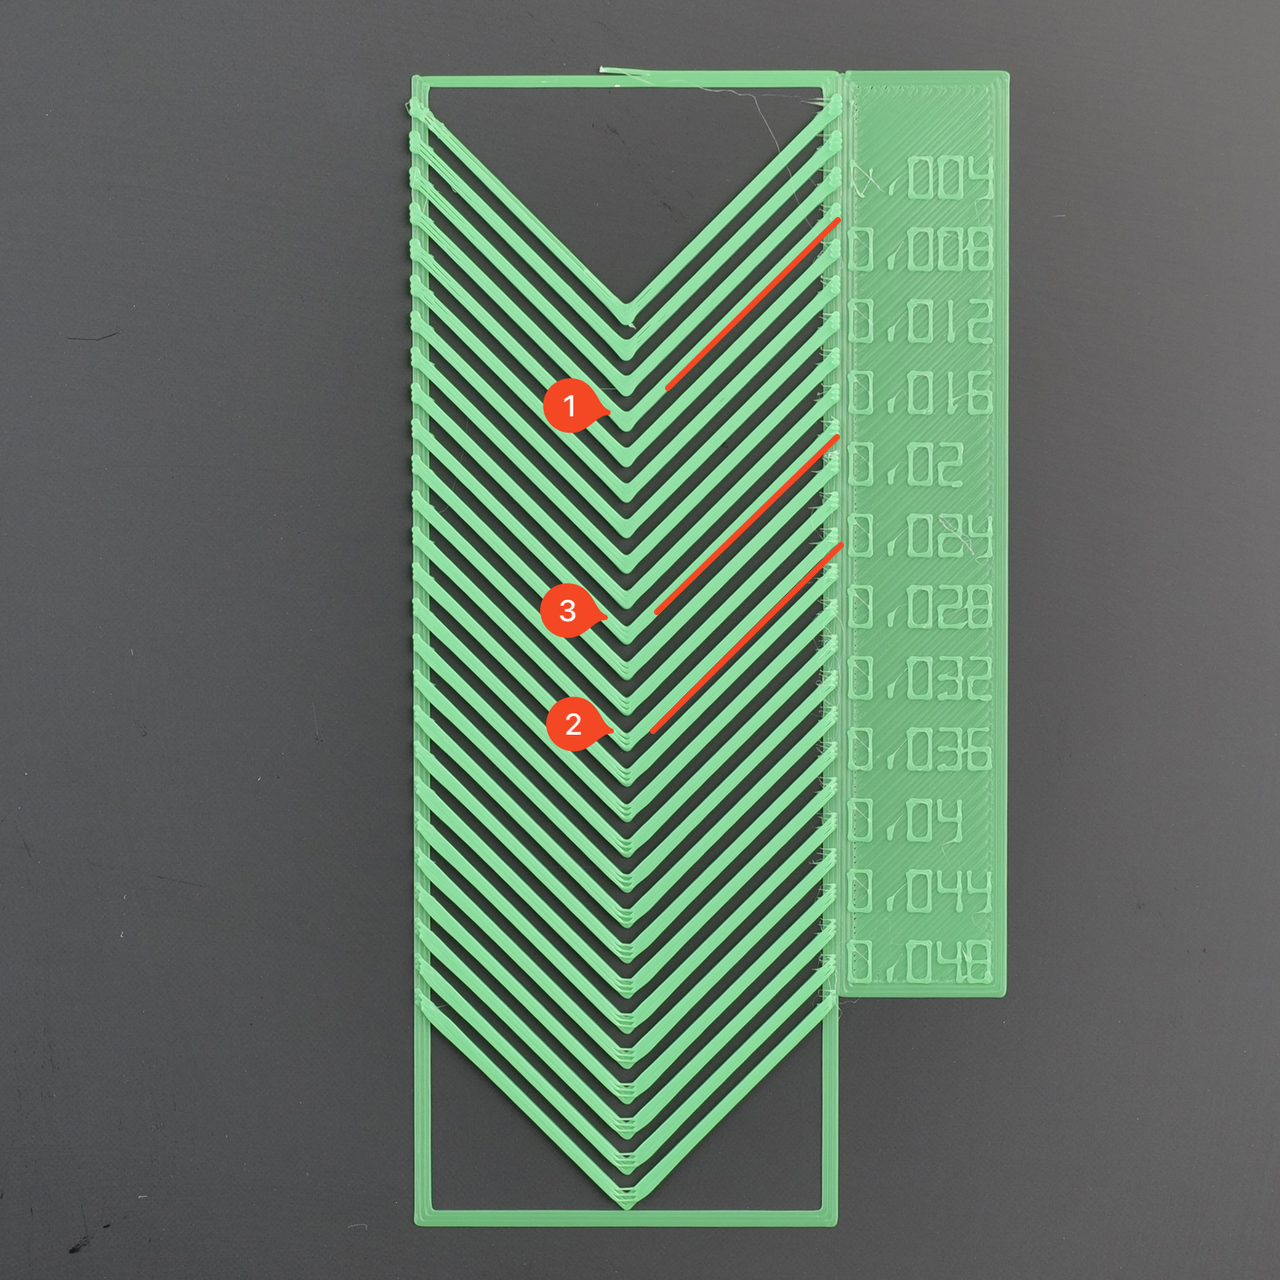
Once you click Calibrate, the test file will be sent to the printer. You just need to wait for the printer to finish the print job, then move to the next step. The pattern will be similar to the one shown in the image.
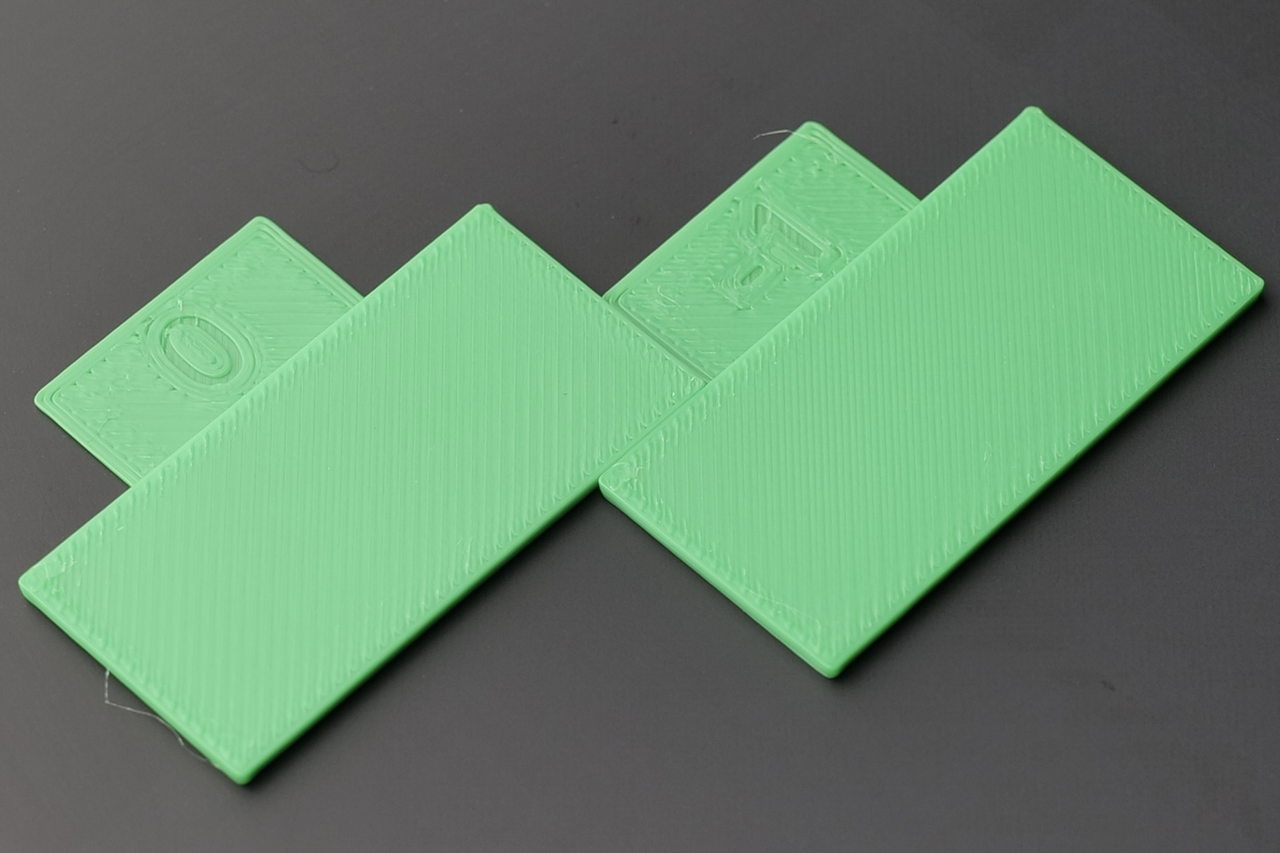
Now that the pattern is successfully printed, you will need to visually determine which of the printed values has the cleanest printed corner. The corner should be as sharp as possible, without any signs of under-extrusion.
Looking carefully at the test results, a K factor value of 0.006 (represented with 1) would be too low, as the corner is bulging and round. On the other hand, starting from the 0.024 K value (represented with 2), we get under extrusion in the corner.
Based on this test, and the filament used, the best result is a K value of 0.018 (represented with 3) which is between the 0.016 and 0.02.
Once you have determined the correct value, simply input it under the Factor K section, give a new name to the filament profile, then click on Finish to complete the calibration.
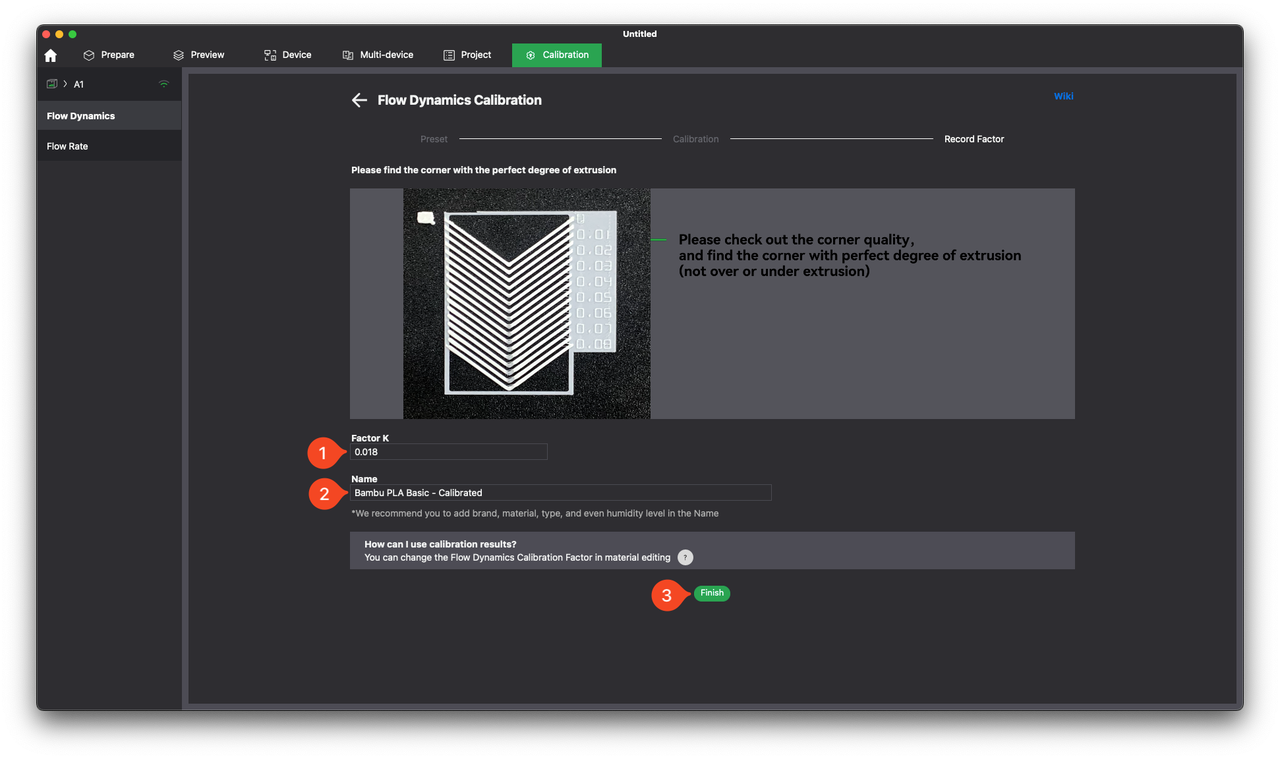
❗ Important!
Pay close attention to the K value entered in this section. An incorrect value can lead to print quality issues.
Flow Rate
Flow Rate is how much filament the printer’s extruder pushes out of the nozzle, measured as a percentage or multiplier of the default amount. It controls the thickness of the extruded plastic. Adjusting it fine-tunes print quality. If the Flow Rate is too high, it causes overextrusion (blobs or lines which overlap too much), and if it’s too low, it causes underextrusion (gaps in the printed lines).
Different 3D printing filaments require different flow rates due to varying viscosity and melting points. PLA flows easily, ABS and nylon are slightly thicker, PETG is sticky, TPU is flexible and viscous, polycarbonate is tough, and composites can be abrasive. Flow rates must match each filament’s properties to ensure smooth extrusion for the expected print quality.
To use the same example as above, the flow rate can be compared to how fast or slow the toothpaste comes out. If you gently squeeze the tube, the line is thin and neat. If you squeeze too hard, the line gets thick and messy.
How to calibrate Flow Rate for the A1?
The Flow Rate calibration is done after the Flow Dynamics calibration has been performed and the plate has been cleaned and installed back on the printer. Simply navigate to the Flow Rate tab, then click on Manual Calibration.
The next step in the calibration process will ask for the following steps:
- Choose the Calibration Type which can be either Complete or Fine Calibration based on a pre-existing value. Usually, if you get good results with your current settings, you can skip the initial calibration and directly print the Fine Calibration.
- Click the sync button to synchronize the information for the printer.
- Select the nozzle installed on the printer, in our case 0.4mm.
- Select the Plate Type, in our case the Smooth PEI Plate.
- Select the filament for calibration. It should be automatically detected based on the configuration done in the previous step. If you are using an AMS lite, make sure to select the external spool.
- Click Calibrate.

The print task will be sent to the printer.

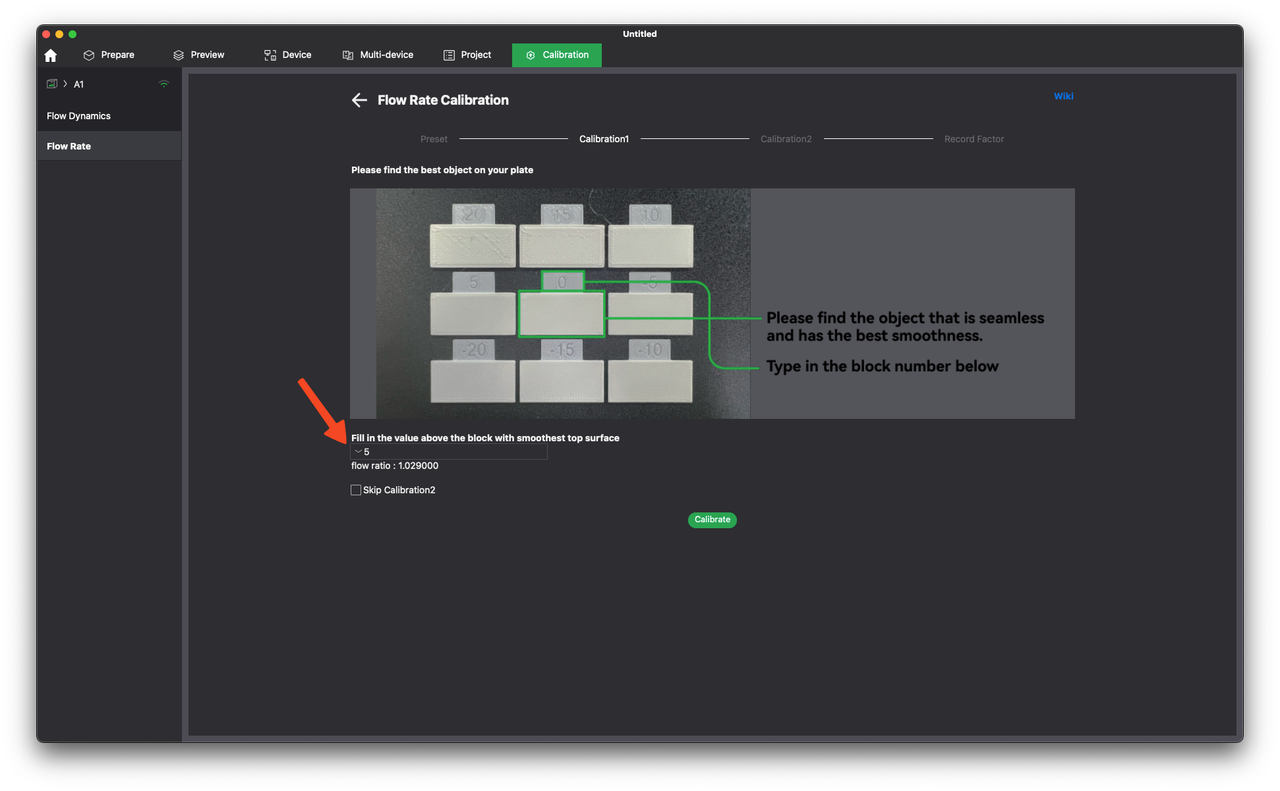
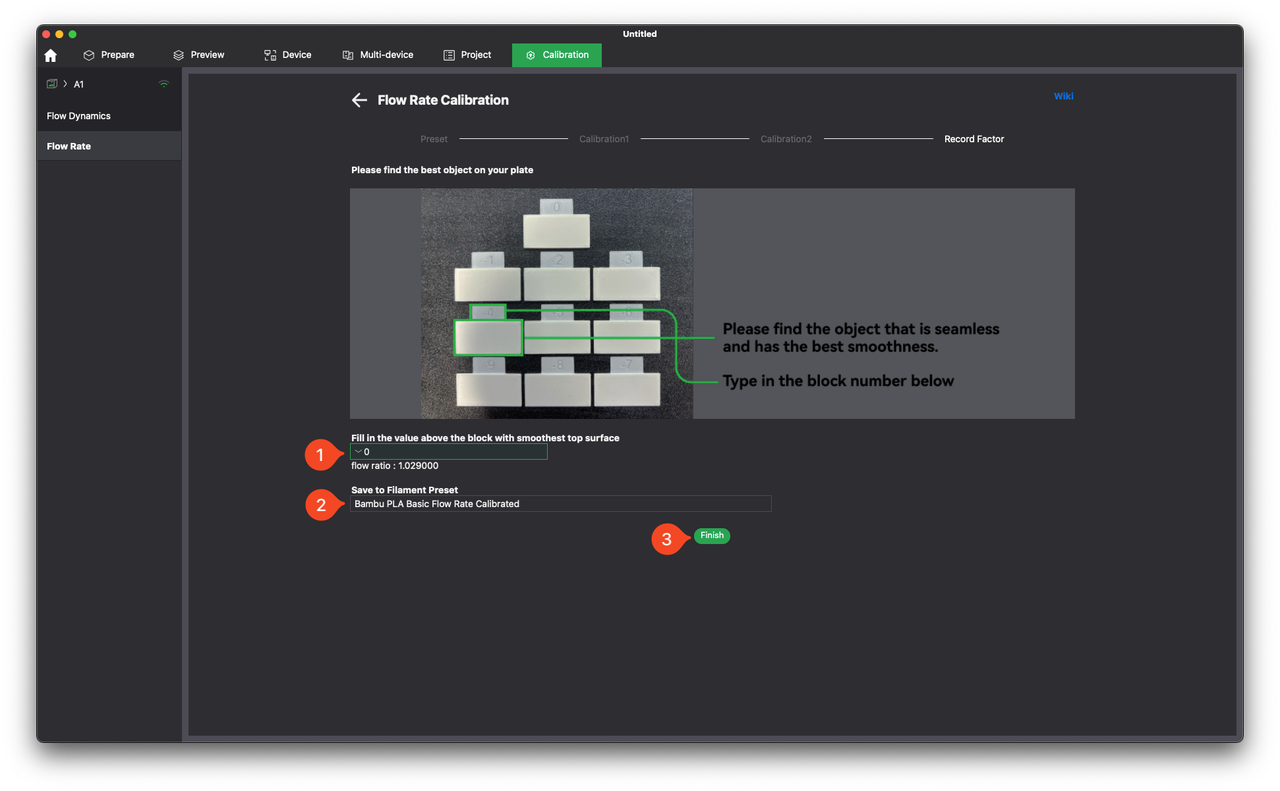
After the first stage of the Complete Calibration print is done, it’s time to visually determine which one of the printed samples has the smoothest finish.
Judging the print result below, choosing one of the top three samples is not recommended, because the flow rate is too high, making the printed lines overlap. The bottom three samples are under-extruded, and there are gaps between the lines. Since -5 is clearly under-extruded, we are left with the middle options, 5 and 0.
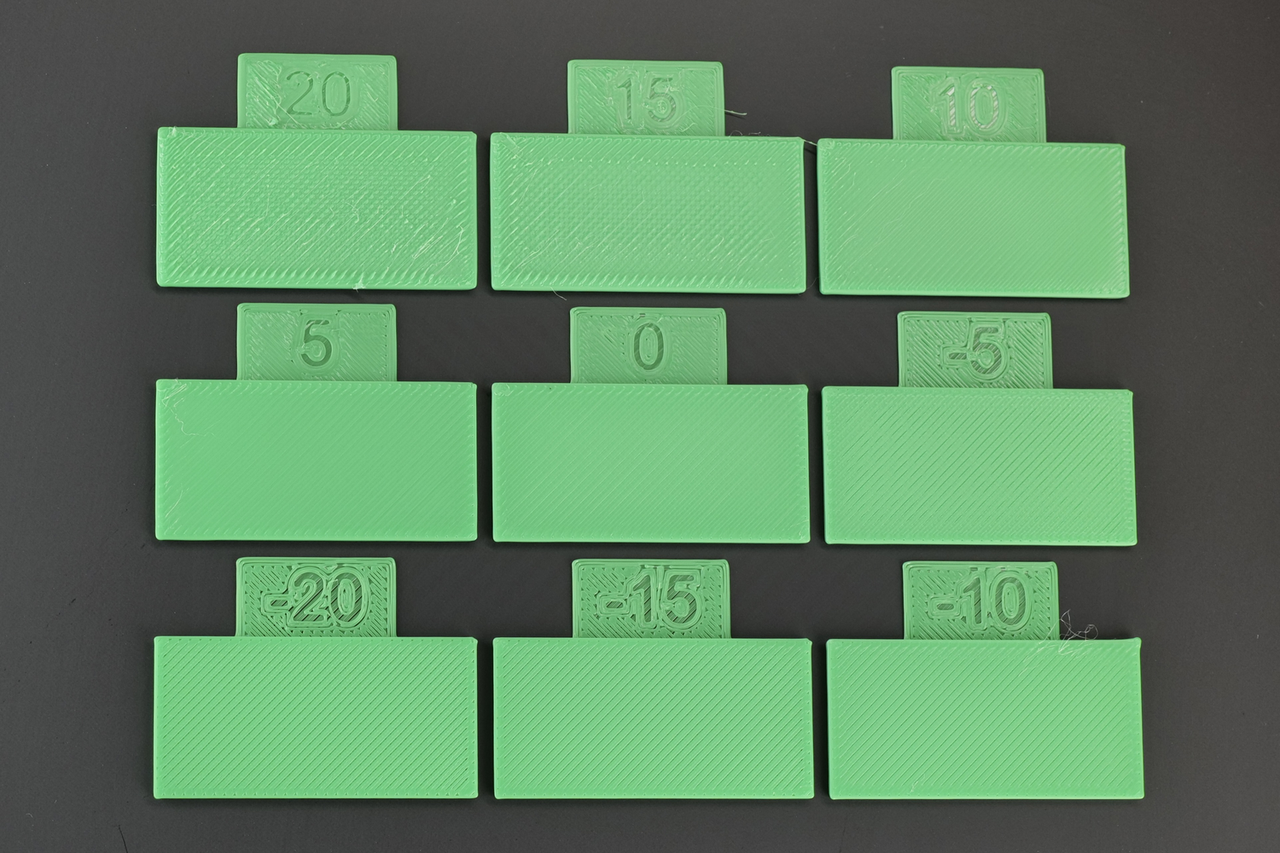
Between the two samples, the one with value 5 is the smoothest. The lines are smooth throughout the print, while the sample with value 0 has a bit of under-extrusion.
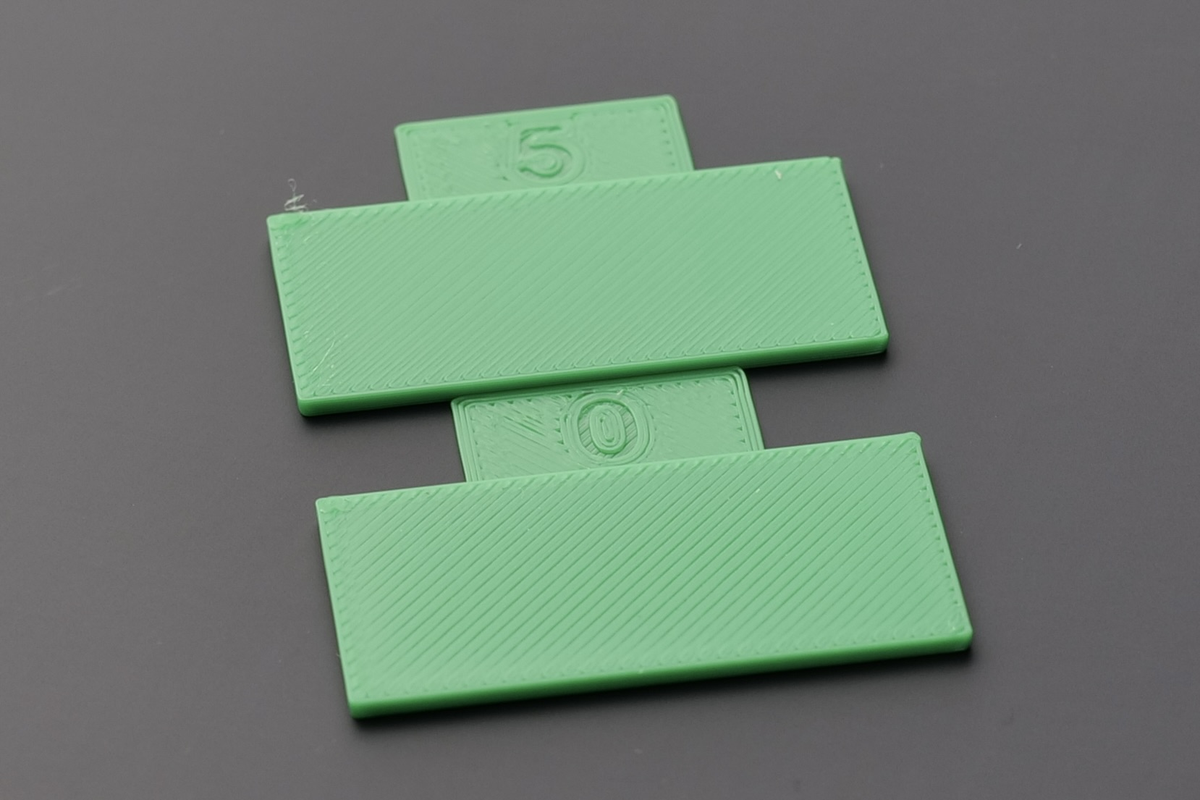
At this point, it’s time to select the best sample in Bambu Studio (5, based on our test) which will show the best flow rate to use, in this case 1.029.
If you are happy with the result, you can choose to skip the fine calibration called Calibration 2. But if you wish to fine tune the flow rate, remove the calibration squares from the build plate, place it back on the heatbed, and click Calibrate. The printer will generate a new set of test samples to generate a finer selection of the flow rate.
❗ Important!
The printer will send the new test samples right after you click the Calibrate button. Ensure the plate is clean, and installed in the printer, before clicking the button.
As expected, the printer will start printing another set of test samples, to help you better determine the best flow rate value. Simply wait for the print to be completed, then move to the next step.
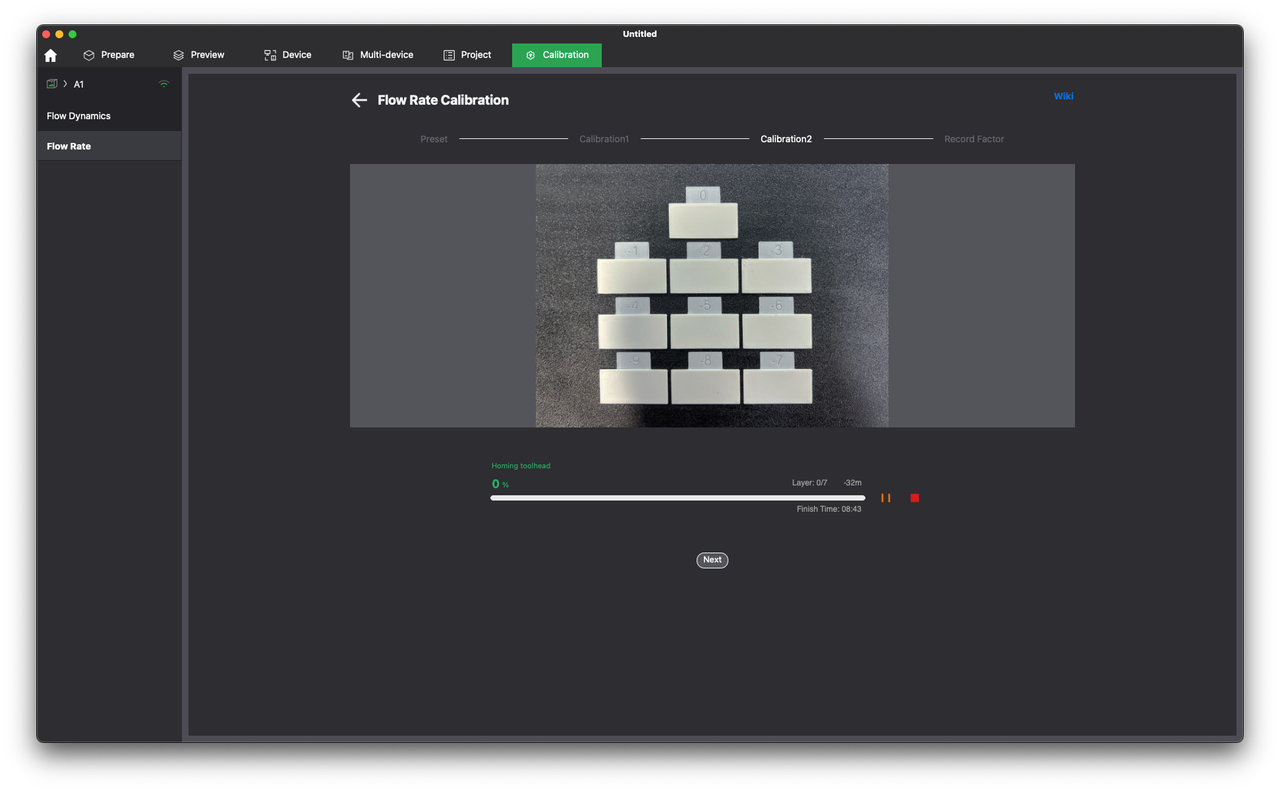
Just like before, you need to compare the test results and find the smoothest test sample. This time, it might be a bit more challenging, as some of the test samples will have very minor differences between them. Try to look at them with the light coming from the left side and positioning the samples similar to the image below.
Pay close attention to the middle section of the test sample rectangles, as it will show any sign of under-extrusion. The start and end of the printed lines might show slight signs of over-extrusion, but that is considered normal.
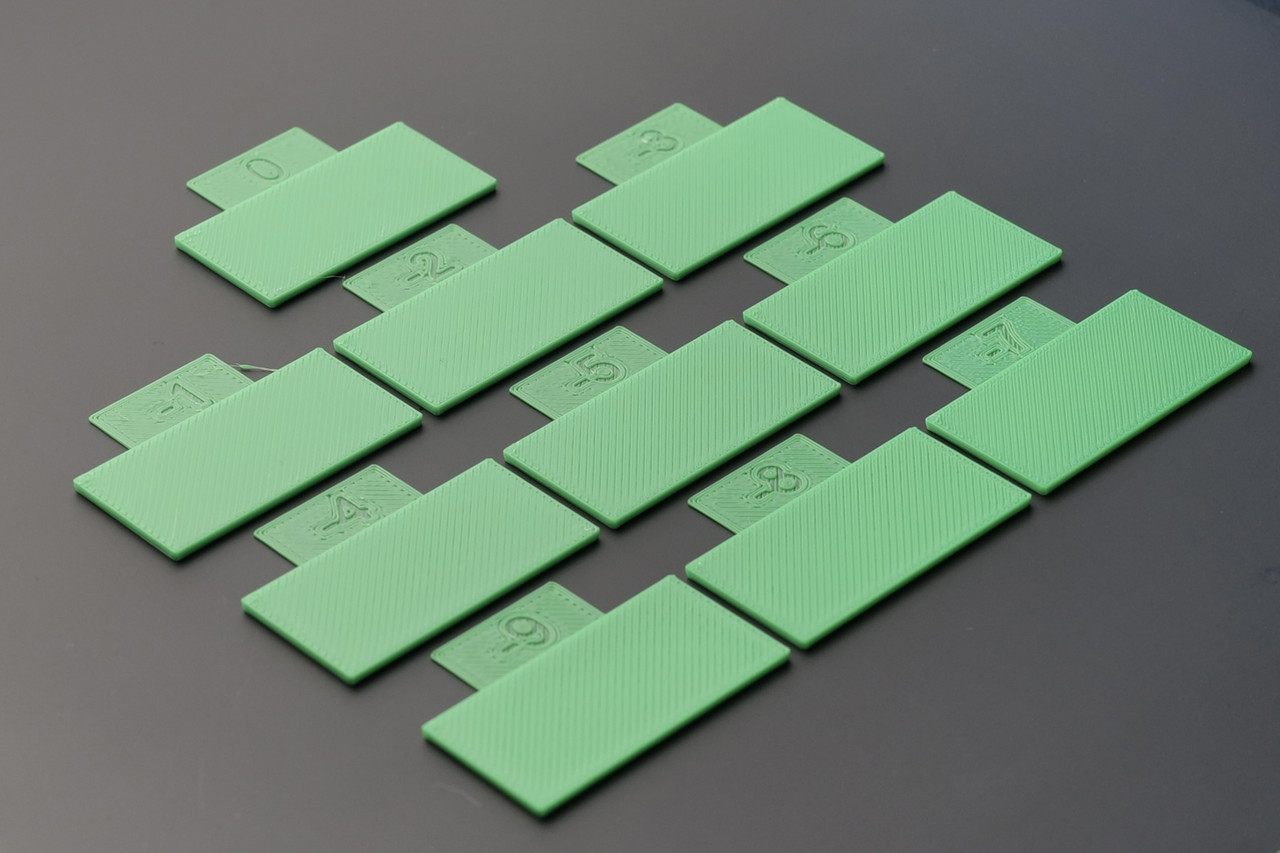
It can be observed that most of the negative samples (-2 to -7) have slight under-extrusion, as there are gaps between the printed lines.
The -1 sample seems to be OK at first glance, but looking closer, you can see some very faint signs of under-extrusion between the printed lines. Due to this, it is recommended to avoid using the -1 value, confirming that 0 is the correct result.
❗ Important!
Avoid selecting the sample which shows slight signs of under-extrusion. For larger prints, this slight under-extrusion can increase, leading to potential gaps between the printed lines.
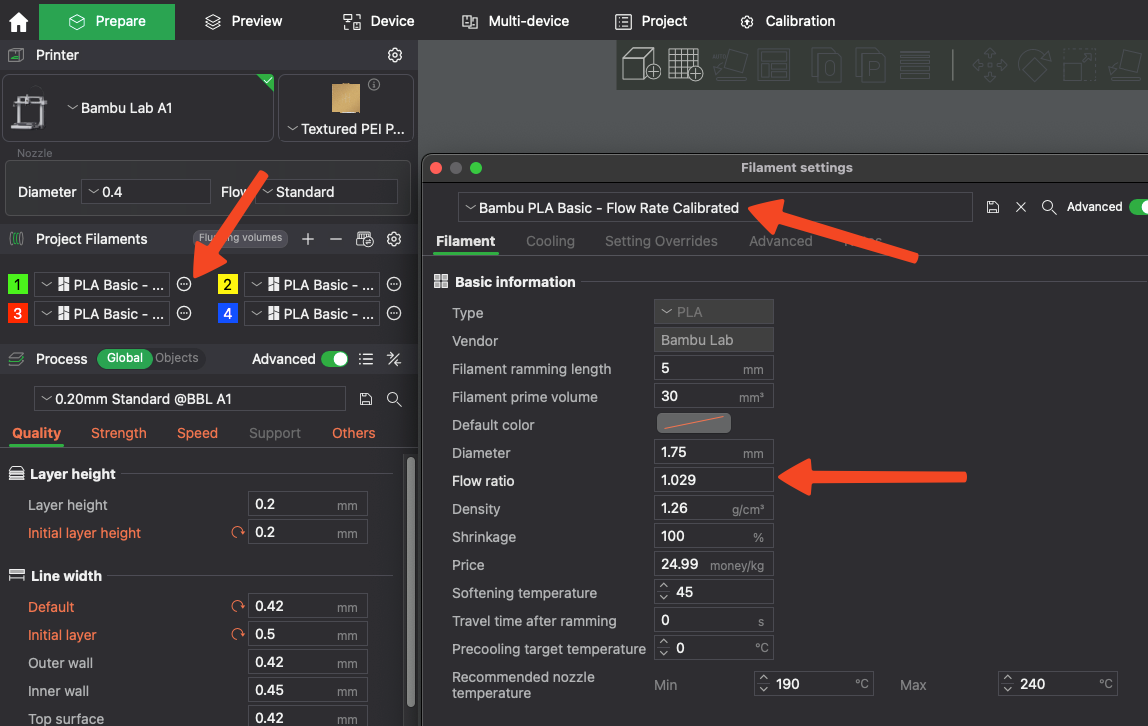
In Bambu Studio, select the sample which is the smoothest, in this case 0, then set the name for the filament preset. The calibration process is completed by clicking Finish.
Your newly calibrated profile will have the new flow ratio applied.
Next time you start a print, make sure the calibrated PA Profile is selected. You can then skip the auto-calibration option at the start of a print.
❗ Important Notes
When considering the Flow Dynamics and Flow Rate calibration, it’s critical to pay close attention to the following details to achieve optimal results:
- For the most accurate calibration results, ensure the filament is thoroughly dried before beginning the calibration process and remains dry afterward. Variations in filament humidity, even after calibration, can have a small impact on the consistency and reliability of the results.
- Always verify that the hotend is clean, both internally and externally, before proceeding with calibration. If you observe a decline in print quality (such as under-extrusion, over-extrusion, or minor stringing) it’s advisable to perform several cold pulls for the nozzle to clear any potential partial clogs that could interfere with smooth filament extrusion. Alternatively, using a new nozzle can confirm if the issue is related to the nozzle, or to calibration.
- Ensure the extruder is clean, to prevent issues caused by contaminants. Small particles, such as filament dust or residue buildup on the gears, can compromise extrusion quality. If you notice any changes in print quality, prioritize cleaning the extruder and nozzle before considering recalibration to ensure consistent results.
- Avoid calibrating with a dirty extruder or a nozzle that is partially clogged, as these conditions can significantly skew the calibration process, leading to unreliable and inaccurate results.
- The build plate needs to be washed before starting the process, to ensure the printed models will adhere as expected, as it can impact the calibration result if the first layer is not attached well to the plate.