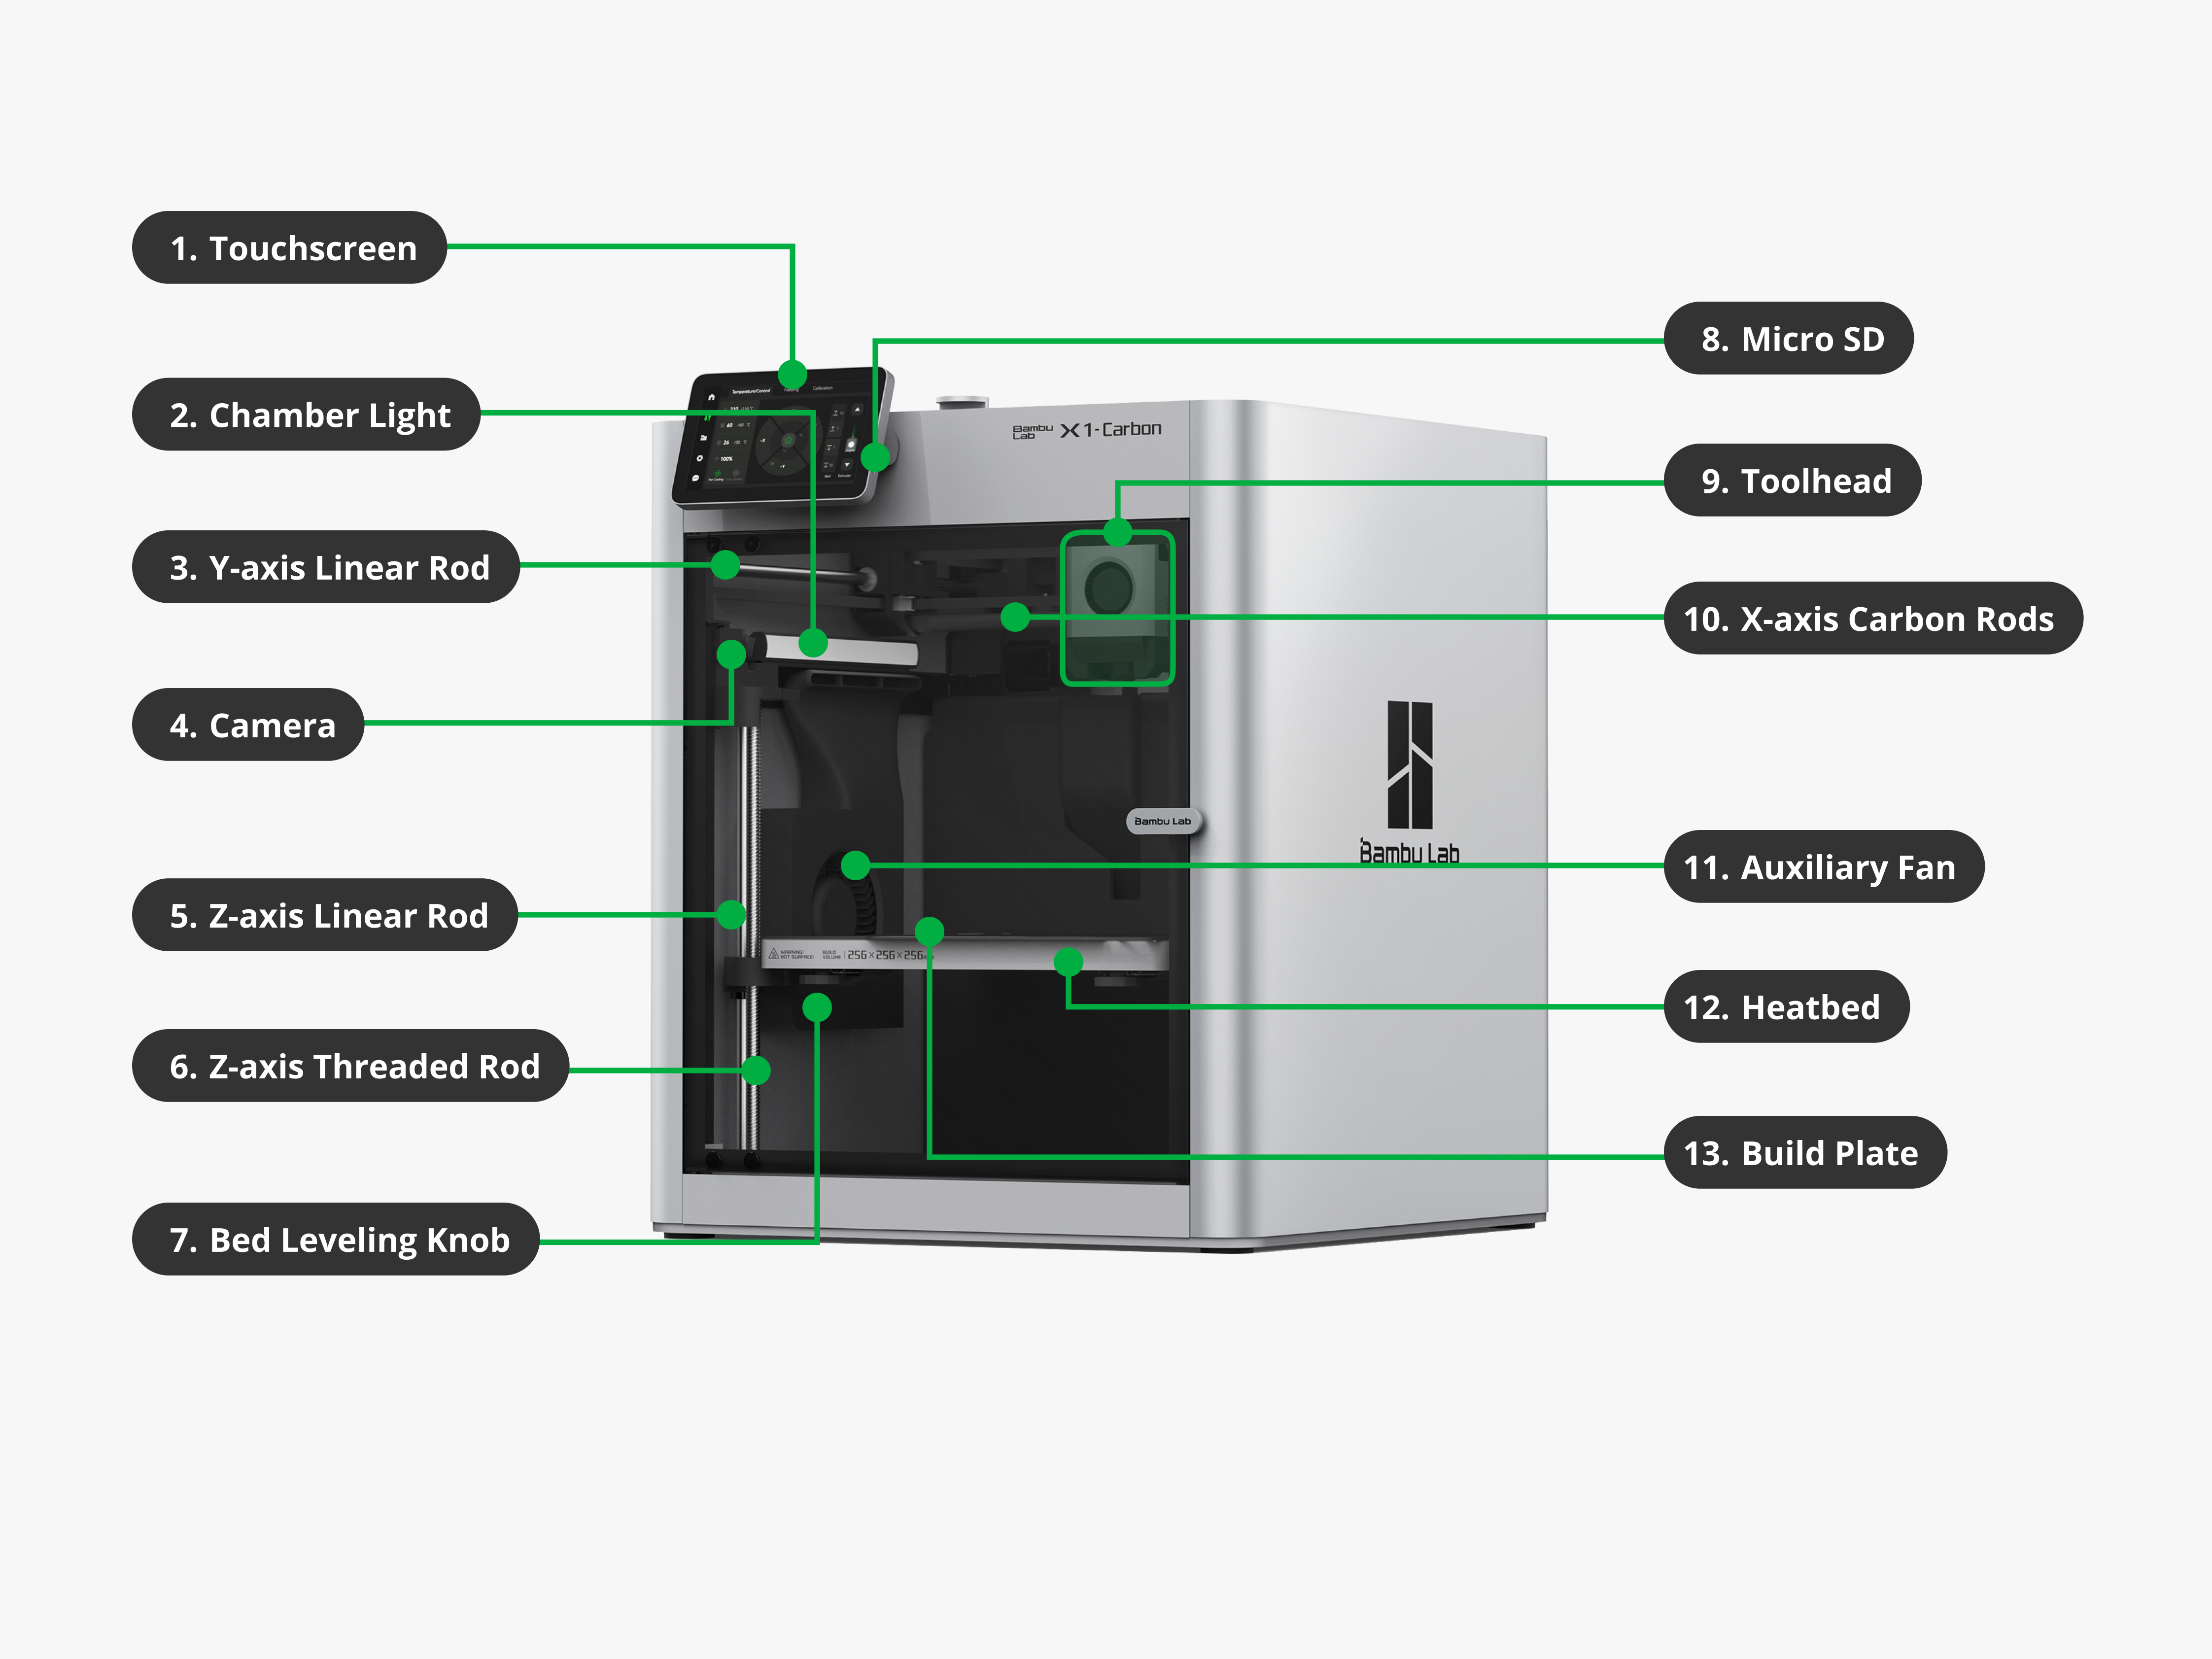
Introduction to the Main Hardware Components of the X1C
Extruder
The extruder is responsible for feeding filament into the hotend, ensuring a steady and controlled flow for precise printing. Filament is pulled from the spool and guided through the PTFE tube, a white tube that helps reduce friction and direct the filament smoothly into the extruder.
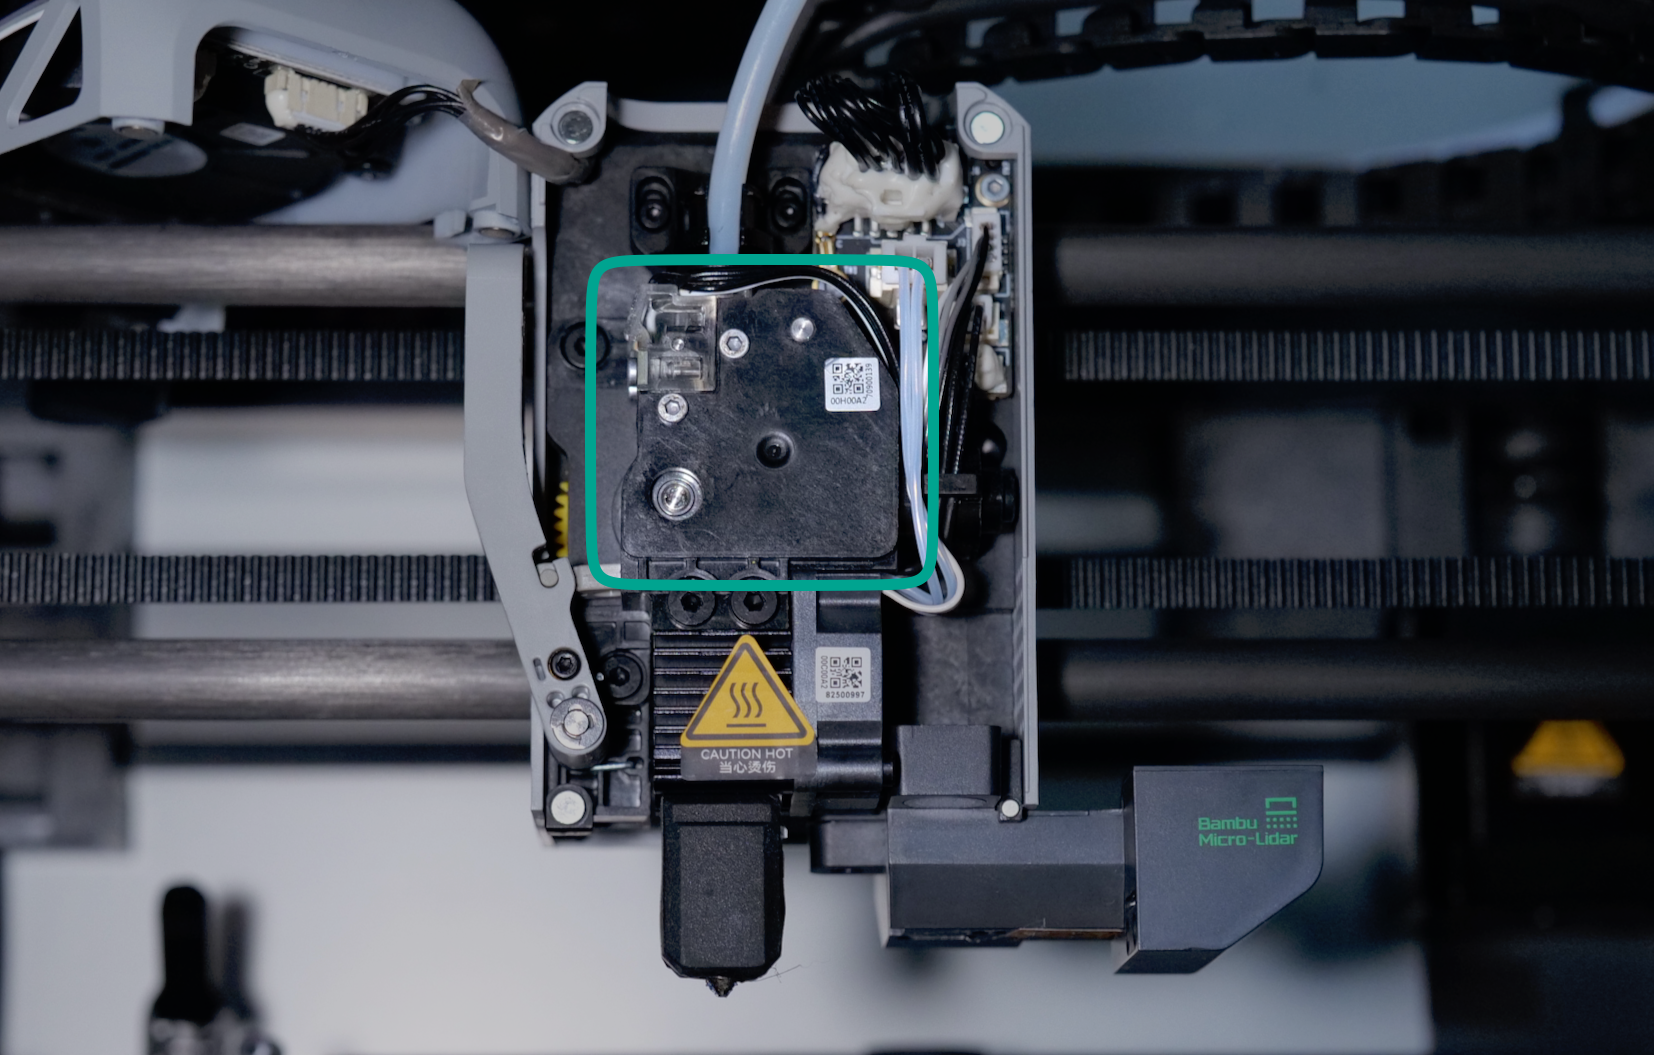
Inside the extruder, a dual-gear system grips the filament and pushes it downward into the nozzle, where it is melted and deposited in thin layers to build the model. This extruding motion is powered by the extruder motor, which is positioned behind the extruder assembly.
For users who need to print with abrasive filaments (such as carbon fiber-filled or glow-in-the-dark materials), the extruder can be upgraded with a set of hardened steel gears. These gears are more wear-resistant than standard ones, extending the lifespan of the extruder when handling tougher materials.
Hotend / Nozzle
The nozzle is a key component in the X1C printer, responsible for melting the filament at a precise temperature to ensure smooth extrusion during printing. It is part of the hotend assembly, which includes several essential components:
- Cooling Fan – Keeps the cold end of the hotend at a low temperature to prevent heat creep, which could cause clogs.
- Heater – Heats the hot end section of the nozzle to the required temperature for melting the filament.
- Thermistor – Monitors and helps regulate the temperature of the hotend, ensuring consistent heating.
- Silicone Sock – Insulates the nozzle, reducing heat loss and maintaining stable temperatures while also preventing filament buildup on the nozzle. Without the silicone sock, the hotend can be cooled by the part cooling fan, which may lead to temperature fluctuations and result in print inconsistencies.
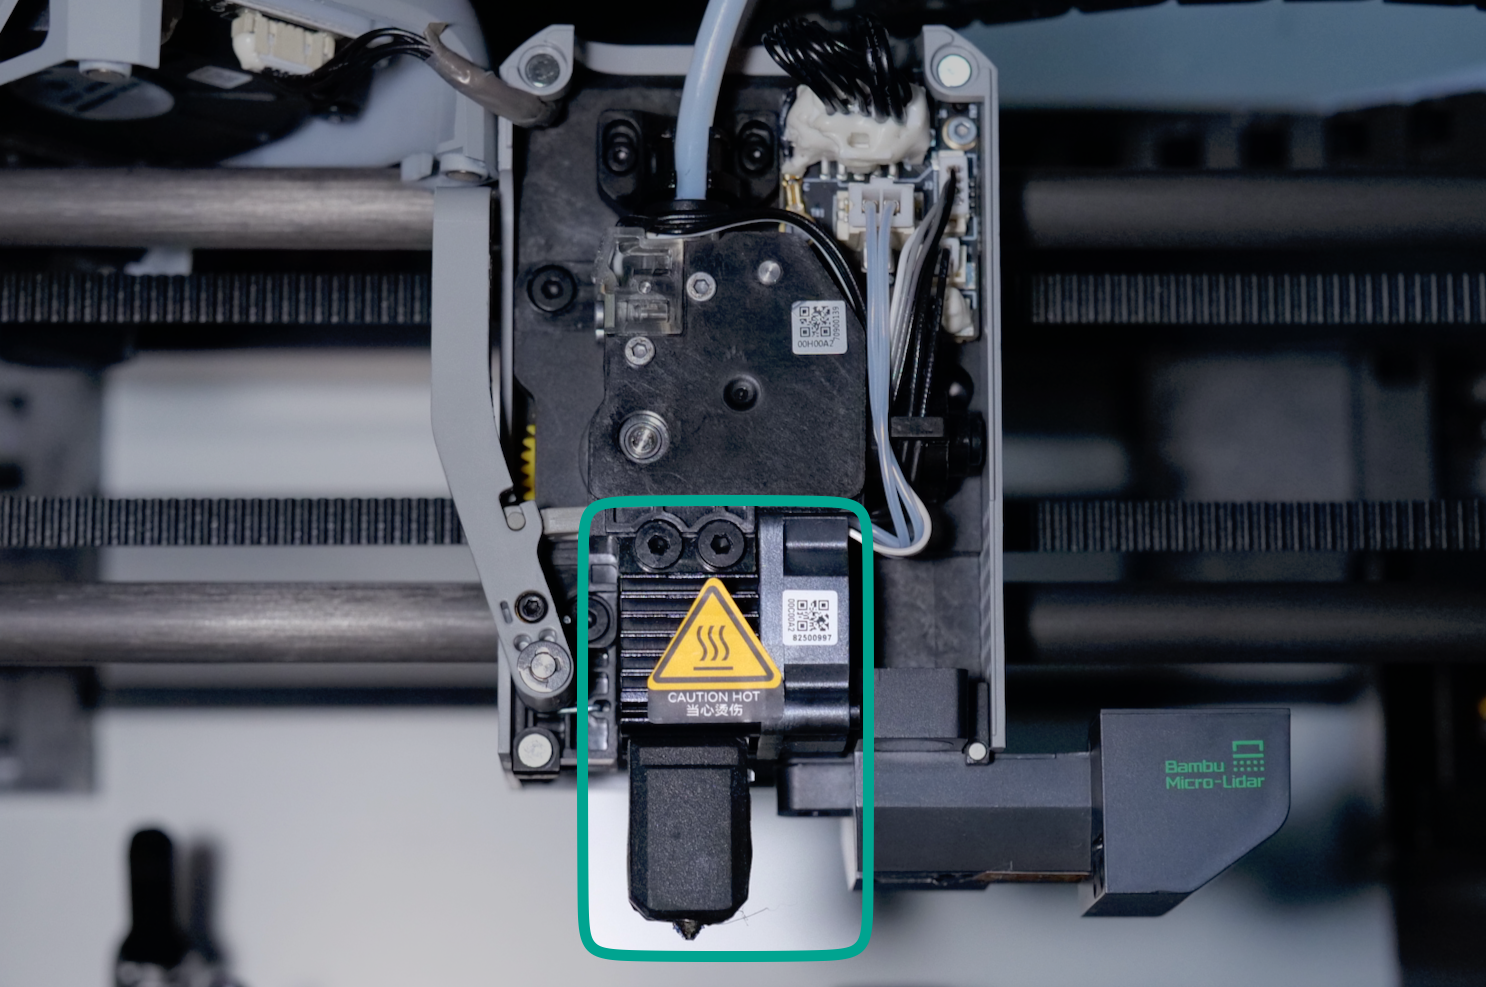
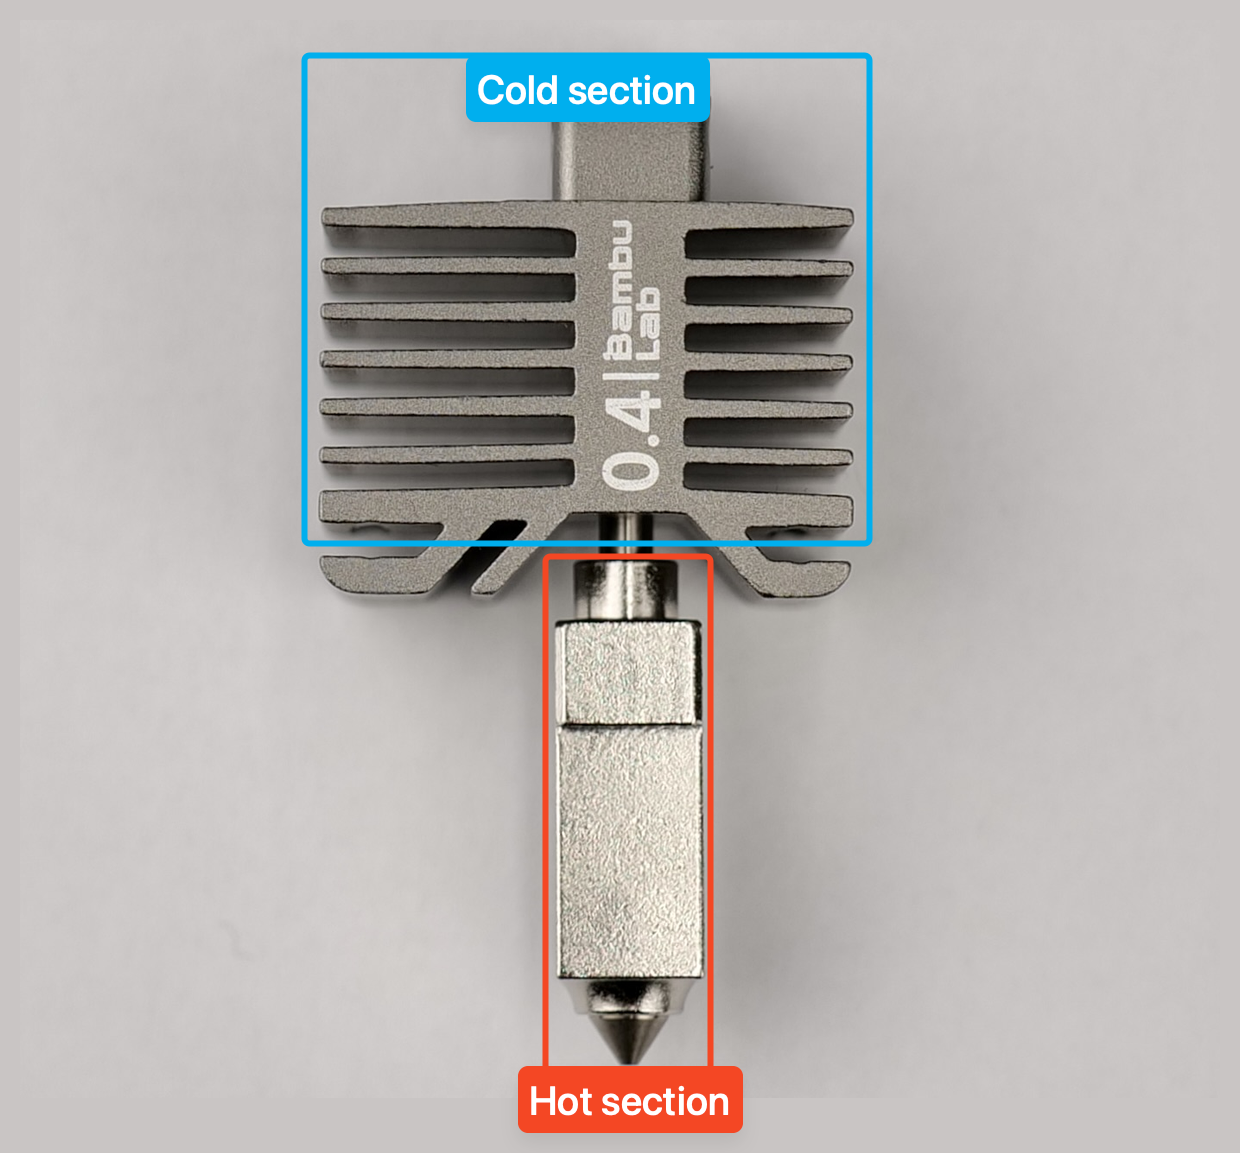
There are two important parts of the nozzle:
- The cold end section containing a heatsink to keep the filament cool until it goes inside the hot end, and it’s kept cool by the small hot end fan on its left.
- The hot end section of the nozzle where the filament is heated and melted.
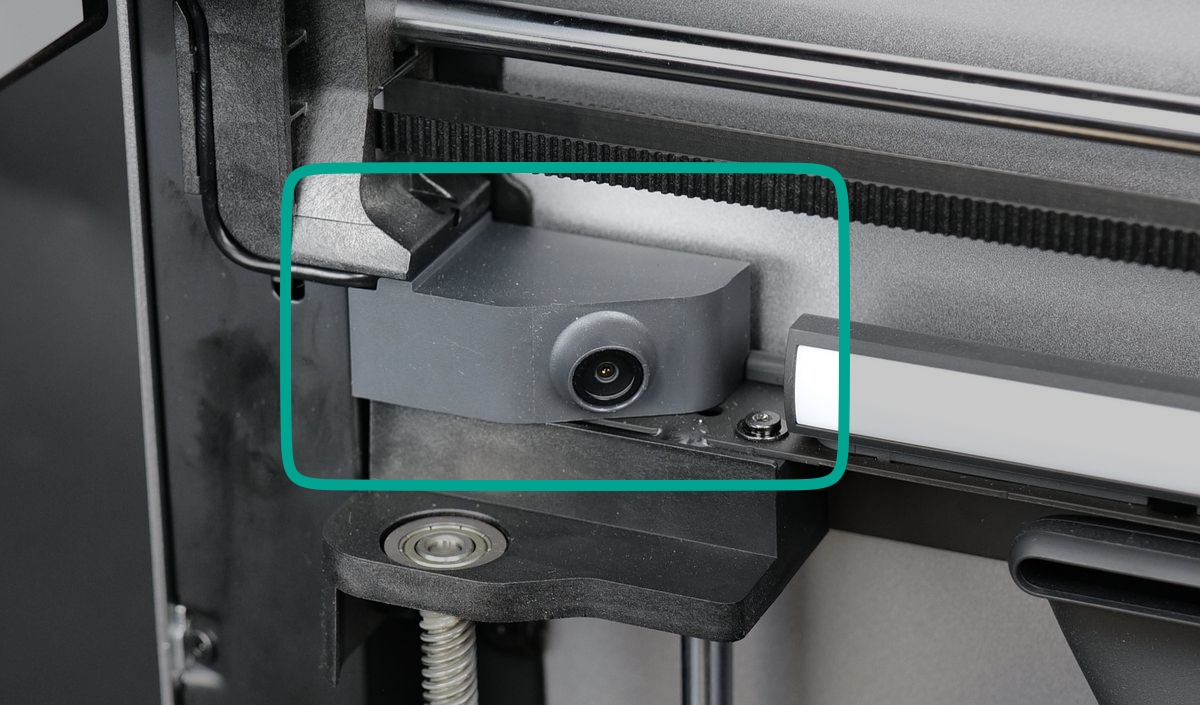
Live View Camera
For timelapse recording and real-time monitoring, the X1C is equipped with a Live View Camera, positioned on the front left side of the printer. This camera allows you to capture print progress, monitor prints remotely, and create smooth timelapse videos. By integrating with the printer’s firmware, it can be remotely accessed in the Bambu Handy app or in Bambu Studio.
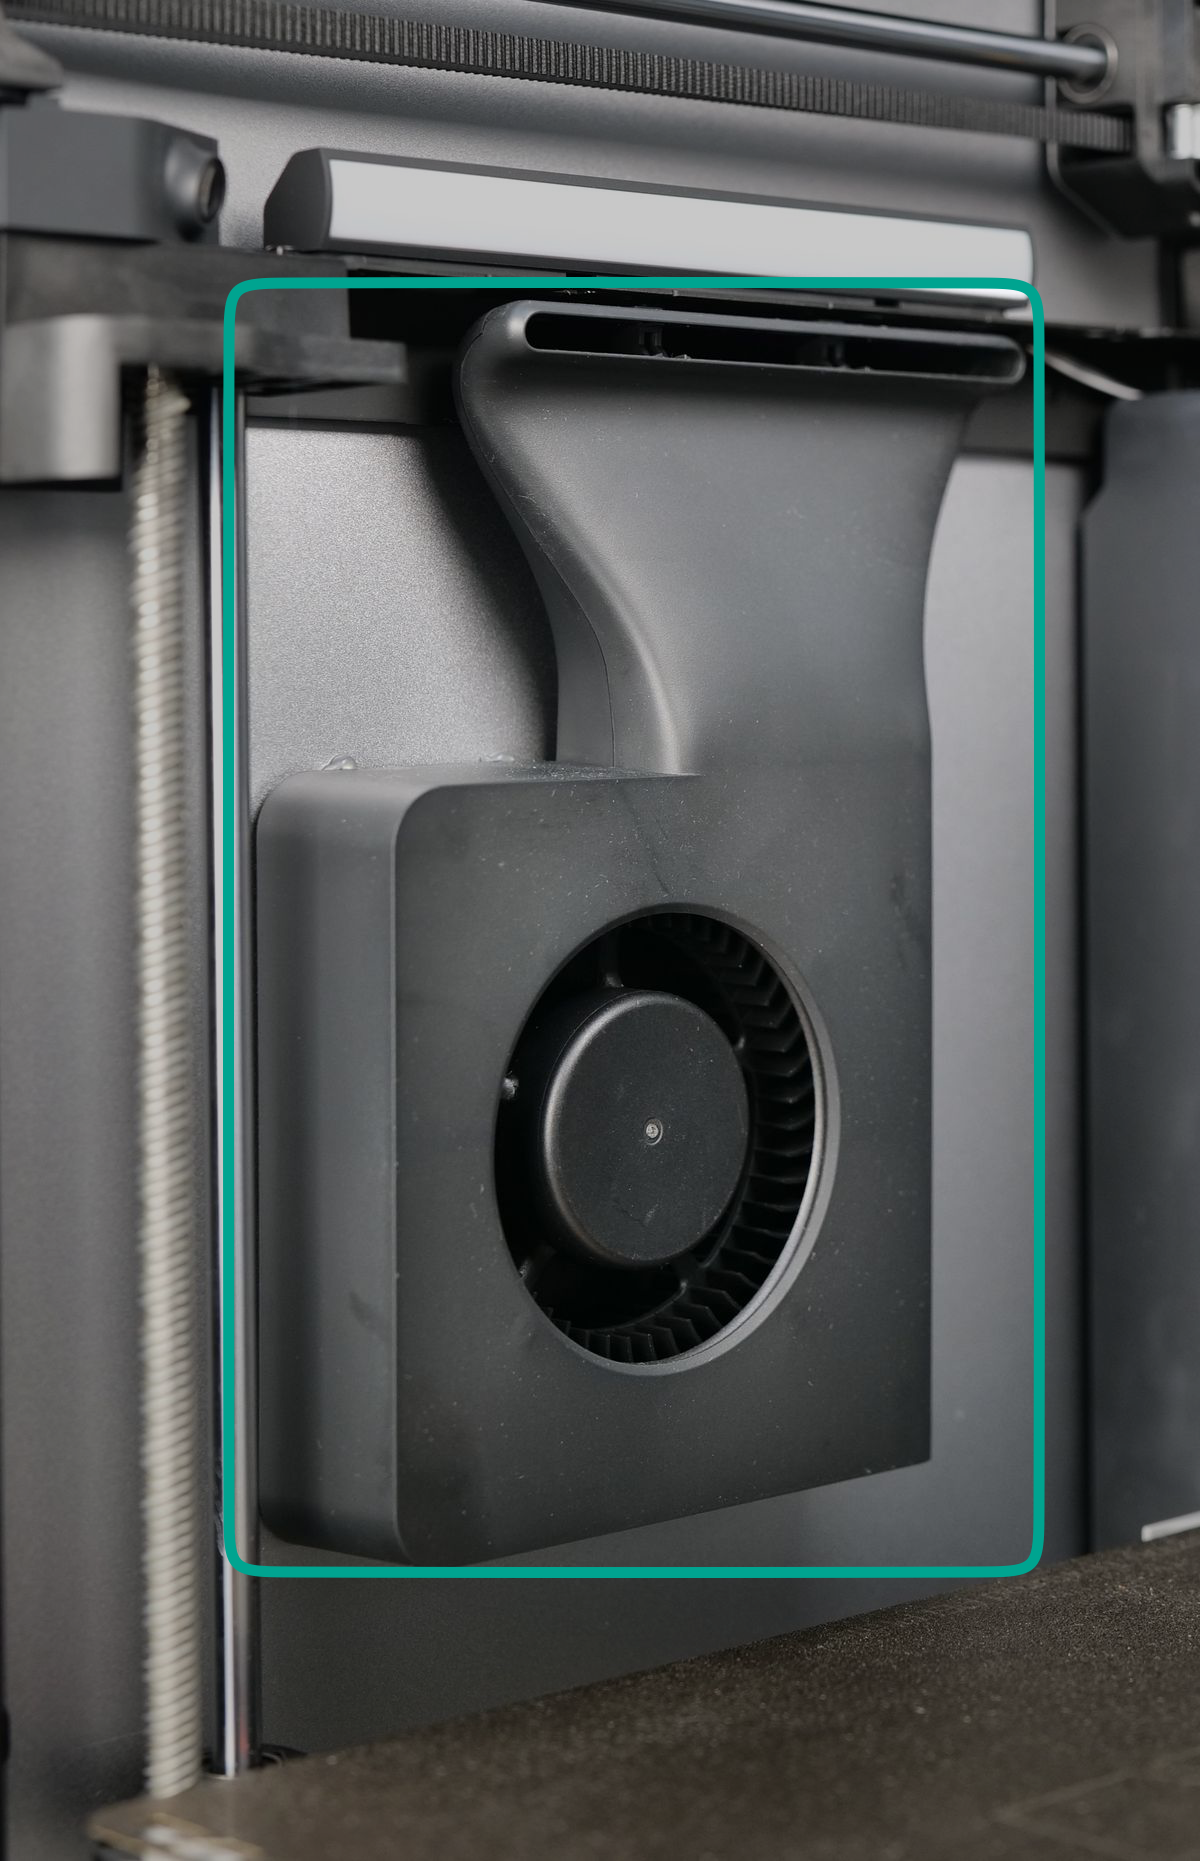
Auxiliary Cooling Fan
The auxiliary cooling fan, located on the left side panel of the printer, plays a crucial role in maintaining print quality by providing additional cooling. While the primary part cooling fan is sufficient for most prints, smaller objects or intricate details may not cool fast enough, leading to deformation or poor layer adhesion.
To address this, the auxiliary cooling fan creates a controlled airflow blanket over the freshly printed layer, helping it solidify quickly and evenly. This ensures better layer bonding and reduces issues like sagging or warping, especially when printing at higher speeds or using materials that require precise cooling control, like PLA.
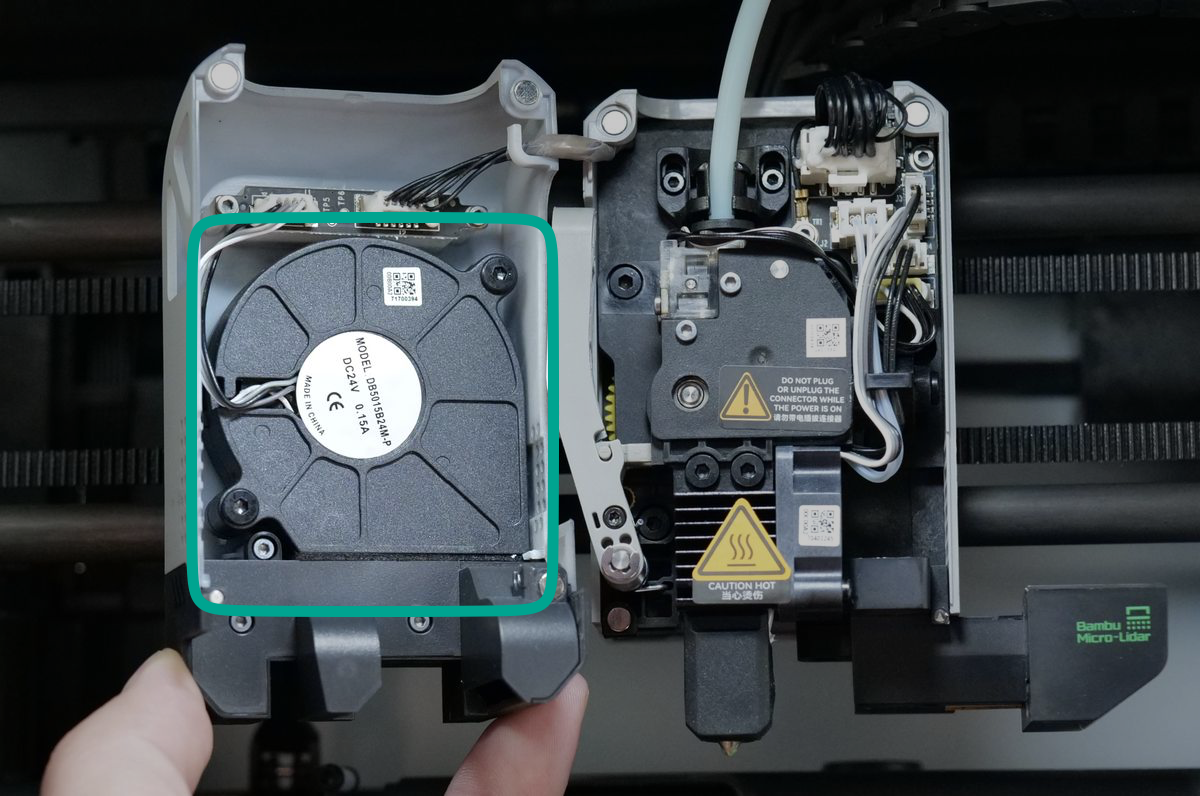
Part Cooling Fan
The Part Cooling Fan helps rapidly cool each printed layer, improving print quality. It’s mounted on the front of the toolhead and attaches magnetically for easy removal. This fan can work together with the AUX fan for extra cooling, or it can be used on its own – especially when printing materials that don’t need intense airflow.
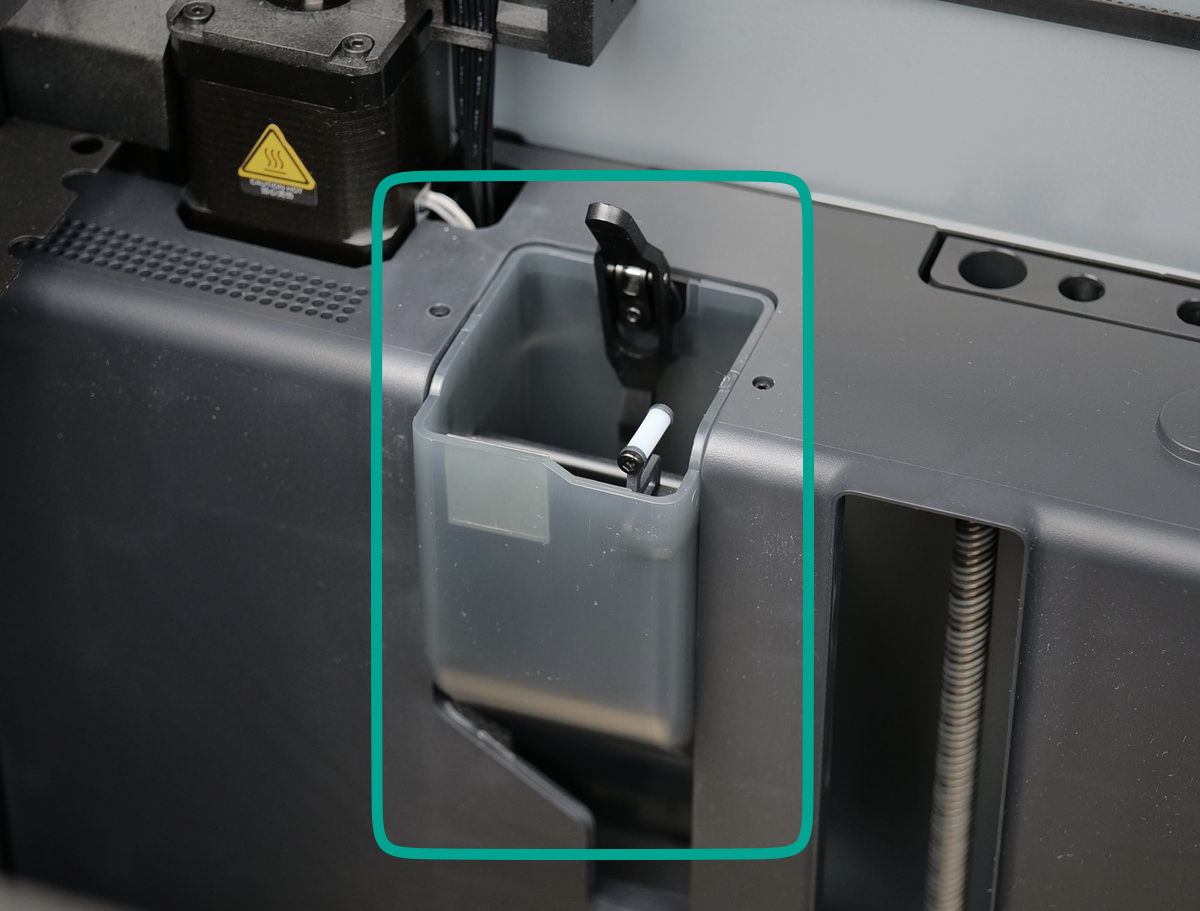
Purge Chute
The purge chute is an opening at the back of the X1C, designed to handle excess filament extruded before and during printing. It plays a crucial role in purging the hotend when switching colors or materials, ensuring that any residual filament is fully removed before the next layer is printed. This helps maintain clean transitions and prevents contamination between different filaments.
To prevent filament jams, the black lever is used to mechanically move the purge chute flap, assisting with the filament ejection out of the printer.
Additionally, the nozzle wiper, located on the front right side of the chute, wipes excess filament from the nozzle tip before a print begins or during a filament change. This keeps the nozzle clean, reducing defects caused by filament buildup.
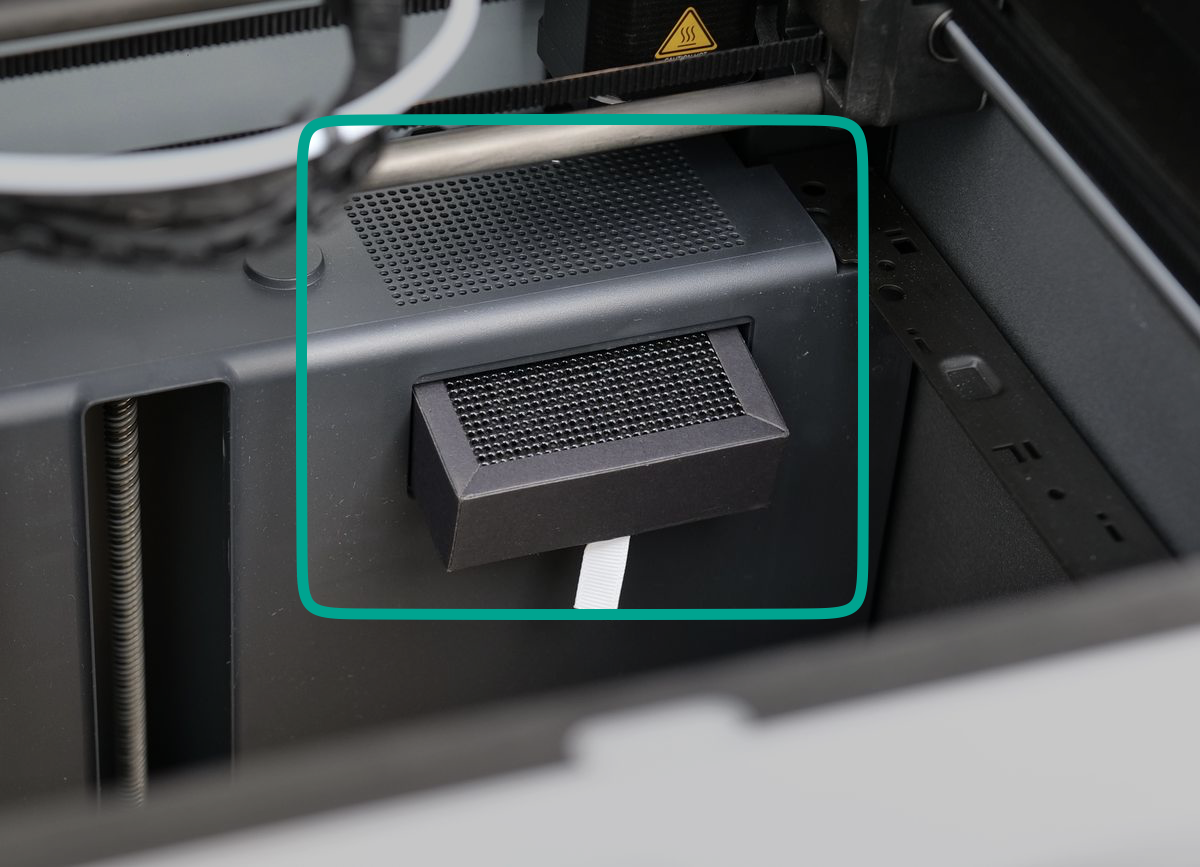
Filter
The carbon filter, located at the back right side of the printer’s chamber and it is used for air filtration. It helps reduce odors and airborne particles by filtering the air before it is expelled through the chamber exhaust fan.
However, it’s important to note that while the filter captures some emissions, it cannot completely remove all VOCs (volatile organic compounds) released during printing. For this reason, it is still recommended to print in a well-ventilated area, especially when using materials like ABS, ASA, or other filaments that produce strong fumes.
Like any air filter, the carbon filter is a consumable and will lose effectiveness over time. To maintain optimal filtration, it should be replaced periodically, depending on usage and the types of filaments being printed.
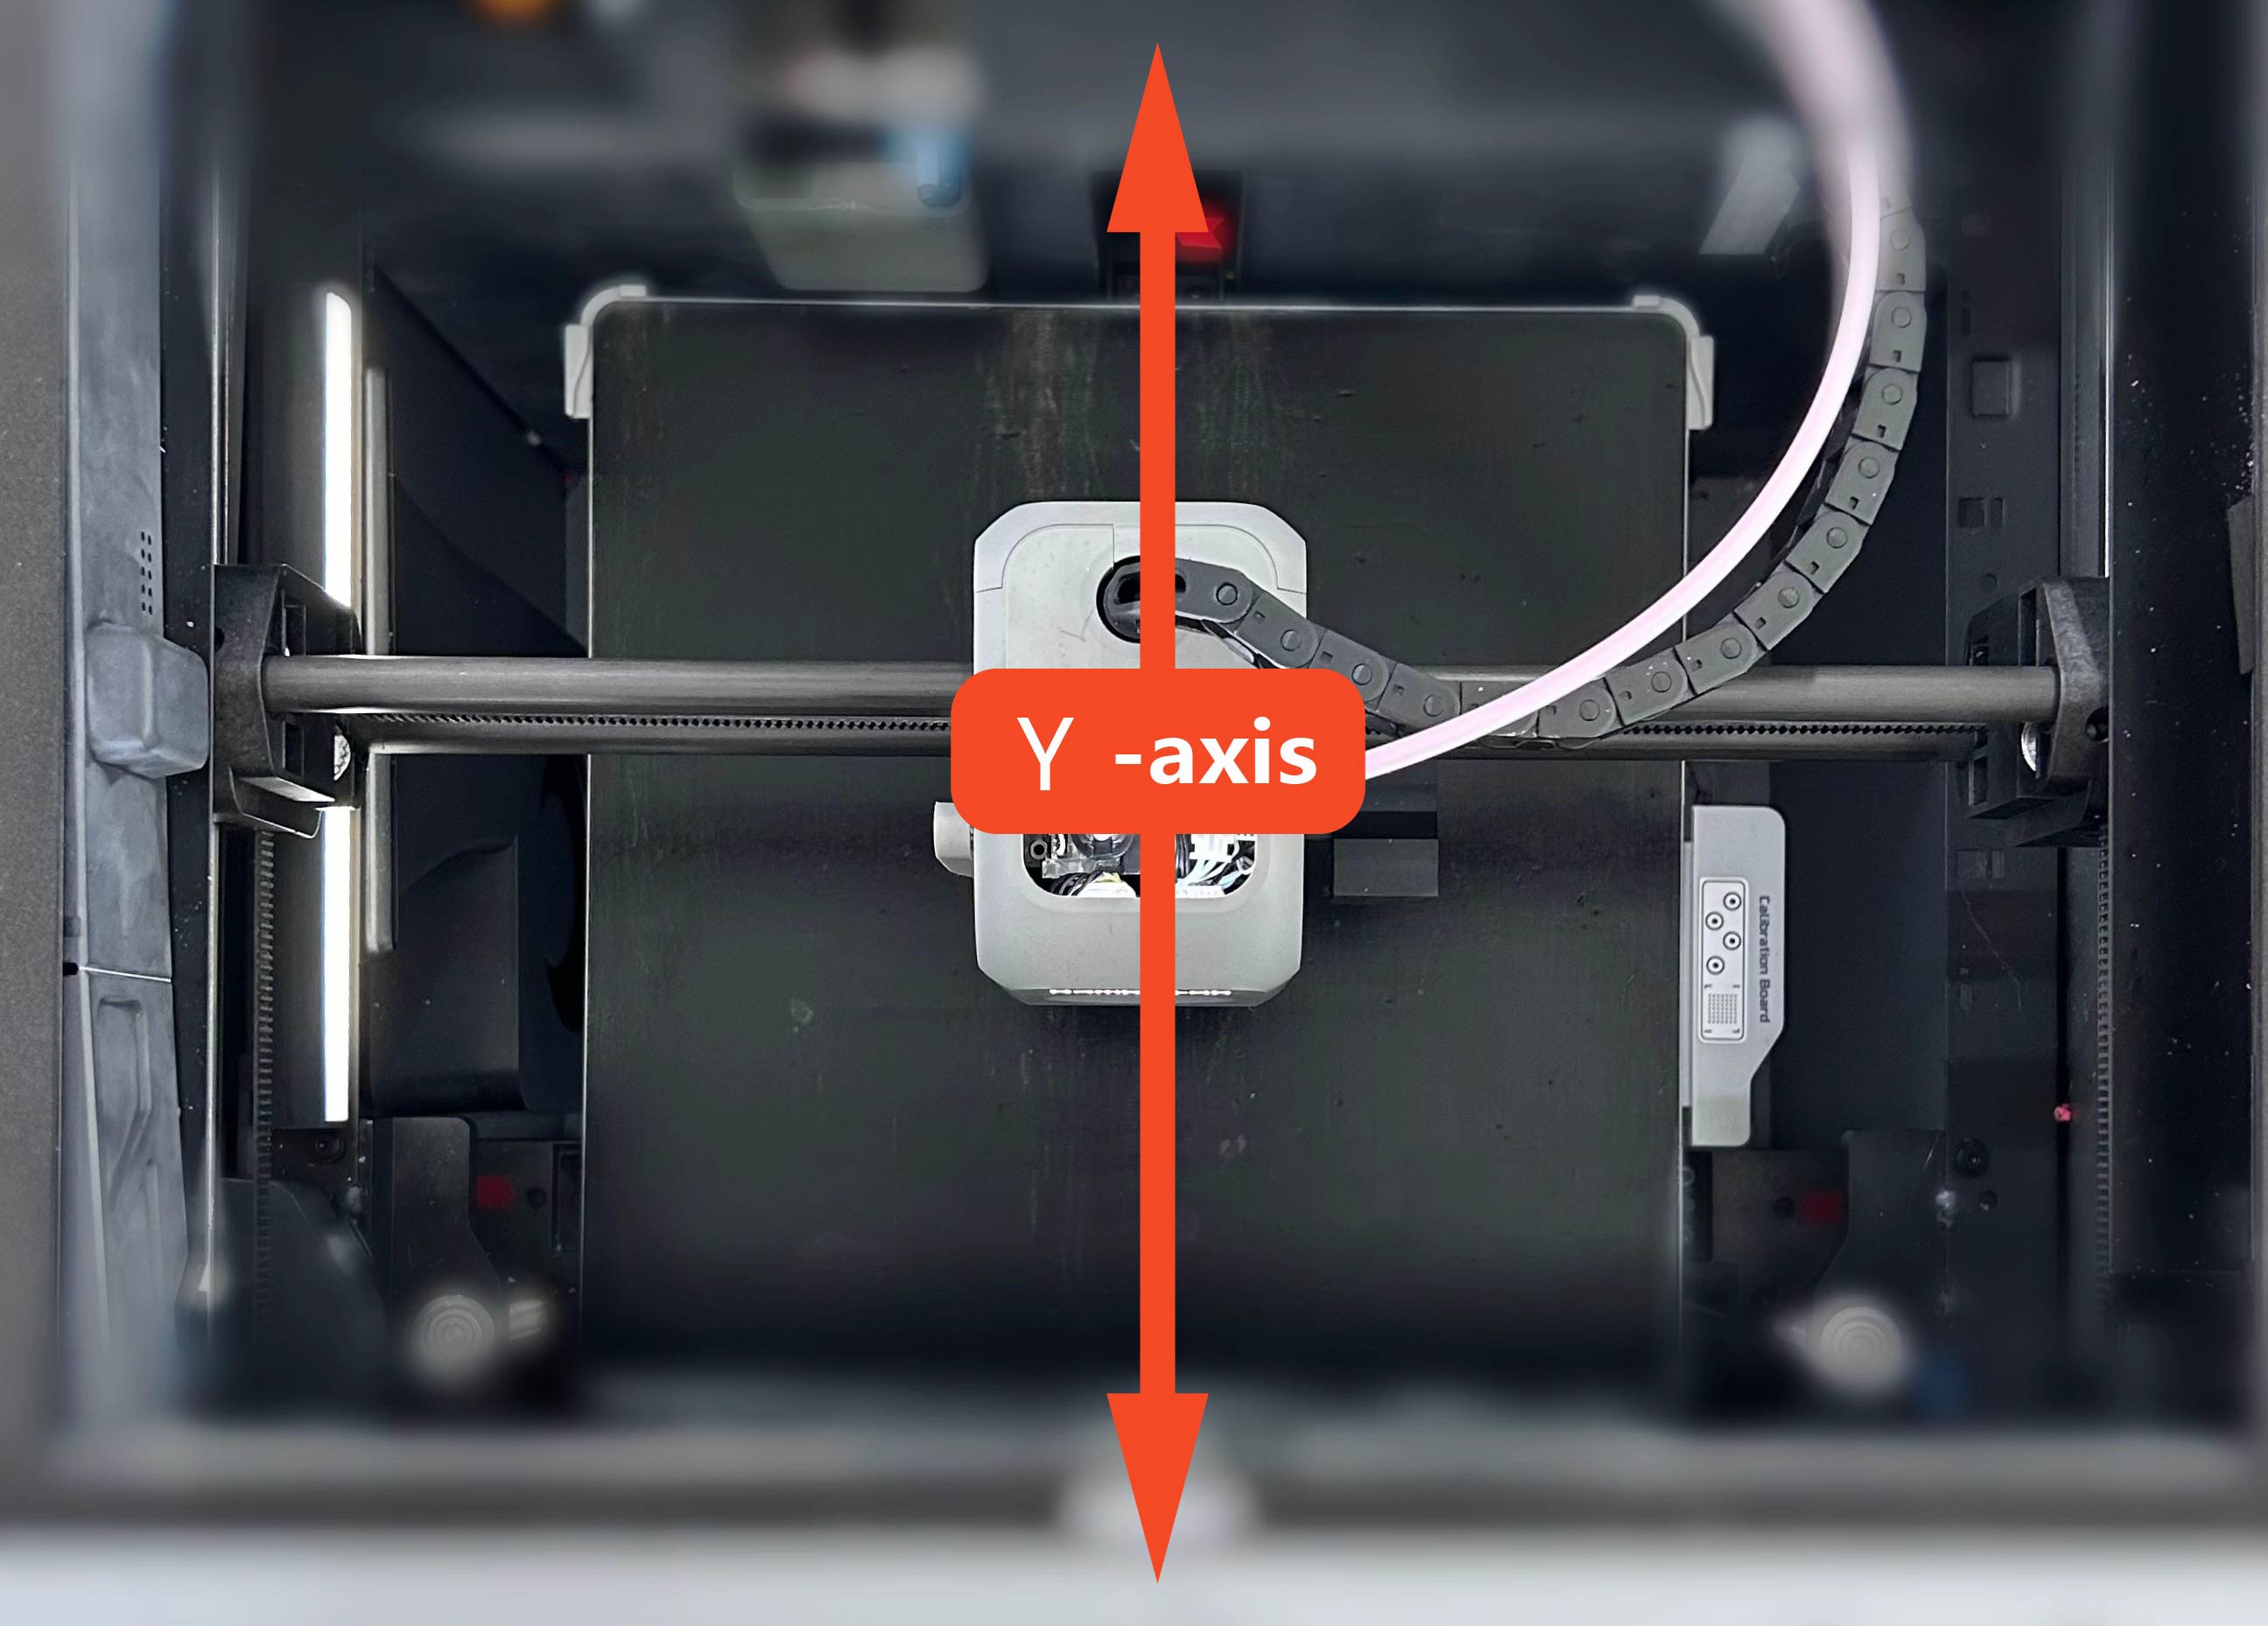
A and B Motors
The X1C features a Core-XY motion system, which allows for precise and efficient movement of the print head across the X and Y axes. Unlike traditional Cartesian systems, the Core-XY design utilizes two synchronized motors, working together to control the print head’s position within the printable volume. This setup reduces moving mass, enabling higher speeds and smoother motion, ultimately improving print quality and efficiency.
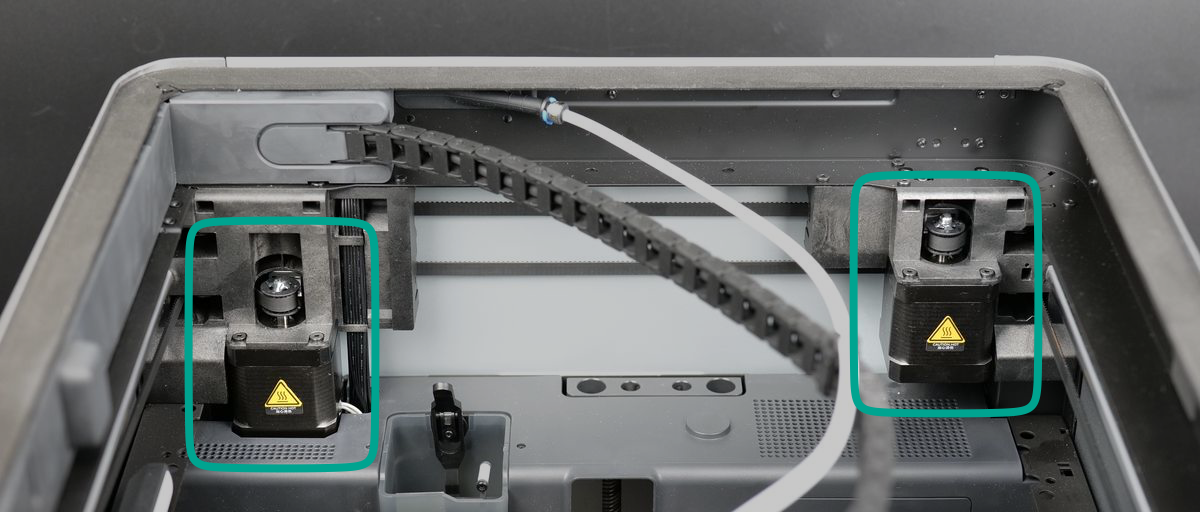
For Core XY printers, the Y-axis is the printer’s toolhead movement back and forward.
The X-axis is the printer’s movement of the toolhead left and right.

Toolhead
The toolhead of the X1C is a compact assembly that houses several essential electronics and sensors. The most important components are:
- Extruder with its motor, which drives the filament
- Hotend, which melts the filament
- Part cooling fan, which helps solidify layers for better print quality
- Filament cutter, which enables seamless material changes
This lightweight design is crucial for the Core-XY motion system, as it reduces moving mass, allowing for faster acceleration, smoother movement, and improved overall printing performance.
Carbon Rods and Belts
The X1C 3D printer utilizes a pair of carbon fiber rods for X-axis movement, providing a lightweight, durable, and low-friction motion system. The toolhead moves across these rods with the help of metallic bushings, ensuring smooth and precise operation.
One of the key advantages of this design is that the carbon fiber rods are self-lubricating, meaning they do not require any grease or oil. In fact, applying lubrication can damage the rods or interfere with their functionality, so it is crucial to never use grease or oil on them.
For maintenance, the rods can be simply cleaned with IPA (isopropyl alcohol) when needed, ensuring they remain free from dust and debris. We will cover the proper cleaning process in a later chapter.
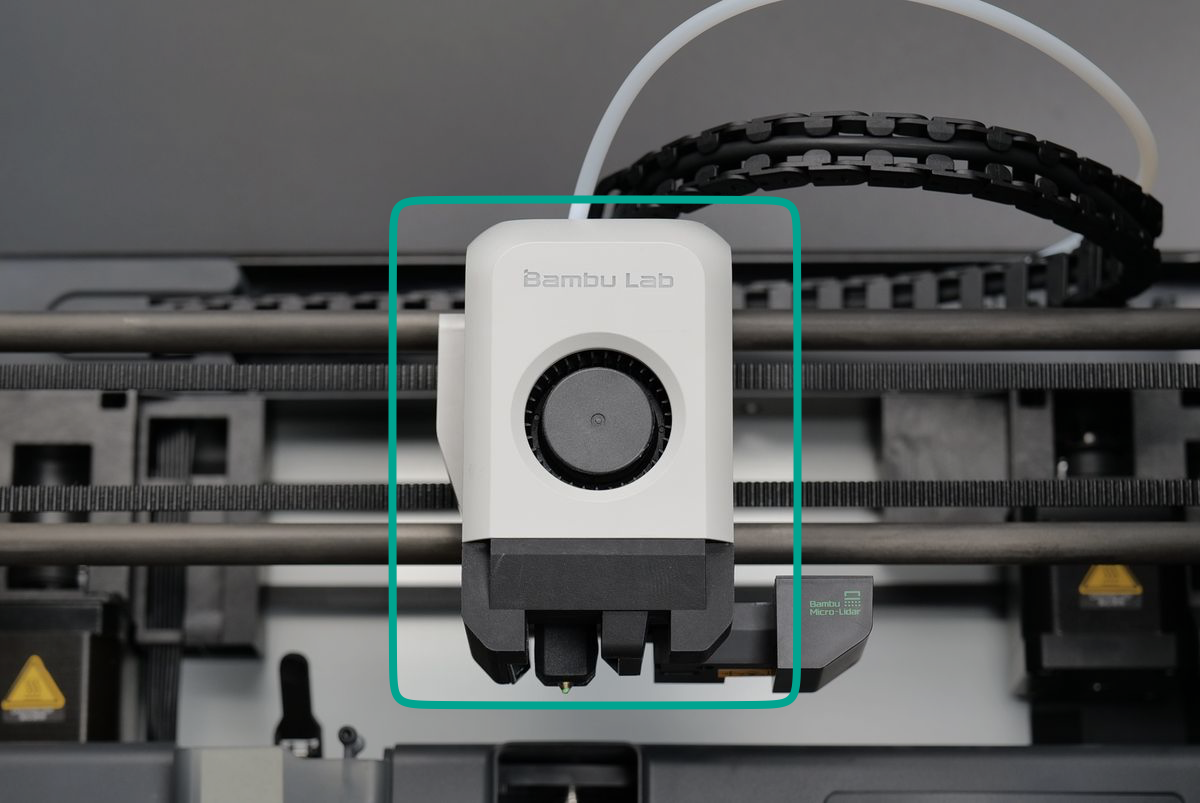
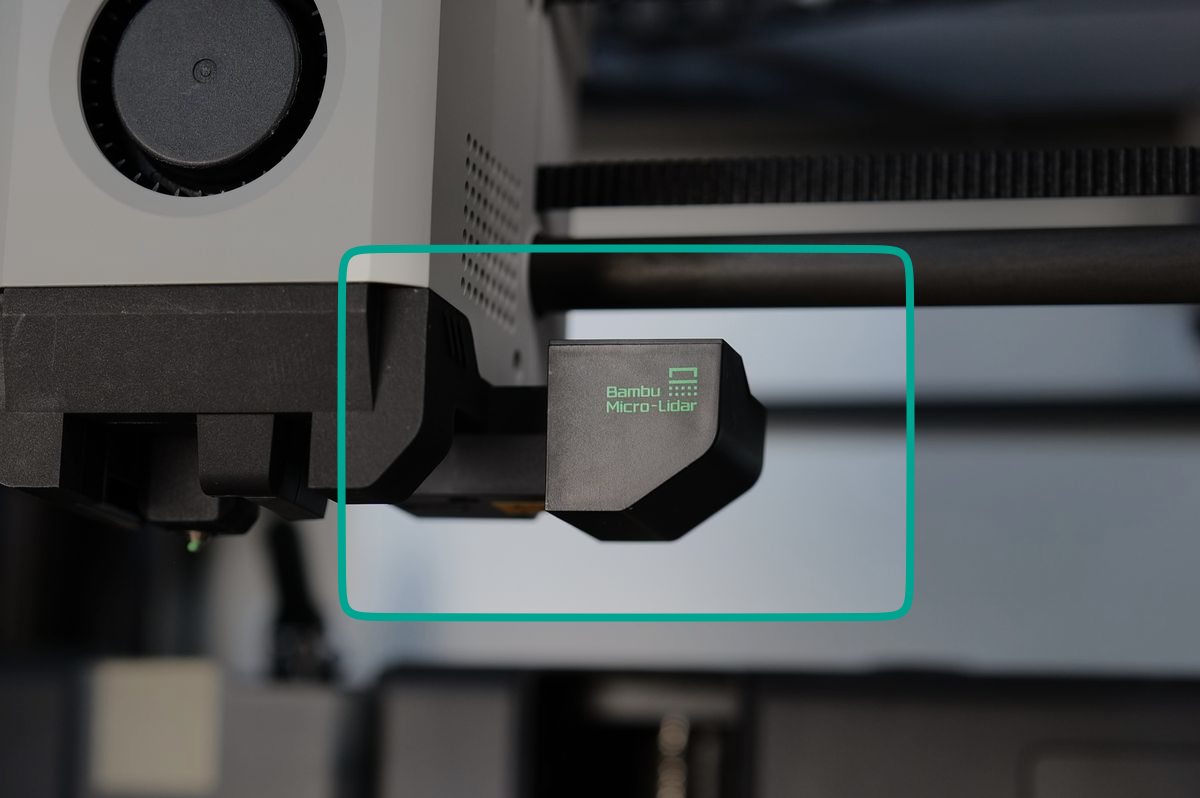
Micro-Lidar
The X1C includes a Micro-Lidar which is used to automatically calibrate the filament to ensure smooth extrusion quality, and it is also used to inspect the first layer of a print. Having such capabilities enables the X1C to produce consistent and repeatable pritns without needing to perform manual tasks.
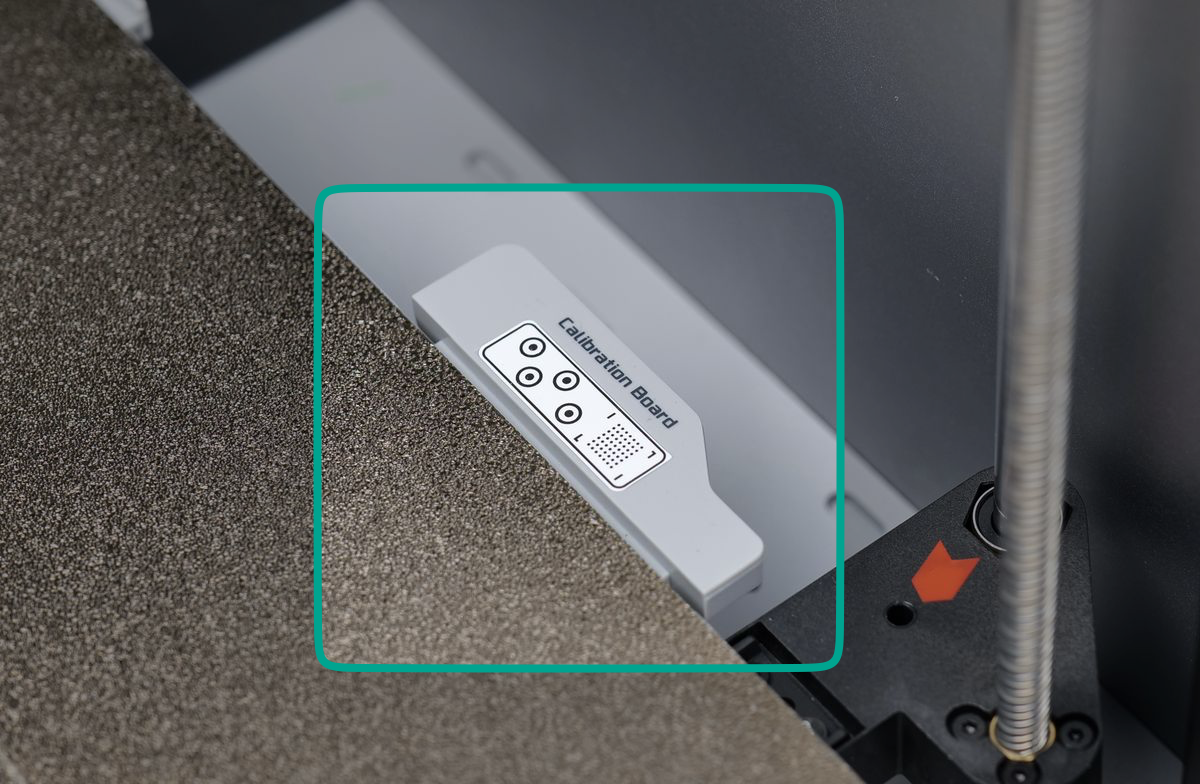
Calibration Board
The Calibration Board works with the Micro-Lidar to help it self-calibrate. By analyzing the printed patterns on the board, the Micro-Lidar can fine-tune its scanning accuracy, ensuring reliable measurements for tasks like first-layer inspection and flow calibration.
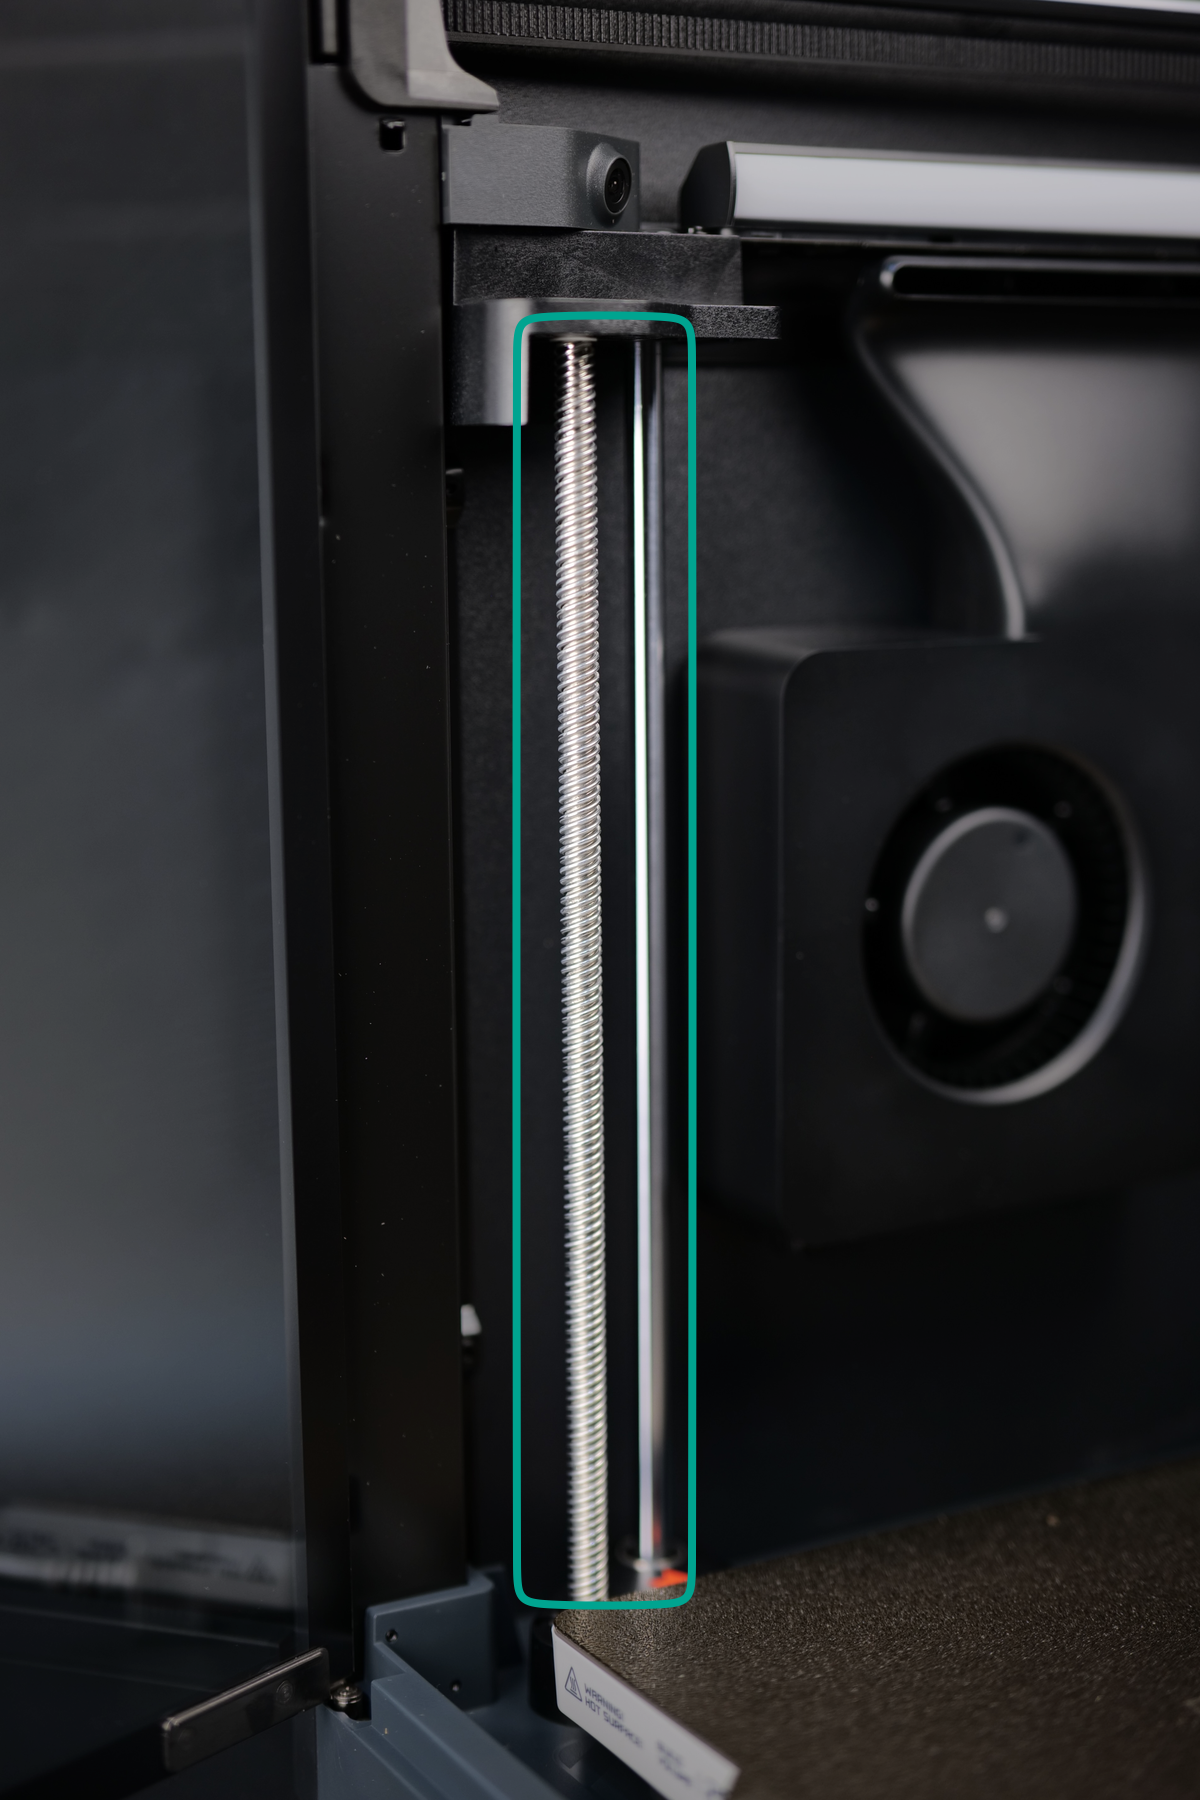
Z-axis Threaded Rod and Linear Rod
The X1C moves the heatbed along the Z-axis using three precisely positioned threaded rods, also known as leadscrews (shown in the left): one at the front left, one at the front right, and one at the middle back of the heatbed. These leadscrews operate in sync, driven by the Z-axis motor located at the bottom of the printer.
To maintain stability and precision, the heatbed moves along linear rods (shown on the right) placed next to each leadscrew. This combination of synchronized leadscrews and guiding rods ensures smooth, accurate motion, allowing for reliable layer height control and high-quality prints.
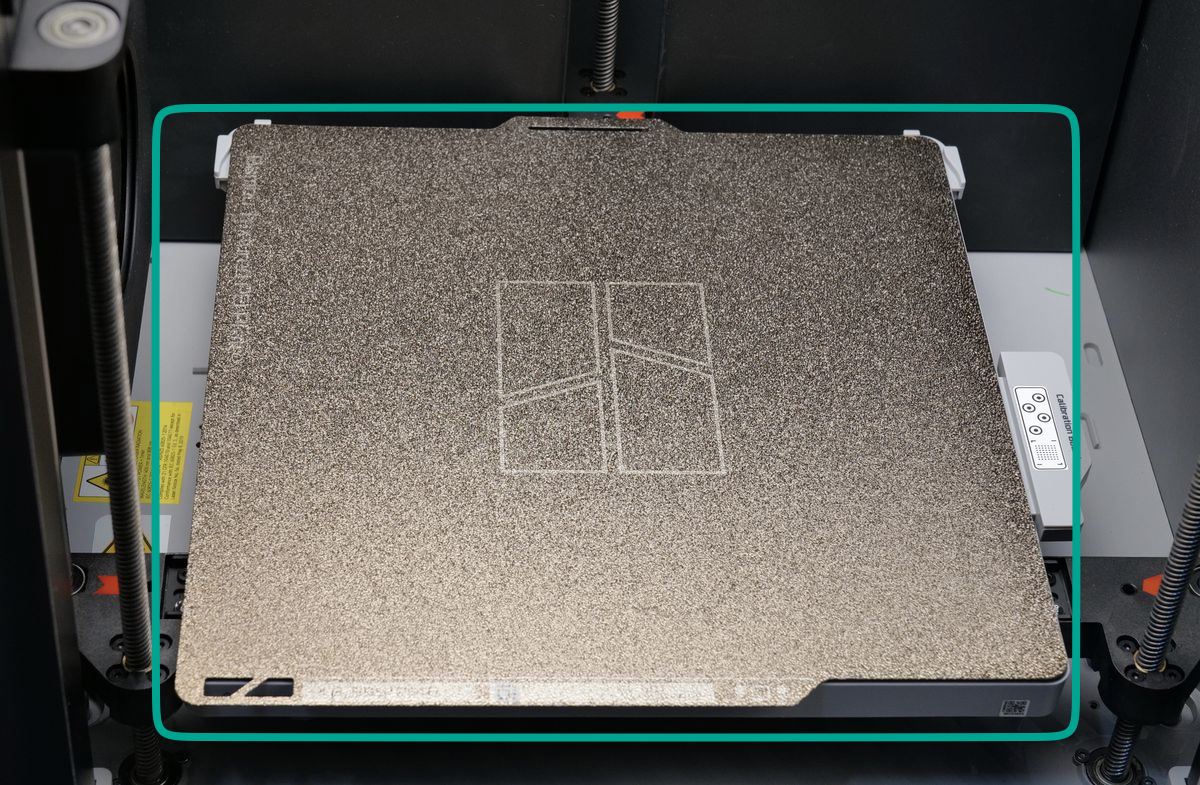
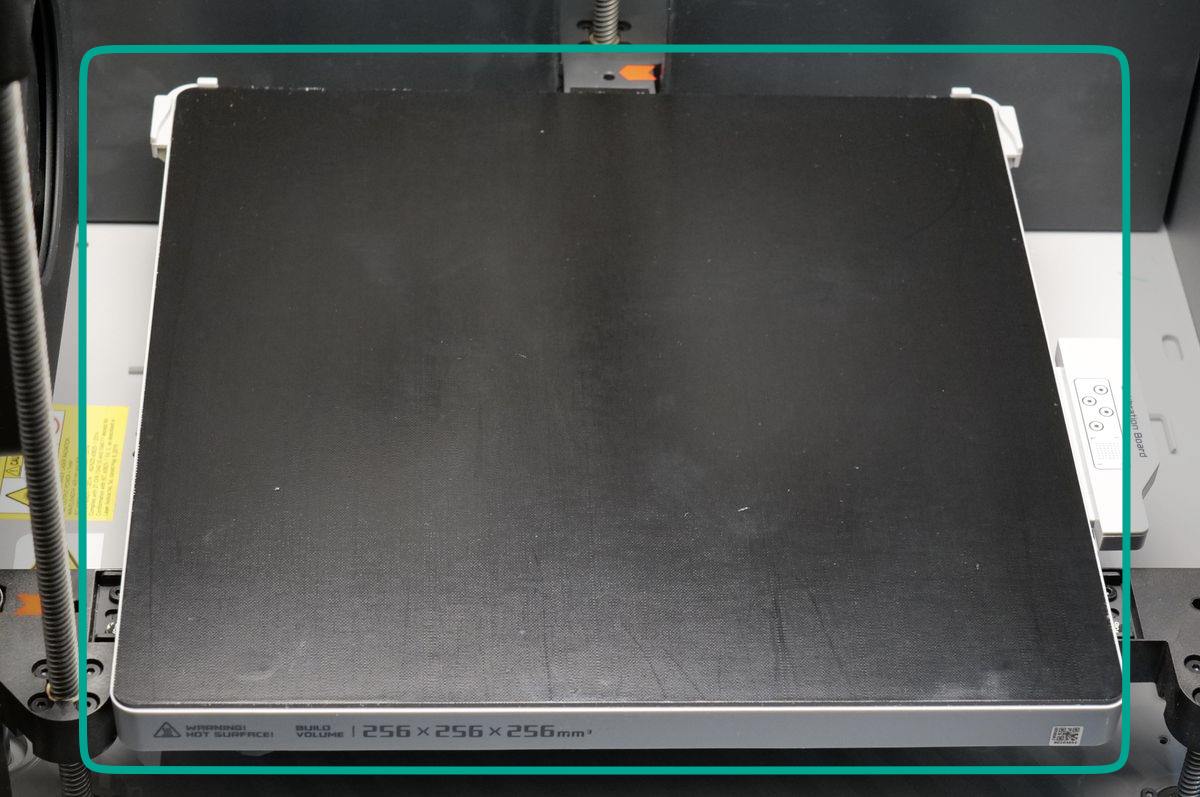
Build Plate
The X1C comes with a golden Textured PEI Plate, which is magnetically attached to the heatbed and serves as the primary print surface. This flexible build plate enhances print adhesion while making model removal easier—simply bending the plate slightly allows printed objects to pop off effortlessly.
There are multiple types of build plates available, each with unique properties suited for different materials and printing conditions. We will explore these options in detail later to help you choose the right one for your needs.
Washing the plate
To ensure optimal performance, the build plate should always be kept clean, as oils, dust, or residue can negatively affect adhesion. It’s best to avoid touching the printing surface directly to prevent contamination. When handling the plate, it is recommended to hold it by the front edge to keep the print area clean.
It is important to regularly wash the plate and avoid touching the print surface with your hands.
You can wash the build plate with warm water and dishwashing detergent, just like you would do with a regular plate then dry with a clean paper towel or let it dry naturally. This video shows the procedure which can be followed:
Heatbed
The heatbed is the heated platform of the X1C, where the build plate is installed. Its primary function is to provide controlled heating, which is crucial for improving filament adhesion and ensuring successful prints. Additionally, a heated surface can make print removal easier by slightly releasing the model as it cools.
The heatbed moves along the Z-axis, raising and lowering during printing to maintain precise layer stacking. While some filaments can be printed without heating or at lower temperatures (when used with specific build plates), having a heatbed capable of reaching higher temperatures offers greater adhesion stability and reduces warping, especially for materials that require a warm environment to print reliably.
More details about filaments and plate compatibility will be covered in the chapter related to build plates.
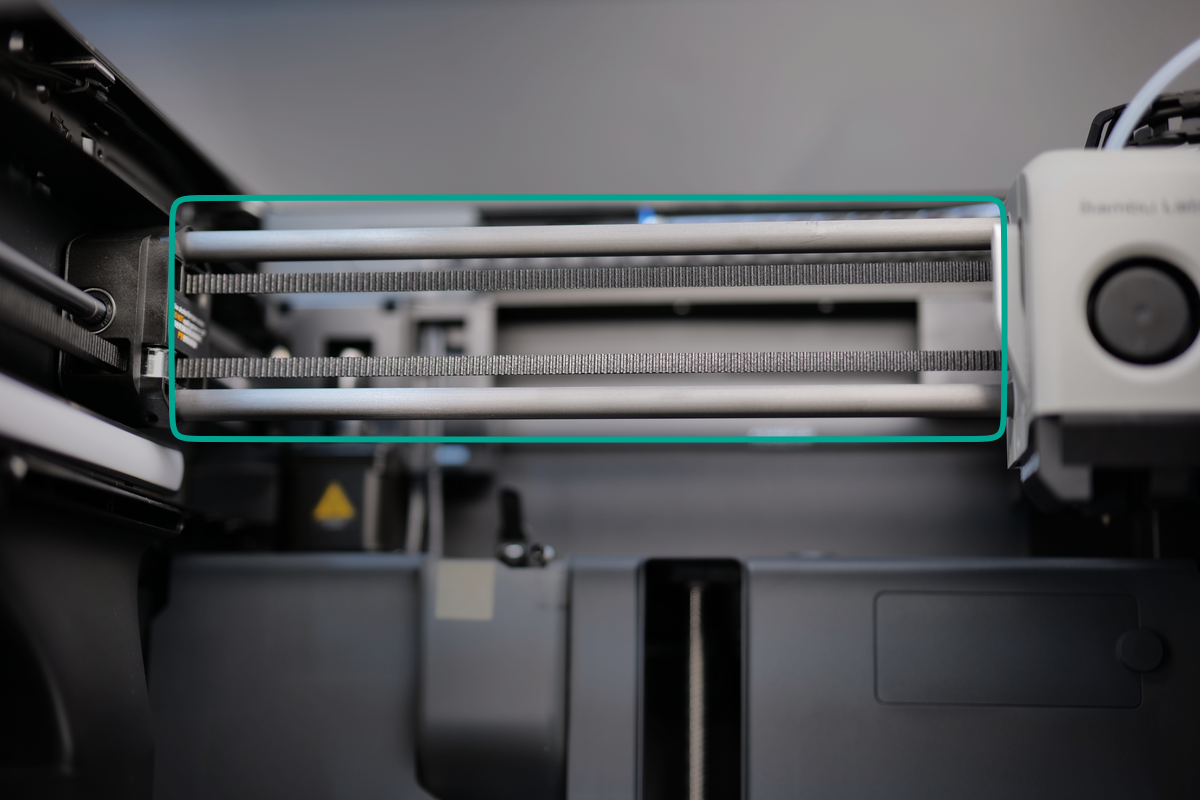
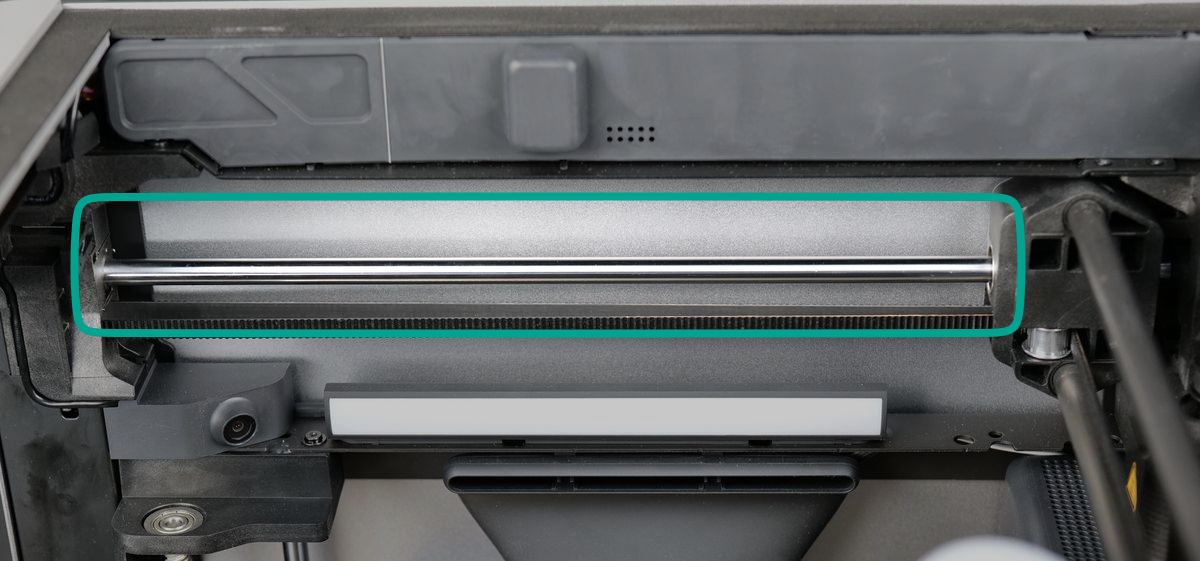
Y-axis linear rods
The X1C features a pair of Y-axis linear rods, made of metal, positioned on the top left and right sides of the printer. These rods serve as the foundation for the X-axis movement, allowing the X-axis to travel smoothly in the Y-axis direction.
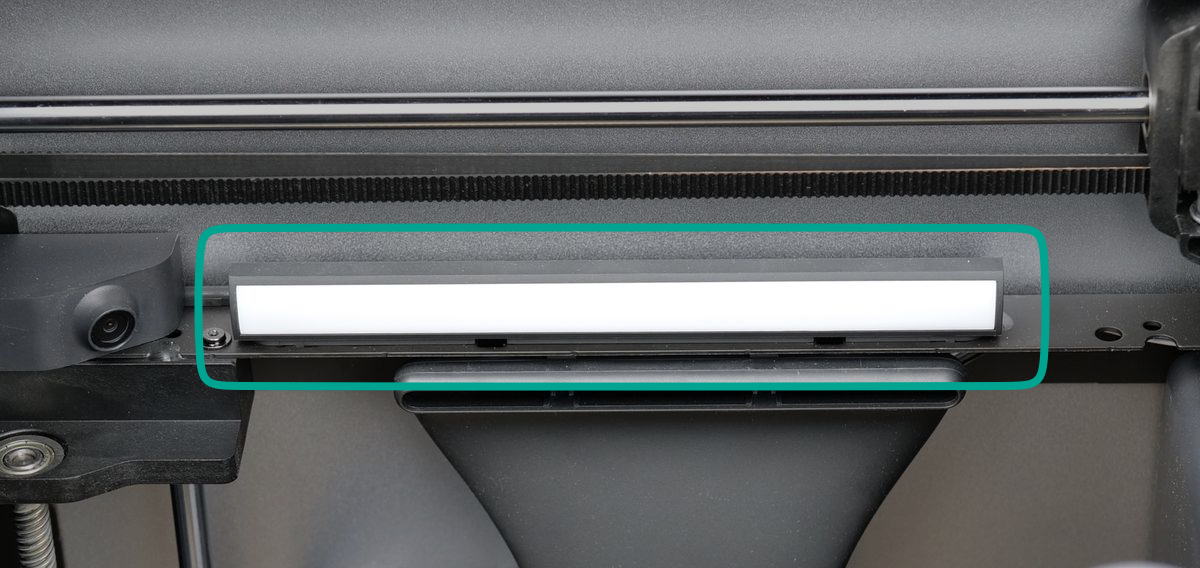
Chamber LED Light
The chamber LED light bar is located on the left side of the printer’s chamber. Its primary purpose is to provide illumination over the 3D printed model, ensuring better visibility. This is particularly useful for the Live View Camera, allowing it to function effectively in low-light conditions. Additionally, the LED light helps you see more clearly inside the darker chamber, making it easier to monitor the printing process.
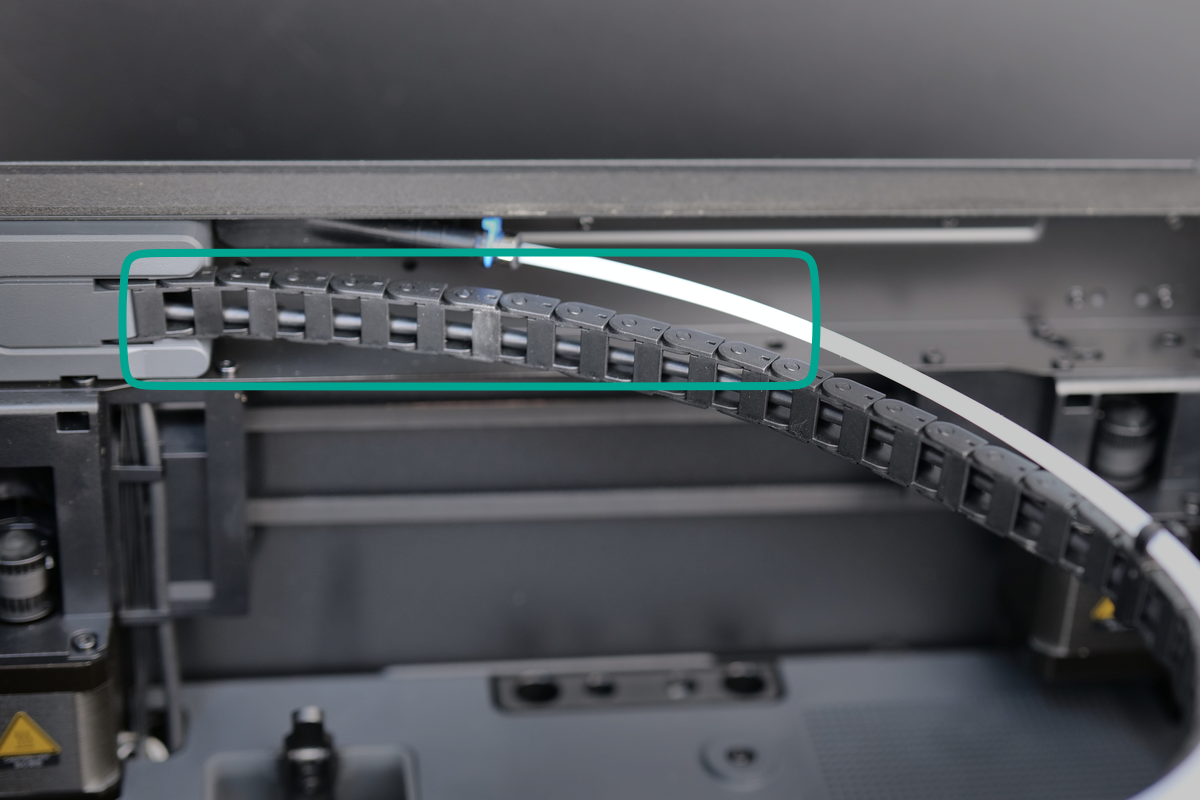
Cable Chain
The cable chain is made from plastic and is designed to support and organize the cablerunning to the toolhead. This ensures the cable remain secure and is protected from damage during the printer’s movement. Attached to the cable chain is the white PTFE tube, which helps guide the filament from the spool to the extruder, ensuring smooth and efficient filament feeding without tangling or obstruction.
Learn more about the X1C components
If you want to dive deeper into the hardware components of the X1C, it’s highly recommended to visit the X1C Glossary on the Bambu Lab Wiki. There, you’ll find comprehensive information about each component used in the printer, including technical specifications, functionalities, and other useful details to help you better understand how the printer works.
Each component is thoroughly described to provide a clear understanding of its role within the printer. Additionally, the wiki includes links to purchase replacement parts, as well as step-by-step instructions on how to replace or maintain them, ensuring you have all the resources needed to keep your X1C in top condition.
This resource is especially useful for users who want to learn as much as possible about their printer’s components. However, if you’re not looking for that level of detail, don’t worry—the X1C course will cover the most important information you need to know. The quiz questions will focus solely on the material presented in the course, ensuring you’re only tested on what’s essential for using and maintaining your printer effectively.