Introduction to X1C Settings and Controls
Part 5 / 11
While waiting for the first print to end, let’s use that time to learn more about the X1C screen and controls.
X1C home screen
This is the printer’s home screen, displaying key details about its status and providing access to several submenus for controlling its functions.
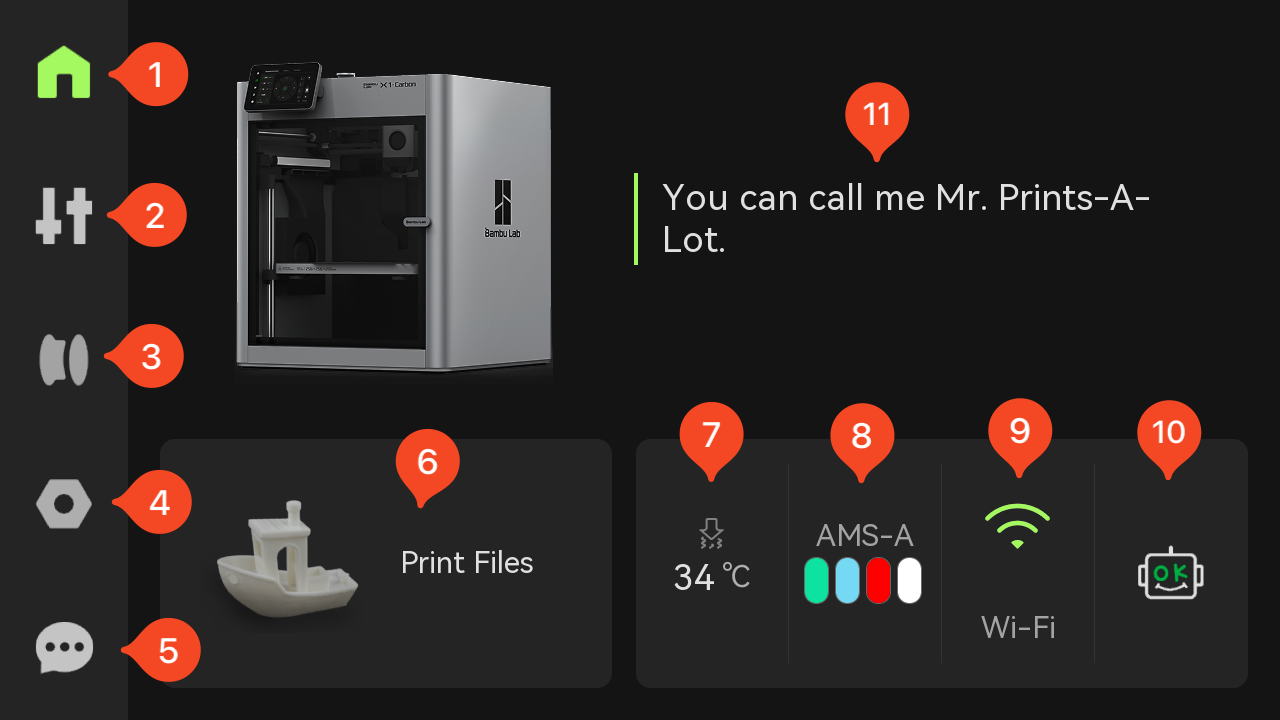
- Home – Returns to the main screen, providing access to primary functions.
- Controls – Opens the Controls menu, where different printer settings like fan speed, nozzle and heatbed temperature, light, speed and motion can be controlled.
- Filament Settings – Accesses the Filament and AMS configuration menu, where the filament can be adjusted.
- Settings – Displays a list of sub-menu items which can be adjusted to control various settings of the printer, like Account, Calibration, Toolbox, Wi-Fi, Firmware and USB Storage, and other settings.
- HMS – Opens the HMS menu where various printer error messages can be shown.
- Print Files – Opens a list of pre-loaded 3D models which can be printed, and also shows the files available on the USB drive, ready to be printed.
- Hotend Temperature – Displays the current hotend temperature, which can be adjusted after tapping the button.
- AMS – Displays the status of the AMS units, and the filament colors loaded in the AMS, which can be adjusted after tapping the button
- Wi-Fi Status – Indicates the quality of the Wi-Fi connection, which can be adjusted after tapping the button.
- HMS Status– Opens the HMS menu where various printer error messages can be shown.
- Message of the day – Shows a message from the printer, which changes after every reboot.
Controls Menu Screen
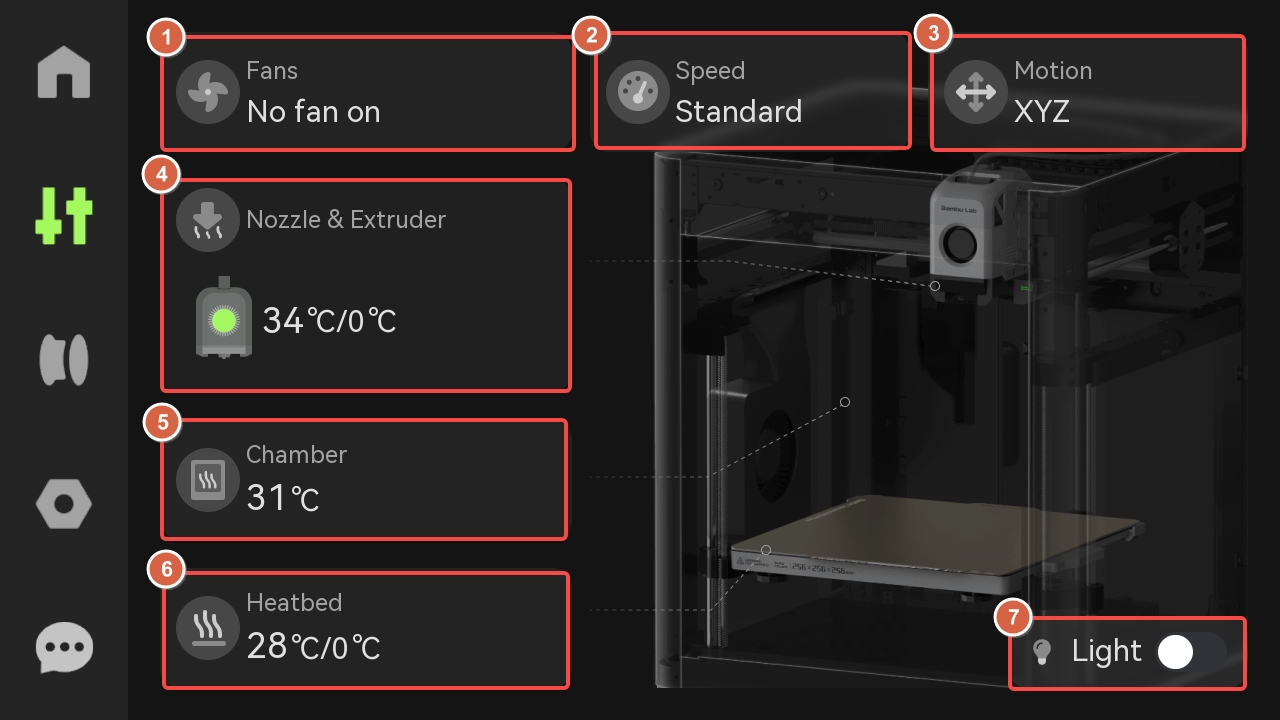
- Fans – The speed of the part cooling fan, auxiliary part cooling fan and temperature regulator fan can be controled.
- Speed – The speed mode can be adjusted, selecting from four different print speeds: Silent, Standard (default), Sport, Ludicrous.
- Motion – The position of the printhead and the heatbed can be controlled, using on-screen buttons.
- Nozzle & Extruder – The temperature and the type of nozzle can be adjusted, while also providing access to the extruder control for feeding and retracting the filament.
- Chamber – Displays the printer’s chamber temperature.
- Heatbed – Provides manual control over the heatbed’s temperature
- Light – The chamber light can be turned On or Off by tapping this button.
Filament Settings Menu Screen
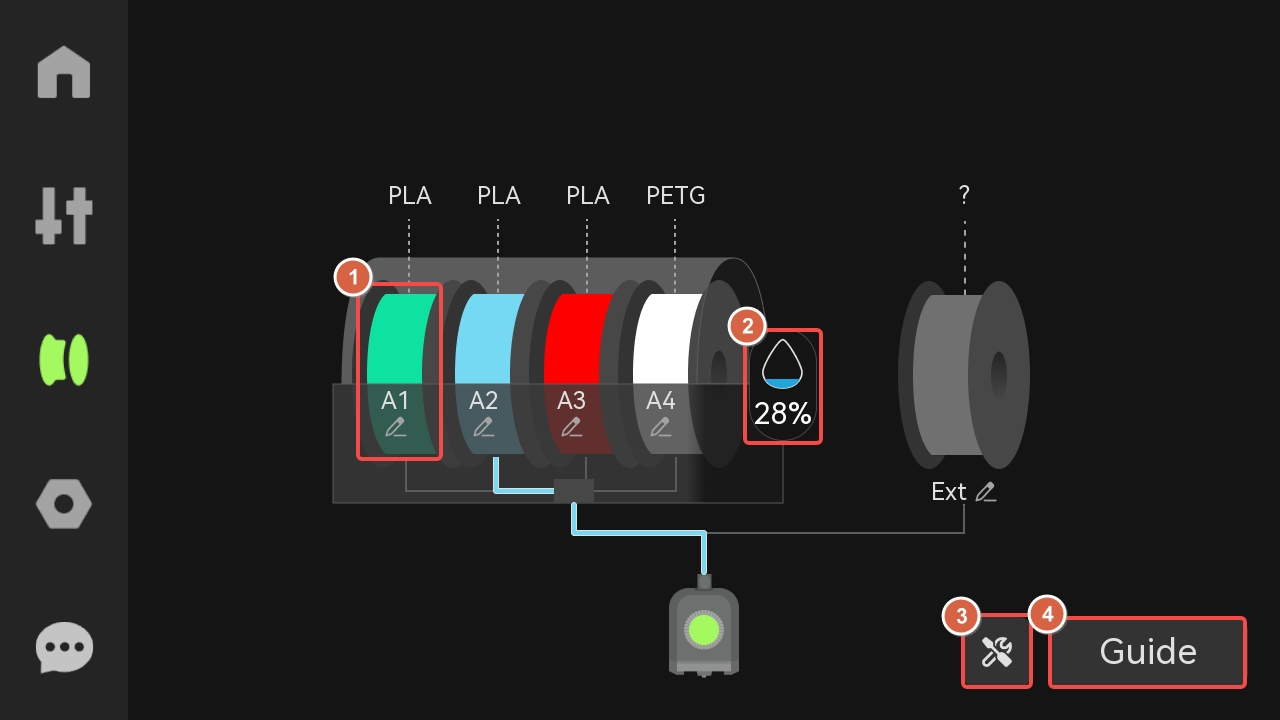
- Spool Controls – Tapping any of the spools displayed in the AMS will provide controls for editing, loading or re-detecting the filament loaded in that slot. It is displayed when an AMS unit is connected.
- AMS Humidity – Displays the currently detected AMS humidity levels, and it is displayed only when an AMS unit is connected. When an AMS 2 Pro is used, the drying features can be controlled.
- Tools – Allows control over the AMS features. From this menu, you can configure the AMS Auto Refill and the AMS Drying functions (with AMS 2 Pro).
- Guide – Provides instructions for how to use the loading and unloading features when using an AMS.
Settings Menu Screen
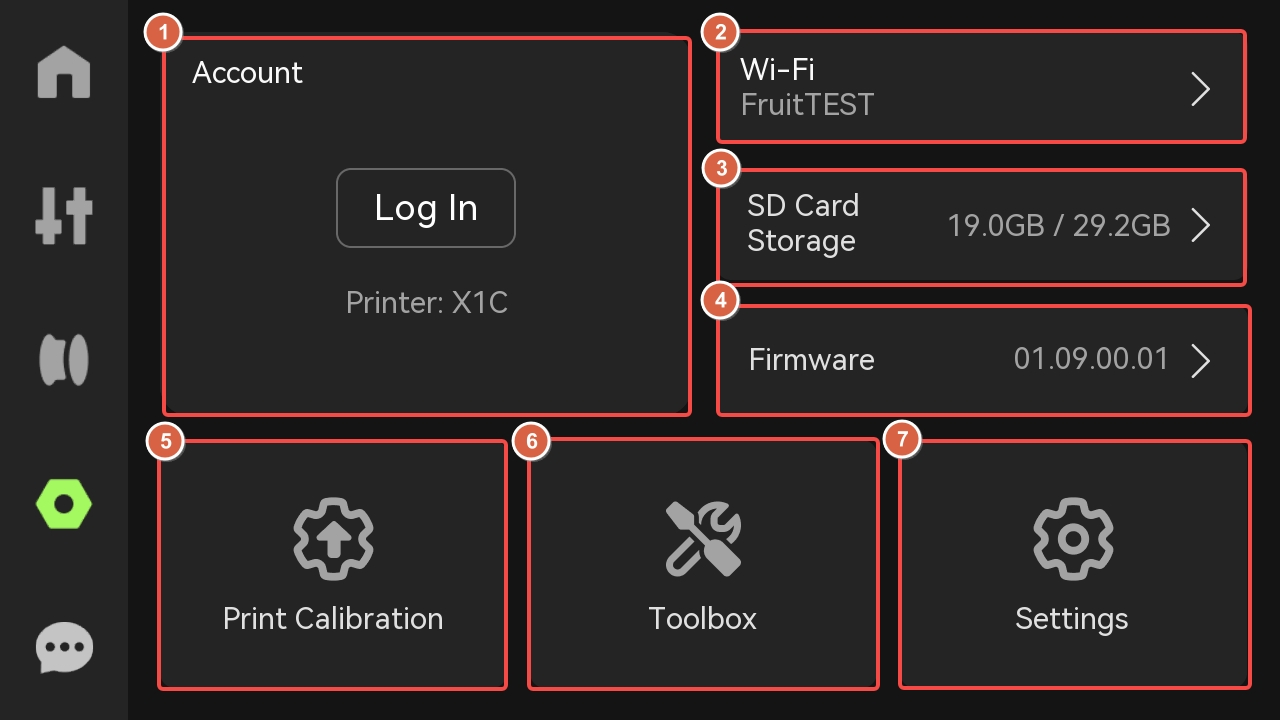
- Account – Displays the currently connected account, bound to the printer. If not connected, provides access to a QR code which can be scanned using Bambu Handy, to perform the connection.
- Wi-Fi – Displays the Wi-FI network to which the printer is connected. Tapping the button allows control over the Wi-Fi (turn On or Off) and also allows re-connecting to a different network.
- SD Card Storage – Displays the used and total capacity of the MicroSD card connected to the printer. Also provides options for formatting the MicroSD card.
- Firmware – Displays the current firmware version. Tapping the button gives access to detailed firmware information, and the posibility to update to a newer version.
- Print Calibration – Opens a menu of available calibration options for the printer, which can be performed to ensure the printer works as expected.
- Toolbox – Opens a menu where the printer can perform a self-test to confirm everything is working as expected, and also gives access to the Maintenance section related to the Carbon Rods and Lead Screws.
- Settings – Opens a list of sub-menus that allow you to control various settings of the printer.
Settings sub-menu
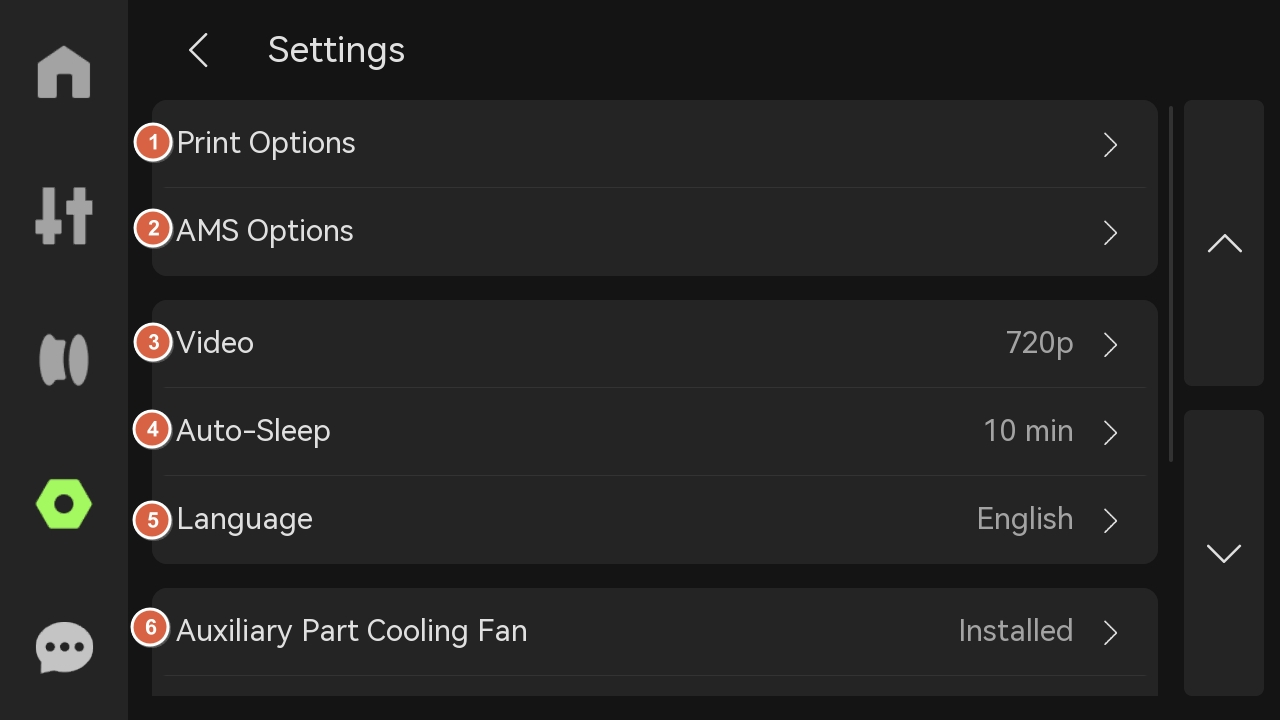
- Print Options – Different features of the printers can be controlled, like AI Print Monitoring, Build Plate detection, First Layer Inspection, Auto-Recovery from Step Loss, Open Door Detection and Store Sent Files on External Storage.
- AMS Options – Different features of the AMS can be controlled, like Read Filament options, Remaining filament estimation, Auto-Refill and AMS order.
- Video – The camera resolution can be controlled, by choosing between 1080p (highest quality) 720p (medium quality) or turning off the camera.
- Auto-Sleep – Provides controls over the length of time after which the printer will automatically enter sleep mode.
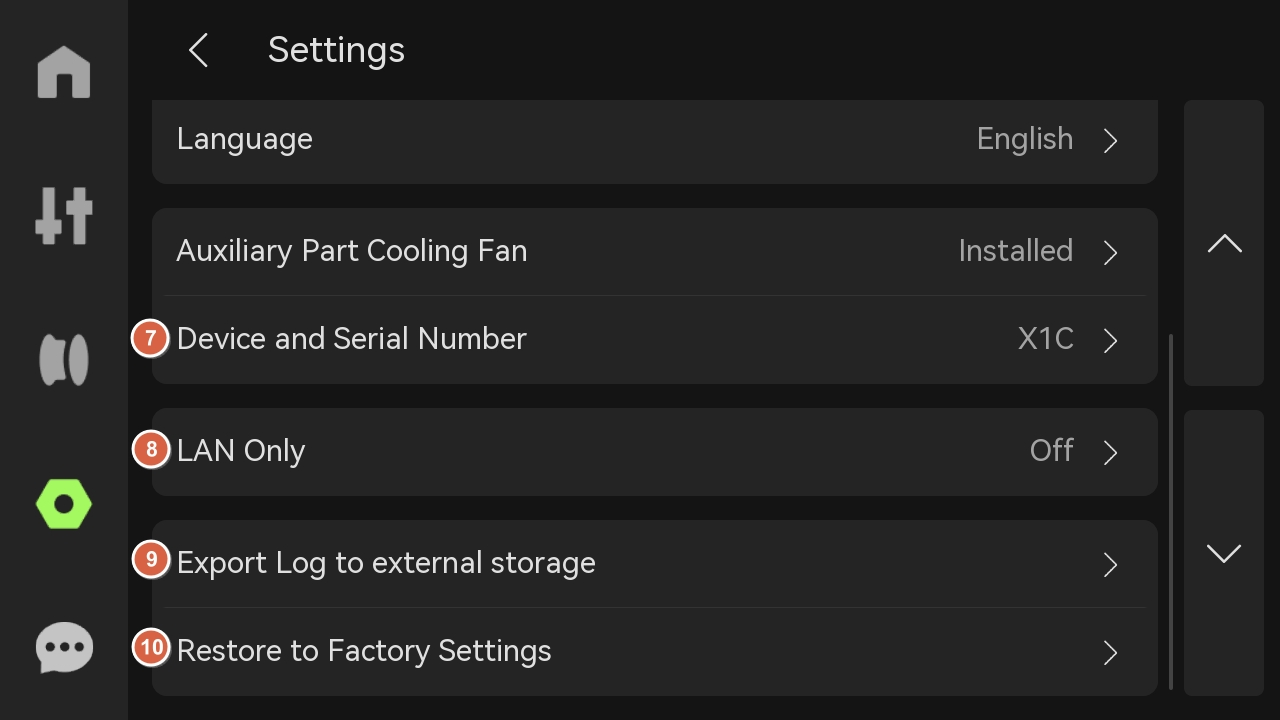
- Language – Provides controls to change the default language of the printer’s interface.
- Auxiliary Part Cooling Fan – Allows the option to enable the Auxiliary Part Cooling fan on X1.
- Device and Serial Number – Provides access to the Serial Number of the printer, AMS units connected, Device Name and the total Print Time.
- LAN Only – Provides control over the network connection type of the printer. When enabled, the printer will only be available in the local network, with no remote cloud access.
- Export Log to external storage – Allows export of logs, key photos and g-code from the printer, to be shared with the Customer Support team for troubleshooting purposes.
- Restore to Factory Settings – Using this feature, you can reset the printer to the default factory settings.
Detailed Settings and Descriptions
The Bambu Lab X1C has a large number of settings and menus which can all be controlled from the printer’s screen. To learn more about each option, a more detailed guide is provided in the Bambu Lab Wiki. This Wiki article explains every sub-menu available on the printer’s screen.